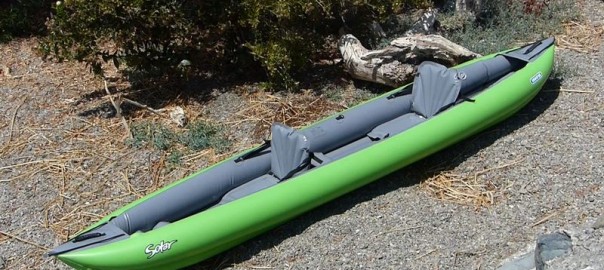
This past week we had the opportunity to take our first look at the Innova Solar 410C inflatable kayak – a 2+ person kayak for recreational paddling.
The Innova line is unique for a number of reasons. First, all the kayaks are handmade in the Czech Republic – the factory has manufactured inflatable boats for well over 50 years. Secondly, the manufacturing process produces kayaks that can become quite compact, making them a great choice for travel. And third, the kayaks are environmentally-friendly as they are mostly PVC-free.
While various iterations of the Solar have been available in Europe for years, Innova recently brought in the newly-redesigned Solar 410C. We had our first opportunity to take out the kayak late last year. So here is our write-up on the the Innova Solar 410C inflatable tandem kayak, which weighs 36 lbs in the pack, is 13 feet 2 inches in length and has a payload of 595 lbs for two persons and gear. (Please note: some of the information will be duplicated from other Innova reviews).
Getting Started with the Innova Solar 410C
The box as received measures 25 x 16 x 11 inches, weighing in at 40 lbs.
Inside is a very nifty and compact backpack with adjustable shoulder straps, front pouch pocket and roll top closure. This contains the kayak body, tracking fin, foot rests, repair kit, instructions, valve adaptor, seats and sponge. Packed dimensions are 25 x 16 x 10 inches as received in the bag, with a weight of 38 lbs for the pack and contents.
We read through the included instruction manuals. Just like all the other Innova products, the Innova Solar manual is surprisingly detailed in some aspects, while lacking in others. As the kayaks are made in Europe, many of the details are based around European specs and regulations and can sound more complicated than it actually is. Please also note that some of the instructions/diagrams have errors.
First step, unpack and unfold the kayak body. What is immediately noticeable is how FLAT the kayak is when deflated – of course, this makes it quite compact for travel.
Install the tracking fin into the “shoe” before inflating the kayak. Slip the end with the larger slot in first, making sure that the fin is pointing towards the “back” of the kayak. This enables it to slide in enough to fit in the second side. The first time we tried this, we struggled to get the second slot into position but this gets easier with use.
The instructions suggest attaching and inflating the foot braces and seats first, but these come already attached from the factory – the front seat is attached to the 2nd set of floor clips, and the back seat to
