Tag Archives: dropstitch inflatable kayaks

Sneak Preview – New 12 PSI AirVolution Dropstitch Inflatable Kayak from Advanced Elements

During one of our many trips to Advanced Elements earlier this year, we were invited to take a look at an upcoming new product.

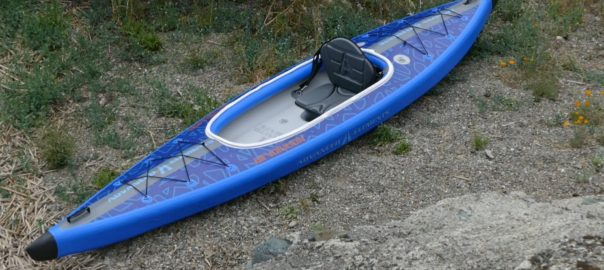
Wow! Our first view of the AirVolution prototypes, Advanced Elements’ new 12-14 PSI high-pressure, dropstitch inflatable kayaks. The series consist of the 13′ AirVolution solo and the 14’6″ AirVolution2 tandem.

Advanced Elements subsequently send us a preproduction sample of the AirVolution single to test out.

Our first take on the AirVolution? This is a wonderful addition to the recreational flatwater paddling niche. It’s a rugged, stable, simple-to-setup kayak that paddles well – and it looks great!

The entire kayak is innovatively constructed using PVC Tarpaulin laminated to high-pressure drop-stitch material – this gives a smoother finish, increased rigidity and a sculpted outline for greater paddling performance. The v-shaped hull design in the bow and removable deep-water fin increase tracking performance, allowing the AirVolution to slice through the water.
Drop-stitch (DS) material is the same used in the inflatable paddle board market, where thousands of threads string the top and bottom panels together, allowing it to be pumped up to higher pressures, thus making it more rigid.

With only two chambers to inflate, the new AirVolution high-pressure inflatable kayak features a streamlined set up procedure, allowing one to get out on the water quickly. Two pressure relief valves ensure the kayak is not overinflated, releasing at roughly 18 PSI.

The open-deck design provides ease-of-entry, while a drain well with plug ensures that you stay drier.

The sculpted EVA foam seat can be ratcheted four-ways, providing maximum support, adjustability and comfort.

Front and rear bungee deck lacing provide plenty of options to attach gear, yet there are still options for storing small items under the decks
We took the AirVolution out for a maiden voyage. Both of us felt the kayak paddled and tracked well, was rugged and incredibly stable. The sculpted hull allows water to drain off, and the smooth skin is very easy to dry. Everything in the package looks great, from the graphics and sculpted silhouette to the EVA-foam molded seat and included accessories.

At 5’4″, I found that moving the seat up 12 inches from the rear well allowed me to be balanced and use the front deck as a foot brace. I also was able to easily stand up.

At 6’2″, my husband had the seat all the way to the back. While his knees were slightly bent, he actually prefers that position when paddling. Since I know we will get asked this, for reference we measured the seat back to the front deck as 45 to 46″. With “water socks” on, he was able to lay his legs down flat. So, I would feel comfortable saying the AirVolution can be paddled by customers up

Original Source: AirKayaks >>

Product Review: Innova Thaya Hi-Pressure Inflatable Kayak for 1 to 2+ paddlers

Earlier this year we had the opportunity to take our first look at Innova’s new Thaya inflatable kayak – a 2+ person, high-pressure, inflatable kayak  for recreational paddling.

The Innova line is unique for a number of reasons. First, the kayaks are handmade in the Czech Republic – the factory has manufactured inflatable boats for well over 50 years. Secondly, the manufacturing process produces kayaks that can become quite compact, making them a great choice for travel. And third, the kayaks are environmentally-friendly as they are mostly PVC-free.

The Thaya is the newest introduction to the US market, already garnering a gold model at the 2019 European Paddlesport sProduct of the Year Awards, based on stability, paddling performance and its environmentally-friendly footprint.
While it is not yet available in the states (due in May 2019) we received an early production line piece for review. So here is our write-up on the the Innova Thaya inflatable tandem kayak, which weighs 39 lbs, is 13 feet 5 inches in length and has a payload of 595 lbs for two persons and gear. (Please note: some of the information will be duplicated from other Innova reviews).
Getting Started with the Innova Thaya
The box as received measures 28 x 19 x 13 inches, weighing in at 44 lbs.

Inside is a very nifty and compact 80-liter backpack with adjustable shoulder straps, front pouch pocket and roll top closure. This contains the kayak body, tracking fin, 2 foot rests, repair kit, instructions, valve adaptor, cinch belt, 2 seats and sponge. Packed dimensions are 25 x 16 x 10 inches as received in the bag, with a weight of 40.75 lbs for the pack and contents.
We read through the included instruction manuals. Just like all the Innova products, the Innova Thaya manual is surprisingly detailed in some aspects, while lacking in others. As the kayaks are made in Europe, many of the details are based around European specs and regulations and can sound more complicated than it actually is.
First step, unpack and unfold the kayak body. What is immediately noticeable is how FLAT the kayak is when deflated – of course, this makes it quite compact for travel.

Install the tracking fin into the “shoe” before inflating the kayak. Slip the end with the larger slot in first, making sure that the fin is pointing towards the “back” of the kayak. This enables it to slide in enough to fit in the second side. The first time we tried this, we struggled to get the second slot into position but this gets easier with use.
Next, decide which paddling mode you will be doing – solo, tandem or tandem with small being or gear. The instructions suggest attaching and inflating the foot braces

Original Source: AirKayaks >>

Product Review: New AirFusion EVO Dropstitch Inflatable Kayak from Advanced Elements

Nearly eight years ago, Advanced Elements debuted the original AirFusion kayak – an inflatable hybrid designed to rival the handling and speed of skin-on-frame kayaks. The AirFusion was unique in that it featured a blended design of aluminum alloy frame poles and pressurized air tubes, resulting in a high performance rigid frame system.

This was followed by the AirFusion Elite, which featured a streamlined set up procedure with fewer poles, a wider beam and integrated rear storage hatch.
At last summer’s Outdoor Retailer show, Advanced Elements unveiled their 2018 inflatable kayak product line with announcement of the new AE1042 AirFusion EVO a 6-8 PSI high-pressure model constructed from dropstitch material, with a Barbie-sized 24″ waistline.
Just this week the first AirFusion EVO arrived, a double cardboard box measuring 37 x 25 x 12 inches and weighing in at 47 lbs.
Getting Started with the Advanced Elements AirFusion EVO
The rugged carrying case/backpack houses the kayak body, seat, repair kit, foam floor, screw-on and Boston pin adaptors, instructions (located in the small plastic pocket inside the backpack), two thwarts, nose and stern bags, and anodized aluminum poles. The kayak folded size is approximately 34 x 17 x 8 inches. Everything in the case weighs 37 lbs, while the kayak with seat is 33 lbs. The case has just enough room to include a small pump and breakdown paddle (not included). AirKayaks note: Take a good look at how the kayak is folded BEFORE setting up, this will help during breakdown.
The manual is pretty well-written though initially a little daunting. (AirKayaks note: Some of the initial AirFusion EVO boxes contained instructions for the droptstitch floor. The AirFusion EVO does not use an inflatable floor, so you can just toss those.) After the first read-through it seemed simple enough – piece together the poles, position the floor, pump up side chambers partially, insert bottom pole through the thwarts connecting both ribs, pump up thwarts, finish pumping up side chambers, pump up bow & stern tubes, attach seat, inflate coaming tube. Done!
AirFusion EVO Setup/Inflation

Unfold the kayak body, locating the kayak bow (front) and stern (rear) – this is easy as the integrated storage hatch is located at the stern.

Next, put the foam floor into position, setting the wider end inside the center of the cockpit – this will position the small rectangular cutout over the velcro tab in the floor. Make sure you pull the velcro tab through the cutout. Tip: the foam floor only covers the area where your feet rest.

Layout the bow and stern thwarts. Each of these is tapered. The front airbag (which also acts as a foot brace) is larger than the rear airbag, while the larger side of each airbag faces the cockpit/center. Lay

Original Source: AirKayaks >>