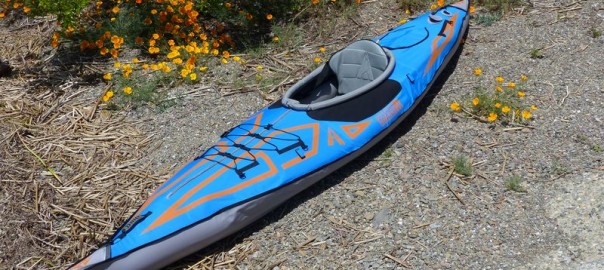
Last summer we were able to get a sneak preview of the new Limited Edition Expedition LTD inflatable kayak from Advanced Elements. As long-time fans of the current yellow model, we were impressed with the LTD’s spiffed up graphics and feature enhancements.
Last week, the AE1009LTD hit the West Coast, and we managed to grab one before our first shipment sold out – not to worry, we picked up more. Here are details on the Expedition LTD AE1009LTD, a 13 foot inflatable weighing in at roughly 42 lbs.
Getting Started with the Expedition LTD LTD Inflatable Kayak
The box as received measures 33 x 21 x 11 inches with a weight of 52 lbs. Inside is a rugged carrying case measuring 37 x 17 x 9 inches (seam to seam) which contains the kayak body, high-backed seat, aluminum riser, repair kit, foot brace and instructions.
The kayak folded size is approximately 31 x16 x 10 inches leaving just enough room to store a pump and breakdown paddle (not included).
The included manual features the current Expedition – set up is pretty much the same – so we will re-copy some of the instructions written in our initial Expedition write-up.
First step, unfold the kayak. The Expedition LTD features an “inner rib” in the bow and stern, which is basically a u-shaped aluminum rib, about one foot long and one-half inch wide.
This comes “pre-assembled” meaning it arrives already inserted into two sleeves inside the kayak cover. Unless you remove the inner bladder, they remain in position. When the kayak is pumped up, the inner bladder with rib presses against the kayak cover – that, in conjunction with two bow and stern plastic sheets, give the kayak a sharp silhouette which aids in slicing through the water.
The Expedition LTD kayak features 9 inflation chambers – two military valves (main chambers) and 7 smaller twist-loks (deck lifts, floor and coaming tubes).
Each Expedition LTD comes with a screw-on adaptor (found in the repair kit in the mesh pocket behind the seat) which locks onto many pumps with pin/slot hose fittings. Additionally, a standard Boston valve adaptor will friction fit into the opening.
First step, open the military valve. The military-style plunger valves are simple to use – twist one way to inflate (UP position) and the other to deflate (DOWN position).
Attach the screw-on adaptor to your pump and then couple it to the first main chamber, located on the rear hull. While there is not a pressure gauge included with the kayak, the adaptor features a “lip” that pushes open the spring plunger, allowing a pump gauge to read the back-pressure; if using the Boston valve adaptor, most gauges will only register as you are inflating.
Pump up the first chamber until
You must be logged in to post a comment.