Tag Archives: Inflatable Kayaks, SUPS & Canoes

Product Review: StraitEdge2 Pro High Pressure Inflatable Kayak from Advanced Elements

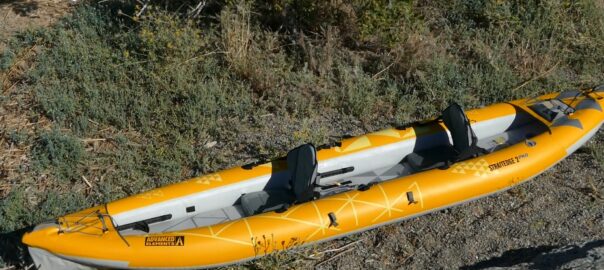
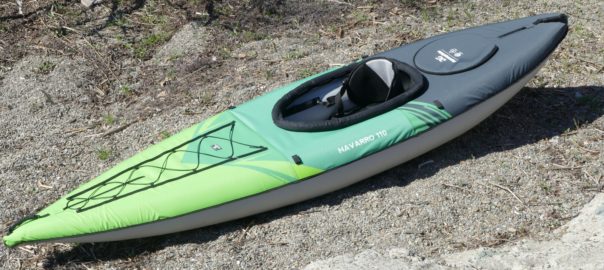
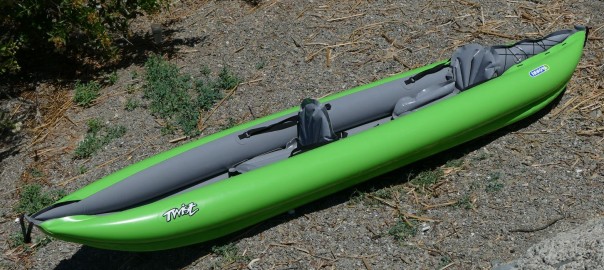
Advanced Elements of Benicia, California recently introduced one of two new kayaks for the 2020 product year. The AE3027 StraitEdge2 Pro is a redesign and upgrade to the long-standing, AE1014 Advanced Elements Straitedge2 inflatable kayak for one or two paddlers.

The new AE3027 Straitedge2 Pro features the identical kayak materials and construction as the earlier AE1014, but with upgraded accessories and features. The Straitedge2 Pro now comes with a 4-6 PSI drop stitch floor, rather than the standard 1 PSI PVC floor. The increased floor rigidity enhances the paddling experience with better tracking and glide.
The Straitedge2 Pro arrived this past month so we took the opportunity – during a brief break in the heat spell – to put it through its paces. Here are details on the Advanced Elements Straitedge2 Pro AE3027, a 13 foot inflatable kayak for one or two paddlers weighing in at roughly 42 lbs.
Getting Started with the Straitedge2 Pro
The box as received weighs 59 lbs, measuring 39 x 21 x 13 inches.

A rugged, oversized, backpack-style carrying case (4.5 lbs) houses the kayak body with integrated floor (34 lbs), high-backed lumbar seats (2.5 lbs each), 2 sets of foot pegs, 2 rod holders, repair kit, fin and instructions. The kayak in the backpack with seats and parts weighs in at 45 lbs total.
Straitedge2 Pro Setup/Inflatation
We began by reading the manual, which gives excellent explanations on inflation, seating, peg installation. And here we come to AirKayak’s Tip #1: No matter how excited you are, take a good look at how the kayak is folded before you set the kayak up, so that you can get it back into the carrying case.

First step, unpack and unfold the kayak. (Please note: We will repeat some of the details previously mentioned in other writeups.)

Inside the bag are four identical plastic pegs, each with a foot pad, a lever and a number of holes – these are the foot pegs. By pressing on the lever, the foot pad can be moved forward and backward, locking into one of the openings.

Open the kayak body fully and you will see a series of 6 cloth pockets and tubes on each inner side – these are for the three seating positions. The first and third set are for tandem paddling while the second (middle) set is for solo paddling.

Point the peg with foot pad facing the paddler, and lever facing the bow. Insert the paddler-side end into the first loop, pushing back enough to then push the bow-end of the peg into the pocket. As these are tight, it is easiest to position it in the opening and then push on the foot pad to get it to slide all the way in.
Continue with the opposite

Original Source: AirKayaks >>

Product Review: New 10-12 PSI Hi-Pressure AirVolution2 Inflatable Kayak from Advanced Elements

Advanced Elements of Benicia, California recently introduced two exciting new kayaks as precursors to the 2021 season – the AirVolutions. What makes them so special? The AirVolution solo and AirVolution2 tandem are constructed entirely from dropstitch material. With just two inflation chambers, and inflation pressures of 10 to 12 PSI, the kayaks are extremely rigid.

We initially posted a Sneak Preview on a pre-production sample of the solo AirVolution.
The Airvolution production models arrived this past week so we took the opportunity to check them out. Here are details on the Advanced Elements AirVolution2 AE3030 (Patent Pending), a 14.5 foot high-pressure inflatable kayak weighing in at roughly 52 lbs.
Getting Started with the AirVolution2
The box as received weighs 68 lbs, measuring 45 x 23 x 15 inches.

Inside, is a super-sized, backpack-style carrying case with wheels (7 lbs) , kayak body (47 lbs), 2 EVA seats (2.2 lbs each), pump with gauge (3.25 lbs), tracking fin (0.45 lbs), cinch belts, repair kit (0.8 lbs) and instructions. The kayak with backpack and parts weighs in at 62 lbs, while the kayak body with seats is 52 lbs. The folded kayak size is roughly 44 x 18 x 10 inches.
We began by reading the manual. This includes pump set-up, inflation, deflation, folding, repairs and troubleshooting. And here we come to AirKayak’s Tip #1: No matter how excited you are, take a good look at how the kayak is folded before you set the kayak up, so that you can get it back into the carrying case.

First step, unfold the kayak.

The Advanced Elements AirVolution2 utilizes two main military valves for inflation, similar to the ones found on many standup paddle boards. These are very simple to use and feature an inflate mode (spring plunger is UP) and a deflate mode (spring plunger is DOWN). By using your finger to gently push on the plunger, it can be moved to the inflate mode (air goes in and doesn’t come back out) and deflate mode (air goes in and comes back out). Before you go to all the effort of inflating the kayak, PLEASE make sure the plunger is in the inflate position.

Next, set up the pump. The AirVolution2 comes with a very nifty, collapsible, dual-action pump with built-in pressure gauge. First step, attach the feet.

The bottom of the pump barrel features tabs that match up to slots on the feet; if you look carefully, you will see that two of the slots are longer than the third – meaning the foot will only go on one way. Line up the tabs, push the barrel into the foot and then twist to lock into position. Attach the hose to the side that says Inflate (there is also a Deflate

Original Source: AirKayaks >>

Product Review: Kokopelli Moki Inflatable High Pressure Kayak with Deck

We recently posted our Sneak Preview on the new series of Moki inflatable kayaks from Kokopelli Packraft – two exciting new models we’ve seen for 2020. What’s so special? The new Moki Series expands the Kokopelli product line, providing a traditional paddling experience.

Last month, the 2020 models started rolling in. We began the series with the new 13.6 lbs XPD, so we now turn to the high-pressure Moki inflatable kayak, a 12 ft 2-inch model with zip-off deck and spray skirt.
Getting Started with the Kokopelli Moki Inflatable Kayak

We unpacked the box and laid out the pieces – inflatable kayak body with high pressure floor, EVA seat, removable deck, spray skirt, foot brace, coaming tube, pump with gauge, repair kit, roller backpack, fin, deck rod, repair kit and instructions. The fin and the repair kit are found in a pocket inside the backpack.
Boxed up, the dimensions are 36 x 25 x 15 inches with a shipping weight of 58 lbs. The kayak weighs 33 lbs with the seat, floor, brace and fin – add another 1.75 lbs for the deck and 1 lb for the coaming and spray skirt. All packed up in the bag, everything weighs 46 lbs. The folded kayak size is 29 x 21 x 9 inches.
The generic instructions for Kokopelli’s inflatable kayak series include inflation and deflation techniques, deck, seat and skirt installation, but lack details on actual set up; we will outline the steps we took, below. In general, set up is straight-forward – unpack, unfold, inflate.

The first step is to unfold the kayak.

The Kokopelli Moki utilizes three main GRI push-push valves for inflation. These are very simple to use and feature an inflate mode (spring plunger is UP) and a deflate mode (spring plunger is DOWN). By using your finger to gently push on the plunger, it can be moved to the inflate mode (air goes in and doesn’t come back out) and deflate mode (air goes in and comes back out). Before you go to all the effort of inflating the board, PLEASE make sure the plunger is in the inflate position.

Next, set up the pump – this is not mentioned in the instructions. The Moki comes with a very nifty, collapsible, dual-action Nano pump and built-in pressure gauge. Fold down the feet and attach the hose to the side that says Inflate (there is also a Deflate side). There are two pieces of plastic tubes in the plastic packaging – these are screw on handles. Unfortunately, there is no place to attach/store the handles when removed so you may want to buy a mesh laundry bag to keep everything together. Or, don’t even bother attaching the handles as the pump is pretty easy

Original Source: AirKayaks >>

Product Review: Rugged New 13lb Kokopelli XPD Inflatable Packraft

We recently posted our Sneak Preview on the new XPD inflatable packraft from Kokopelli Packraft – one of the exciting new models we’ve seen for 2020. What’s so special? While the XPD packraft is based on the Kokopelli Rogue-Lite profile, the XPD features a more beefed-up PVC construction for rigorous use on flat water and lakes through Class II.

Last week, the 2020 models started rolling in, so we begin our 2020 Kokopelli reviews with the 13.6 lbs XPD, which can be inflated to higher pressures of 2.75 PSI.
Getting Started with the Kokopelli XPD
We unpacked the box and laid out the pieces – inflatable packraft body (13.7 lbs), inflatable seat base (8 ozs), repair kit (4.1 ozs), Nano dual action hand pump with gauge (2 lbs), instructions and two 2 cinch belts( 1.6 oz each).

Boxed up, the dimensions are 29 x 20 x 8 inches with a shipping weight of just under 20 lbs. The packraft folded is roughly 24 x 20 x 8 inches, rolled it is roughly 25 x 8.5 inches.
The generic instructions for Kokopellli’s PVC series include inflation and deflation techniques, seat and backband installation (not found on the XPD but used in the Recon) but lack details on actual set up; we will outline the steps we took, below. In general, set up is straight-forward – unpack, unfold, inflate.

The first step is to unfold the packraft – it is remarkably flat – and orient yourself; the rear/stern is wider and has the inflation valve.

The Kokopelli XPD utilizes one main GRI push-push valve for inflation. These are very simple to use and feature an inflate mode (spring plunger is UP) and a deflate mode (spring plunger is DOWN). By using your finger to gently push on the plunger, it can be moved to the inflate mode (air goes in and doesn’t come back out) and deflate mode (air goes in and comes back out). Before you go to all the effort of inflating the board, PLEASE make sure the plunger is in the inflate position.

Next, set up the pump – this is not mentioned in the instructions. Unlike most of the packrafts – which use inflator bags – the XPD comes with a very nifty, collapsible, dual-action Nano pump and built-in pressure gauge. Fold down the feet and attach the hose to the side that says Inflate. There are two pieces of plastic tubes in the plastic packaging – these are screw on handles. Unfortunately, there is no place to attach/store the handles when removed so you may want to purchase a mesh laundry bag to keep them together. Or, don’t even bother attaching the handles as the pump is pretty easy to use without them.

The Nano pump

Original Source: AirKayaks >>

Product Review: Navarro 110 Inflatable Kayak from AquaGlide

We continue with our series on the new Aquaglide line of inflatable kayaks. For 2020, Aquaglide introduced four new models – Navarro, Deschutes, McKenzie and Noyo – consisting of 9 different styles.
Our three previous reviews focused on the Deschutes recreational series. We now switch over to the Navarro line of decked kayaks, a new design for Aquaglide.

We begin with the Navarro 110 – an 11-foot high-pressure touring model for one paddler, retailing for $599.99. The Navarro line also consists of the Navarro 130 (for one paddler with removable deck) and the Navarro 145 Tandem (for one or two paddlers with optional single and double decks.)
Getting Started with the Aquaglide Navarro 110
We unpacked the box and laid out the pieces – inflatable kayak, stuff sack with handles, instructions, repair kit, foot brace, tracking fin and seat.

Initial measurements show the kayak body weighs 29 lbs, with a folded size of roughly 22 x 21 x 11 inches. The kayak with seat, fin and brace – all in the stuff sack – weighs 31.5 lbs. Boxed up, the dimensions are 25 x 23 x 12 inches with a shipping weight of 38 lbs.
(AirKayaks Side Note: When initially removing the kayak from the carrying case, take a good look at how the kayak is folded.)
The Navarro 110 comes with an instruction manual, but as previously mentioned in our Deschutes series, the instructions aren’t detailed enough for new users. This is compounded by the manual layout in which each section is first written in English, then up-to 17 different languages (including Bulgarian and Estonian), before you get to the next English section. The inflation instructions start on page 16.

Set up is straight-forward and simple – unpack, unfold, inflate.
There are two side chambers utilizing Boston valves, while the high-pressure floor features a military valve. The instructions say to pump up the two side chambers to 2 PSI, and then the floor to 6 PSI. (We did follow those instructions, but we are going to suggest a different method, and will explain why. Some of this is mentioned in the manual.)

First, attach the Boston valves by screwing them onto the kayak. Boston valves are two-part, screw-on valves. The bottom portion is threaded onto the kayak, the top valve is screwed open for inflation and then tightened shut after inflation. Air is easily released by unscrewing the base connector. How does it work? A flap inside the valve opens when air is pumped into the kayak, and falls shut when not pumped so that air will not rush back out.
(AirKayaks Side Note #2: The Boston valves have a tether that keeps the valve attached to the kayak, ensuring that the valves don’t get lost after deflating. Make sure

Original Source: AirKayaks >>

Product Review: New Deschutes 145 Inflatable Tandem Kayak from Aquaglide

As posted earlier this year, Aquaglide’s inflatable kayak and paddle board product line for 2020 underwent a major makeover, with the introduction of seven new models, a facelift for three models and the retirement of 6 models.

As some of the new products have arrived, we’ve begun a series on the new Deschutes models. Our first two reviews included the Deschutes 110 and Deschutes 130, so we finish up our series with the Deschutes 145, an open-style, 14.5 foot inflatable kayak designed for tandem paddling. (Please note: some of the information will be repeated from other writeups.)
Getting Started with the Aquaglide Deschutes 145
The kayak is nicely packaged with bubble wrap protecting valves, handles, etc. We unpacked the box and laid out the pieces – inflatable kayak body, backpack, instructions, repair kit, tracking fin, two seats, valve adaptor and a plastic splash guard. The repair kit features generous-sized repair patches, a valve wrench and glue.

Initial measurements showed the kayak body weighs approximately 26 lbs with the seats adding another 4 lbs (2 lbs each). The kayak with seats and fin – all in the backpack – weighs 34 lbs. Folded size of the kayak body is 26 x 22 x 9 inches. Backpack size is roughly 27 x 23 x 18 inches, which can be cinched down. All boxed up, the dimensions are 30 x 28 x 16 inches with a shipping weight of 45 lbs. It’s a squeeze, but if you fully deflate the kayak you can get optional paddles and pump into the pack.
(AirKayaks Side note #1: When initially removing the kayak from the carrying case, take a good look at how the kayak is folded.)
The Deschutes 145 comes with an instruction manual, but as previously mentioned, the instructions aren’t detailed enough for new users. This is compounded by the manual layout in which each section is first written in English, then up-to 17 different languages (including Bulgarian and Estonian), before you get to the next English section. The inflation instructions start on page 16.

Set up is straight-forward and simple – unpack, unfold, inflate.
The instructions say to put the valve in the closed position and to pump up the sides to 3 PSI, but there are no details explaining this in the instructions.

For those unfamiliar, the military-style plunger valve is simple to use – with your finger, twist the plunger slightly up to the “closed” position to inflate (air goes in but doesn’t come back out) and “down” to deflate or open (air comes out).

The Deschutes 145 military valves require a special adaptor, which is found in the repair kit. It must be friction-fit to a Boston valve adaptor; this is a common fitting, slightly conical and about 1/2 inch

Original Source: AirKayaks >>

Product Review: New Deschutes 130 Inflatable Kayak from Aquaglide

Late last summer, we were able to test out several of Aquaglide’s new inflatable kayaks for 2020. We were particularly intrigued with the Deschutes series featuring streamlined hulls that were lightweight, simple and quick to set up.

 
This past week, the first of the new products began to arrive. Our previous review was on the Deschutes 110, so our second review will be the Deschutes 130, an open-style, 13-foot inflatable kayak designed for solo paddling. (Please note: some of the information will be repeated from other writeups.)
Getting Started with the Aquaglide Deschutes 130
We unpacked the box and laid out the pieces – inflatable kayak body, backpack, instructions, repair kit, tracking fin, seat, valve adaptor and a plastic splash guard. The repair kit features generous-sized repair patches, a valve wrench and glue. Initial impression – the kayak is nicely presented and packaged with bubble wrap protecting valves, handles, etc.

The kayak body weighs approximately 22 lbs with the seat adding another 2 lbs. The kayak with seat and fin – all in the backpack – weighs 27.5 lbs, with a folded size of 27 x 16 x 10 inches for the body only. Backpack size is roughly 27 x 22 x 18 inches, which can be cinched down. All boxed up, the dimensions are 31 x 18 x 16 inches with a shipping weight of 36 lbs. We were able to get everything – plus a pump and paddle – into the pack.
(AirKayaks Side note #1: When initially removing the kayak from the carrying case, take a good look at how the kayak is folded.)
The Deschutes 130 comes with an instruction manual, but as mentioned in our Deschutes 110 writeup, the instructions are pretty sketchy for new users. This is compounded by the manual layout in which each section is first written in English, then up-to 17 different languages (including Bulgarian and Estonian), before you get to the next English section. The inflation instructions start on page 16.

Set up is straight-forward and simple – unpack, unfold, inflate.
The instructions say to put the valve in the closed position and to pump up the sides to 3 PSI, but there are no details explaining this in the instructions.

If you are unfamiliar with military-style valves, they are simple to use – with your finger, twist the plunger slightly up to the “closed” position to inflate (air goes in but doesn’t come back out) and “down” to deflate or open (air comes out).

The Deschutes 130 military valves require a special adaptor, which is found in the repair kit. The Aquaglide military adaptor couples to the valve with a Boston valve adaptor; this is a common fitting, slightly conical and about 1/2 inch thick. Friction fit the adaptor

Original Source: AirKayaks >>

Product Review: New Deschutes 110 Inflatable Kayak from Aquaglide

Earlier this year we posted details on Aquaglide’s inflatable kayak and paddle board product line for 2020, which included the introduction of seven new models, a facelift for three models and the retirement of 6 models.

This past week, the first of the new products began to arrive. Our initial choice for review was the Deschutes 110, an open-style, 11-foot inflatable kayak designed for solo paddling. (Please note: some of the information will be repeated from other writeups.)
Getting Started with the Aquaglide Deschutes 110
We unpacked the box and laid out the pieces – inflatable kayak body, backpack, instructions, repair kit, tracking fin, seat, valve adaptor and a plastic splash guard. First thing to note – the kayak is nicely packaged with bubble wrap protecting valves, handles, etc. Also to note – the repair kit features generous-sized repair patches, a valve wrench and glue.

Initial measurements showed the kayak body weighs approximately 18.8 lbs with the seat adding another 2 lbs. The kayak with seat and fin – all in the backpack – weighs 24.45 lbs. Backpack size is roughly 27 x 22 x 18 inches, which can be cinched down. All boxed up, the dimensions are 31 x 18 x 14 inches with a shipping weight of 32 lbs. We were able to get everything – plus a pump and paddle – into the pack.
(AirKayaks Side note #1: When initially removing the kayak from the carrying case, take a good look at how the kayak is folded.)
While familiar with most of the Aquaglide products, we began by reading the included instructions. Here we came to our first issue – the instructions are pretty sketchy for new users. This is compounded by the manual layout in which each section is first written in English, then up-to 17 different languages (including Bulgarian and Estonian), before you get to the next English section. The inflation instructions start on page 16.

Set up is straight-forward and simple – unpack, unfold, inflate.
The instructions say to put the valve in the closed position and to pump up the sides to 3 PSI – but there is no diagram or explanation of what “closed” means.

For those unfamiliar, the military-style plunger valve is simple to use – with your finger, twist the plunger slightly up to the “closed” position to inflate (air goes in but doesn’t come back out) and “down” to deflate or open (air comes out).

The Deschutes 110 military valves require a special adaptor, which is found in the repair kit. The Aquaglide military adaptor couples to the valve with a Boston valve adaptor; this is a common fitting, slightly conical and about 1/2 inch thick. Friction fit the adaptor onto the Boston valve fitting, then attach the fitting

Original Source: AirKayaks >>

Product Review: New Innova Twist 2 N Inflatable Tandem Kayak

In June we received our first shipment of the newly-updated Innova kayaks for 2019 – in particular the Twist N, Swing N and Solar 2019. Made in the Czech Republic, the Twist and Swing models are now constructed from Nitrilon (N), the same rugged material used in the traditional Innova Sunny, Helios and Safari models. Nitrilon is known for making the kayaks more rigid as well as water and abrasion resistant, without substantially increasing weight. It’s also PVC-free, thus environmentally friendly.

Our first selection was a review on the Twist II N. The Twist 2 interior has been redesigned slightly to include additional d-rings, providing an easy conversion from a tandem to a solo kayak, thus more versatile for larger paddlers or those needing more space for extra gear. While the kayak silhouette remains virtually unchanged, the added material thickness increased the kayak weight from 24 lbs to 29 lbs as well as a price increase.
This week we had the first opportunity to take out the revamped Innova Twist II N, an 11 foot 10-inch two-person inflatable weighing a mere 29 lbs (including seats and foot brace) with a selling price of $599.
Please note: Some of this information will be repeated from prior write-ups.
Innova Twist IIN: Getting Started
The box as received measures 23 x 16 x 10 inches, weighing in at 32 lbs.

Inside is the Twist II N body, cinch strap, multiple instruction sheets, tracking fin, foot rest, repair kit, two seats, bilge sponge, valve adaptor and a drawstring stuff-sack. The Twist II N body with seats and brace weighs 28 lbs with a folded size of 20 x 16 x 8.
Innova Twist 2 N Inflatable Kayak Setup/Inflatation
We read through the included instruction manuals. As with all the Innova manuals to date, the instructions are quite detailed – there is one instruction sheet for fin installation, one for utilizing the valves, one on refolding and another on the kayak in general. Most include IKEA-style graphics which are occasionally just short of a brain twister, and while some steps are dauntingly detailed, some are not mentioned. As the kayaks are made in Europe, many of the details are based around European specs and regulations.

First step, unpack and unfold the kayak body.

What is immediately noticeable is how FLAT the kayak is when deflated.

Install the tracking fin before inflating the kayak. The Twist II N utilizes a single fin with double slots. Slip the end with the larger slot in first, making sure that the fin is pointing towards the “back” of the kayak. This enables it to slide in enough to fit in the second slot. While the first time can be a struggle to get the back side into position, after a

Original Source: AirKayaks >>

Product Review: New Convertible Elite High Pressure Inflatable Kayak from Advanced Elements

 Advanced Elements of Benicia, California recently introduced one of two new kayaks for the 2019 product year. The AE1007E Convertible Elite is a package upgrade to the long-standing, popular AE1007R Advanced Elements Convertible inflatable kayak for one or two paddlers.

First launched in 2003 as the AE1004 AdvancedFrame2, the original model featured an integrated deck for double paddling. The kayak was reintroduced in 2006 as the AE1007R AdvancedFrame Convertible, sporting an open cockpit design which could be enclosed with optional single and double decks for solo or tandem paddling.
The new AE1007E Convertible Elite features the identical kayak materials and construction as the current AE1007R, but with upgraded accessories and features. The Convertible Elite now comes with a 4-6 PSI drop stitch floor, rather than the standard 1 PSI PVC floor with i-beams. The increased floor rigidity enhances the paddling experience with better tracking and glide.
The Convertible Elite arrived this past month so we took the opportunity – during a brief break in the rains – to put it through its paces. Here are details on the AdvancedFrame Convertible Elite AE1007E, a 15 foot inflatable kayak with high-pressure floor weighing in at roughly 54 lbs.
Getting Started with the Convertible Elite
The box as received weighs 60 lbs, measuring 34 x 21 x 12 inches.

Inside, the rugged backpack-style carrying case houses the kayak body, floor, seats, thwart, repair kit and instructions. The kayak with backpack and parts weighs in at 52.4 lbs, while the kayak body is 44 lbs.

Please note: A quick “overview” of set up is now sewn into the inside of the carrying case – we highly recommend that you read this.
Convertible Elite Setup/Inflatation
We began by reading the updated manual. This, too, has evolved over the years and gives excellent explanations on inflation, usage, refolding, etc. And here we come to AirKayak’s Tip #1: No matter how excited you are, take a good look at how the kayak is folded before you set the kayak up, so that you can get it back into the carrying case.

First step, unfold the kayak. (Please note: We will repeat some of the details previously mentioned in other writeups.) The AdvancedFrame series of kayaks feature an “inner rib” in the bow and stern, which is basically a u-shaped aluminum rib, about a foot long and one-half inch wide.

This comes “pre-assembled” meaning it arrives already inserted into two sleeves inside the kayak cover. Unless you remove the inner bladder, they remain in position. When the kayak is pumped up, the inner bladder with rib presses against the kayak cover – that, in conjunction with two bow and stern plastic sheets, give the kayak a sharp silhouette which aids in slicing through the water. (Please note: We removed

Original Source: AirKayaks >>