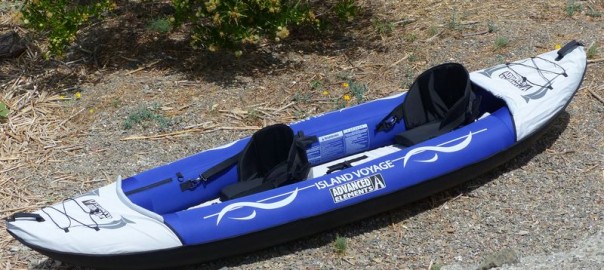
This week we received our first shipment of the Island Voyage 2 inflatable kayak from Advanced Elements. New in 2015, the Island Voyage 2 is a recreational model with an open-design – allowing one to easily switch from single to tandem paddling – yet economically-priced at $399.
Following is our writeup on the Island Voyage 2, an 11 ft 2 inch kayak. Please note, some of this will be repeated from prior write-ups.
Getting Started with the Island Voyage 2
We unpacked the box and laid out the pieces – inflatable kayak, drawstring duffel bag, instructions, repair kit, tracking fin and two seats.
Initial measurements showed the kayak body weighs 25 lbs while the kayak with seats in the duffle is 30 lbs. The drawstring case is roughly 37 x 28 inches. Boxed up, the dimensions are 25 x 19 x 14 inches inches with a shipping weight of 35 lbs.
(AirKayaks Side note #1: When initially removing the kayak from the carrying case, take a good look at how the kayak is folded This is probably the most overlooked step and it is VERY helpful when trying to get the kayak back into the bag.)
Island Voyage 2 Inflatation and Setup
The included instructions appear adequate and include diagrams with inflation details.
Set up is straight-forward and simple – unpack, unfold, inflate.
The first step is to attach the removable tracking fin, which enhances paddling/tracking in deeper water. Make sure the fin is pointing towards the rear of the kayak, then insert the front of the fin, pushing down and back, to lock the front end. Then move the fin back until the holes line up, and replace the retaining pin. At this point, pull up on the fin to make sure you have it locked in position. AirKayaks side note #2: You may want to bring along a towel, as the fin and bottom hull of the kayak are black, and become quite burning in the sun.
There are three inflation chambers utilizing Boston valves – the floor and two side chambers. Boston valves are two-part, screw-on valves. The bottom portion is threaded onto the kayak, the top valve is screwed open for inflation and then tightened shut after inflation. Air is easily released by unscrewing the base connector. How does it work? A flap inside the valve opens when air is pumped into the kayak, and falls shut when not pumped so that air will not rush back out.
(AirKayaks Side note #3: The Boston valves have a tether that keeps the valve attached to the kayak, ensuring that the valves don’t get lost after deflating. Make sure this does not get in the way when screwing on the valve base, and the valve is not cross-threaded, or
You must be logged in to post a comment.