Tag Archives: Paddling Gear

Product Review: New Ultralite 12V Feather Pump from Kokopelli Packraft

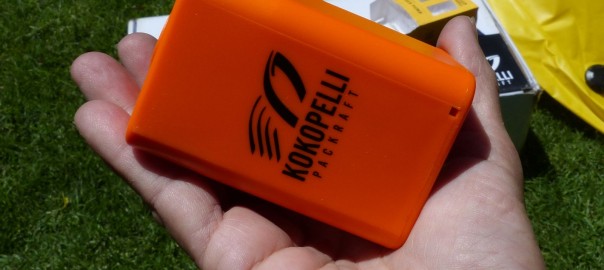
Earlier this summer we received our first shipment of Kokopelli Outdoors‘ new Feather pump. The tiny 12-volt wonder weighs just under 6 oz, and was touted to quickly inflate or deflate one single-sized packraft chamber to 90% in 60 seconds.

Seemingly too-good-to-be-true, we took the opportunity to put it to work when setting up Kokopelli’s Rogue Lite packraft. So here is our review on the Kokopelli Feather pump.
Getting Started with the Kokopelli Feather Pump

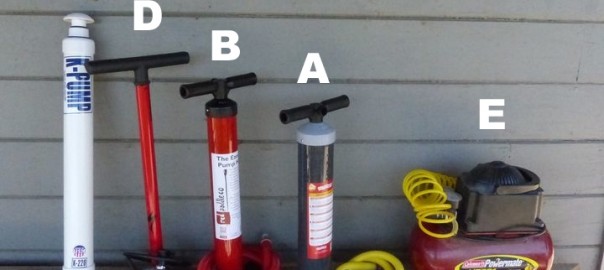
The Feather pump comes in a small box with 5 adaptors, a drawstring carrying case, and a micro USB cable. The pump body weighs 5.9 oz and measures 3.25 x 2.25 x 2.5 inches – small enough to fit in your palm.

The five adaptors include A) a wider, low profile, white adaptor used with vacuum storage bags; B) a Boston valve adaptor as found on some air beds and inflatable kayaks; C) a slightly-smaller, white, low profile white adaptor used with inflatable rafts (like Kokopelli); D) a flexi-adaptor used for outdoor mattresses and E) a pointed nozzle adaptor for swim toys. The flexi adaptor works in conjunction with adaptors (A) or (C). (Please note, the following was done with a D7 Leafield valve, so if using another type you may need to play around a bit.)

The USB charger cable is 12 inches long, weighs 0.4 oz and is used to recharge the Feather pump by hooking into anything with a USB port – computer, solar charger, etc.

First step, put the valve into the open/deflate mode. At 0.27 PSI, the pump does not have enough torque to open the valve. So make sure the plunger is in the DOWN position (air goes in and and can come back out.)
The included instructions have very basic information on inflation and deflation. While the illustrations depict using the pointed nozzle adaptor (#E above), that will not work – the nozzle is too long to make any contact with the C7 or D7 Leafield valves found on Kokopelli rafts.
We took a look at the other 3 rigid adaptors and found each could work, as none actually couple to the valve, you just hold the pump over the valve.

There are two openings on the Feather pump – the one on the top is the deflate mode.

The one on the side is the inflate mode.

Put the smaller ring (C) onto the inflate opening and press the power button (opaque plastic membrane located on the side, above the USB port connection). Hold the adaptor over the valve.

Within a few seconds, you will start to see the body filling out. In fact, it took a whopping 56 seconds for me to inflate the entire Rogue Lite – a 7′ 1″ packraft with a 12″ diameter tube.
Once you

Original Source: AirKayaks >>

Sneak Preview: airCap Solar-Powered Pressure Gauge from TriB Outdoor Tech

We recently came across a nifty new product designed to take the guesswork out of inflation – the airCap from TRiB Outdoor Tech. The airCap is a solar-powered, high-accuracy pressure gauge which is compatible with Leafield C7 and D7 valves. It measures up to 20 PSI in real-time, making it ideal for a range of inflatable craft including rafts, kayaks, SUPs and RIBs.
The airCap is designed to replace your watercraft’s existing inflation valve cap. Simply unscrew the existing cap, remove the cap tether and replace it with the airCap. Once the craft is inflated, the airCap will give real-time readings, allowing you to see if the pressure gets too high or drops too low.
We contacted TRiB Outdoor Tech to find out more about the product. TRiB (pronounced Tribe) is a new outdoor technology company based out of Moscow, Idaho. According to TRiB’s co-founder, Erik Cegnar, TRiB’s passion is in paddlesports and rafting, with a focus toward innovation in outdoor and other watersports.
As Erik explains, “We are a group of engineers and designers, a small company with big dreams. We are starting this company with the idea of bringing innovative products to market to enable, empower and enhance the outdoor experience. We love the outdoors and think that those experiences can be and often are life changing. We have some amazing products in the works.”
As is often the case, the initial airCap idea came out of a first hand experience – while into Day 2 of a 6-day rafting trip down the Middle Fork of the Salmon River, the “unspeakable” happened. During a break for lunch, Erik and companions were relaxing on the beach when one of the kayaks exploded. As Erik recounts, “As you can imagine, the rest of the experience was limited.”
Most paddlers are aware that inflation chamber pressures fluctuate constantly based on outdoor temperatures – if it is hot, the air inside your chamber will expand, increasing the pressure. Conversely, if it is chilly outside, or the water is cold, the air will contract and cause your inflation chambers to be under-filled. With real-time readings, the airCap can let you know if more air should be added, or some pressure released.
Coincidentally, after speaking with Erik we were sent a prototype kayak from another manufacturer for test purposes. The kayak arrived sporting an airCap, so we took the opportunity to take a good look, which convinced us to buy some.

We subsequently used the airCap on an NRS Pike inflatable kayak, and a Kokopelli Castaway XL Packraft. The image above shows the valve cap on the left and the airCap on the right.

We found the airCap to be pretty simple to install. Basically, remove the existing valve cap by using a

Original Source: AirKayaks >>

Product Review: 2018 Red Paddle Co Titan SUP Pump

Earlier this month, we received our first shipment of 2018 Red Paddle Co inflatable paddle boards with updated Titan pumps. First developed in 2015, the Titan pump was touted as a game-changer, with the ability to cut inflation time in half.

For years, the standard inflatable SUP pump was the Bravo HP single-action, high volume/low pressure pump, a squatter, thick-barrel single-action pump designed to put in more air volume, which in turn took more effort to reach higher pressures. Higher pressures in an inflatable board vastly improve the board performance, by increasing rigidity (reducing flex).

In 2013, Red Paddle Co introduced the HP EZee single-action, low volume/high pressure pump, a taller, thin-barrel single action pump designed to put in less air per stroke, thus allowing one to more easily pump to higher pressures. As the pros and cons of each are obvious – one fills a board up more rapidly, while the other takes longer but is less of a struggle to reach 18-20 PSI – numerous paddlers opted to purchase both pumps. In response, some manufacturers expanded the slim-barrel design to a double-action pump, putting air in on the up and down stroke. While theoretically this will put air in twice as fast, in actuality it becomes a struggle on the “up” stroke.
In 2015, Red Paddle debuted the Titan pump. What made the Titan different? The Red Paddle Co Titan pump is an amalgamation of the two pumps. The Titan pump has two chambers, basically one side is a high volume/low pressure, and the other a low volume/high pressure. A unique double gear system actually combines the two chambers, so that when initially pumping, paddlers are using BOTH chambers to fill the board, allowing them to put in a whopping 4.71 liters, compared with just over 2 liters for the standard HP pump. When the pumping starts to get tough, one can switch the internal gear over to the high pressure chamber, allowing one to easily attain higher PSIs with less effort. An integrated pressure gauge allows one to monitor the process.

Over the past three years, Red Paddle has continued to tweak the inner design and construction, resulting in a killer pump with wider applications.
We had the opportunity to test out the most recent iteration when inflating our 2018 Red Paddle Voyager 12’6″. Following is an update from our initial review of the Titan pump.
The new Titan pump – included with most of the boards – arrives rolled up inside the Red Paddle SUPs. If purchasing separately, the pump arrives in a box 24 x 13 x 6 inches weighing 6.2 lbs. Inside is the pump body with integrated pressure gauge, a detachable hose and a series of adaptors. Pump dimensions

Original Source: AirKayaks >>

Product Review: AquaGlide 12V Turbo High-Pressure 1-20 PSI Electric Pump

The increased popularity of high-pressure inflatables – and the increased pressure needed for inflatable paddle boards – has launched a quest for easy inflation. Almost daily, we field calls from people who want easier and quicker pump options, so they can spend less time on the beach, and more on the water.
A while ago, we published our popular Guide to High Pressure Inflatable Pumps. Since then, more options have become available.

Recently we received our first shipment of Aquaglide’s 12-Volt 2-Stage Turbo HP Pumps, which bills itself as capable of inflating from 1 to 20 PSI. The Turbo HP is a fairly diminutive size, measuring 12 x 5 x 6 inches and weighing in at 3 lbs 5 oz. The pump includes a 4 foot long, rugged, non-kink hose with two adaptors – an HR-style military adaptor and a screw-on adaptor.
As most of our inflatable kayaks run 1 to 6 PSI, and our inflatable paddle boards run 12 to 18 PSI, this seemed a good option. Best of all, it works off a car power point-cigarette lighter, but also includes alligator clips for direct connection to car or boat battery.
Using the AquaGlide 12V Turbo HP Pump
As our previous tests were done with a Red Paddle 18-PSI Surfer 10’0″, we opted for a Red Paddle Ride 9-8 which we had in our boat building – a pretty similar size and volume of 196 liters.

Instructions are pretty basic. First, connect the HR-adaptor to the hose end, and screw the hose onto the pump. Initially, it was tough to couple as the o-ring material is stiff. We pushed hard and were able to make the connection. Turn on the car battery (not the motor) and plug the connector into the car power point. Dial in the desired PSI – in this case we opted for 18 PSI, and hit the on button.

The initial (first) stage was fairly quiet. By one minute, the board was totally unfurled, then it jumped to Turbo mode (2nd stage) and became louder. We timed the inflation. At 3 minutes the board was at 5 PSI, 4 minutes to 7 PSI, 6 minutes to 11 PSI, 8 minutes to 14 PSI, 9 minutes to 15 PSI. At 10 minutes, 29 seconds, the motor shut off after reaching 18 PSI.

We tried to carefully twist off the hose, and it nearly blew us off. We managed to re-make the connection, and re-pumped it to 15 PSI. Through trial and error, we found that slowly twisting off the hose would lose air. If we quickly pulled off the hose – by pushing/twisting and popping off – it came off easily. So practice a little first. We did use a K-Pump quick check valve.

Original Source: AirKayaks >>

Product Review: Advanced Elements StashPak RollTop Dry Bags – 20L & 40L

This past summer, Advanced Elements of Benicia, California, introduced their new WaterTech™ Gear line of deck and cargo bags designed to fully complement Advanced Elements inflatable kayaks and paddle boards, as well as any kayak or watercraft.

The new WaterTech Gear accessory line consists of seven models ranging in size from 3 to 60 liters, with retail prices of $24.95 to $79.99. The product line covers a wide range of applications from small roll-tops and waterproof backpacks to deck bags and duffels.
We decided to take a look at the product line, beginning with the new 20-liter and 40-liter StashPak rolltop drybags.

The StashPaks are basically large duffels constructed from a heavy-duty PVC tarpaulin for water-resistance and durability; each is capable of handling quite a bit of gear. The bags are easy to use – after filling, simply roll down the top 3-5 times, then clip it shut. The more it’s rolled, the more water-resistant it becomes. (AirKayaks note: These are water- resistant, not water-proof. If you are concerned about your belongings, put them first in a waterproof ziplock inside the bag.)

Each bag comes with a nifty, removable, clip-on pack with zipper – perfect for small gear that needs to be easily accessed like phones, GPS, keys and wallet. When detached, the packs can also serve as carrying pouches; each has a handle and measures roughly 14 inches tall and 8 inches wide. The four attachment straps are adjustable roughly 7 inches each side, and each attachment point has an additional d-ring for lashing gear. As an added bonus, the StashPak body can be rolled up and stored inside the detachable pouch.

Each StashPak comes with two detachable carrying straps with clips; these attach to four d-rings located on the back side. The carrying straps turn the bag into a quasi-backpack; each can be adjusted from 24 to 42 inches in length. There are an additional two d-rings adjacent to the rolltop clips.

While not mentioned in the product specifications, each of the StashPaks come with a “compression valve” – basically a small valve that is screwed open or shut to add or remove air. To use, make sure you have a good seal of 3 to 5 rolls and then clip shut. Screw open the valve and start pushing out the air to create a vacuum, then screw the vent shut – this makes a smaller package if carrying a lot of gear. Conversely, one can open the valve and blow air in, making it more “floatable.”
Outer bag measurements are as follows:
20L: 26 inches tall (unrolled) with a 10 inch diameter. Rolled 4 times, 20 inches tall (unfilled)
40L: 34 inches tall (unrolled) with a 12 inch diameter. Rolled 4 times, 28 inches tall (unfilled).
The

Original Source: AirKayaks >>

Product Review: The Titan High-Pressure Inflatable SUP Pump from Red Paddle Co.

Earlier this year, we received our first shipment of Red Paddle Co’s long-awaited Titan high pressure SUP pump. The Titan pump was touted as a game-changer, with the ability to cut inflation time in half.

For years, the standard inflatable SUP pump was the Bravo HP single-action, high volume/low pressure pump, a squatter, thick-barrel single-action pump designed to put in more air volume, which in turn took more effort to reach higher pressures.
Higher pressures in an inflatable board vastly improves the board performance, by increasing rigidity (reducing flex).

In 2013, Red Paddle Co introduced the HP EZee  single-action, low volume/high pressure pump, a taller, thin-barrel single action pump designed to put in less air per stroke, thus allowing one to more easily pump to higher pressures.
As the pros and cons of each are obvious – one fills a board up more rapidly, while the other takes longer but is less of a struggle to reach 18-20 PSI – numerous paddlers opted to purchase both pumps.
In response, other manufacturers expanded the slim-barrel design to a double-action pump, putting air in on the up and down stroke. While theoretically this will put air in twice as fast, in actuality it becomes a struggle on the “up” stroke.

In 2015, the Titan made its debut. What makes the Titan different? The Red Paddle Co Titan pump is an amalgamation of the two pumps. The new Titan pump has two chambers, basically one side is a high volume/low pressure, and the other a low volume/high pressure. A unique double gear system actually combines the two chambers, so that when initially pumping, paddlers are using BOTH chambers to fill the board, allowing them to put in a whopping 4.71 liters, compared with just over 2 liters for the standard HP pump. When the pumping starts to get tough, one can switch the internal gear over to the high pressure chamber, allowing one to easily attain higher PSIs with less effort. An integrated pressure gauge allows one to monitor the process.
While we were keen to test out the new pump, the Titans sold out before we had a chance. Our intent was to review the Titan, as well as update our Guide to Choosing A High Pressure Inflatable SUP Pump – which we published last summer. As we no longer had the Red Paddle Venus 10-0 used in the original comparison, we pulled out the Red Paddle Ride 9-8 – which is fairly similar in specs.
Three shipments later, we snagged the last Titan off the shelf.
So, here is our review of the new Titan dual-barrel high pressure inflatable SUP pump from Red Paddle Co.
The pump as arrived couldn’t be simpler – pump body with integrated pressure gauge and a

Original Source: AirKayaks >>

Product Review: Single & Double Spray Decks for Aquaglide Chelan & Columbia Kayaks

This past week we received our first shipment of AquaGlide splash decks – optional accessories which can turn your AquaGlide kayak from an open design to an enclosed one or two seater. The decks can be used with the Chelan, Columbia XP and Columbia HB series inflatable kayaks.

There are two deck options in three lengths – a single for solo paddling and a double for tandem paddling – sized to fit the single, two and tandem sizes. The spray decks keep water and wind out during chilly or inclement weather, while the coaming tubes allow you to attach optional spray skirts for even more protection from the elements.
We initially looked at the Tandem spray decks, a single and a double-seater sized for the Columbia XP, Columbia HB and Chelan Tandem XLs.
Installing the AquaGlide Spray Decks

The decks are quite portable. They each arrive rolled up in separate, draw-string, carrying cases measuring 42 x 3 x 12 inches and weighing in at 9 lbs each. (AirKayaks note: As the cases are identical, you may want to mark them 1 and 2 for differentiation.) 

Each deck comes with a repair kit and a set of 14 clips.
There are no instructions included, but once you get the hang of it, installing the decks is pretty simple.  We began with the double deck.

Remove the deck from the bag, and drape it over the kayak, aligning ends with the raised visors. (AirKayaks note: As we learned the hard way, there is a right and wrong way to orient the decks. Make sure that the plastic zippering “map case” is positioned in the bow, and that the twistlok valves on each of the coaming areas are on the back side of each cockpit opening.)

With the kayak fully inflated, take each of the clips and attach them to the cloth d-rings, located 6 on each side, and one each on the front and back raised visors. To make things easy, the clips can be left in position – if you purchase both decks, you’ll then have one full extra set if any clips are lost.

The visor portion is quite simple, but not intuitive at glance. Roll over the deck bow so that it slips over the raised visor – repeat this in the stern.

You will notice that each of the d-rings lines up with velcro strips on the spray decks.

Run the velcro loops through the clips, and fasten shut, pulling slightly to make it taught.

Next, inflate the two coaming tube twistloks (1 per seat). The coaming tubes help deflect water, but also can be used to attach optional spray skirts. The Boston valve adaptor will not friction fit over the twistlok so you will have to do one of

Original Source: AirKayaks >>

Guide: Choosing a Pump for your High-Pressure Inflatable SUP Paddle Board.

As high-pressure inflatable paddle boards have increased in popularity – and the development of even higher-pressure materials on the rise – the issue of pumps has become a hot topic.
Specifically, what is the simplest, easiest way to get your inflatable SUP to the higher pressures of 18 to 20 PSI without developing a hernia or popping a blood vessel?

While we have used many of the pumps that have come through the door, we had not actually compared one to another. So, we pulled out all the SUP pumps in the warehouse, lined them up and tried them out, one by one.
Before going further, here are a few things you need to keep in mind when reading our review:

All pumping times and amounts are dependent on the size of board (length, width and thickness) which equates to the volume of air you will be pumping. Many of the popular boards run from 190 to 220 liters, but we do have smaller boards down to 160 liters and some big, beefy boards at 370 liters.
Despite what the manufacturer may tell you, try out the board and figure out what PSI you actually need – no sense in spending the time and energy pumping something up with little gain. While some boards can be inflated to 25 PSI, for most of us that is overkill. Smaller people may get away with 12 PSI and we had one 6’4, 300lb customer fine at 19 PSI. But in no case should you go higher than the manufacturer recommended pressure.
I have ranked them by “difficulty” level, but I am a smaller adult at 5’4″. Larger people may have an easier time reaching higher pressures.
The pumps we used all have the Halkey-Roberts (HR) valves and attachments. If you purchase an aftermarket pump, please make sure that a) the adaptors that come with it will work with your board or b) that you can get your hands on an adaptor and glue it onto the hose end. The HR valves are on the following inflatable boards that we know of: Red Paddle Co, C4 Waterman, Advanced Elements, AquaGlide, Airis Inflatables, Conquest, BIC.
To give a rough factoring, we’ve listed the air volume for the pumps – check on the volume for your pump. For example, 2000 cm3 is equal to 2.0 liters. If a pump puts out 2 liters and the board is 200 liters, theoretically it would take 100 full strokes to fill the board – we didn’t always see that, though. So, a 2000 cm3 pump will put out less air – and be easier to pump to higher pressures – than a 2500 cm3 pump. The 2500 cm3 pump will fill out a board faster, but

Original Source: AirKayaks >>