Tag Archives: Tips from our Readers

Coupling a Boston Valve Adaptor to a TwistLock Valve

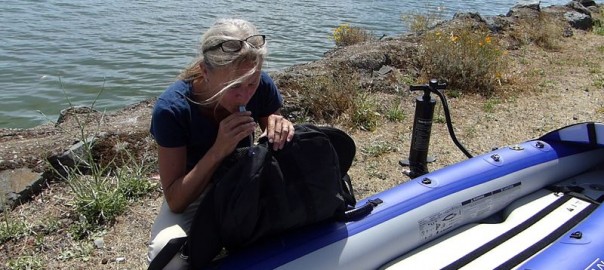
Have you ever stumbled across one of those pesky twistlock valves found on some inflatable kayaks, that can’t be used with an adaptor? If so, you were probably forced to do one of three things – have a buddy hold the valve over the twist lock; carefully negotiate holding the adaptor and twistlock together with one hand while pumping with the other; or give up and blow it up with your mouth.

One customer, Debbie Morris, send us the following nifty fix. According to Debbie, “My brother helped me solve the inflation problem with the small deck valves. We attached a cut piece of hose which fit perfectly over the valve. The Boston valve adapter from our pump fit inside the other end. No more trying to hold the attachment with one hand now. I have enclosed pictures.”

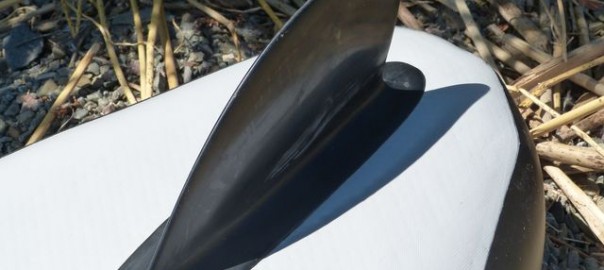
Utilizing a couple inches of flexible tubing with 3/4 inch (20mm) outer dimension and 5/8 inch (17mm) inner dimension, Debbie was able to fit each side over the Boston valve adaptor and twist lock valve, creating a good seal that allowed her to easily inflate her Innova Helios. The tubing can be found at many large home improvement and hardware stores.

Many thanks for the tip, Debbie!

Original Source: AirKayaks >>

How to Straighten a Bent Fin on an Inflatable Kayak or SUP

It’s a common occurrence – you just purchased an inflatable kayak or paddle board and excitedly open the box to discover – bent fins!

While this might appear devastating at first, straightening an integrated bent fin on an inflatable is a fairly easy task – basically, the application of heat allows it to return to normal. (Please note, this is just for the integrated flexi-fins found on many inflatables, not the removable rigid fins.)
Here are three options:
1) If it is a minor bend, flip your inflatable upside down and let it sit in the sun for a while. This often will return it to a straight position. (Please note: do NOT put your inflatable in the sun at full pressure – release some of the air so that it feels soft.)

2) For tougher bends, use a hair dryer. Hold the fin and after about 5 or 10 minutes the fin should soften enough to slowly straighten.

3) Very tough bends may require a little more effort. We thank Red Paddle Co for the photos and information on the “hot water” fix per below:

Pour hot water from the kettle on to the fin to make the fin flexible.

Straighten the fin with your hands and then using sticky tape secure the fin in its upright position.

Allow to cool either naturally or by pouring cold water over the fin. You should find your fin is now straight.

How to ensure this doesn’t happen again?
Make sure to store the inflatable in such a way that the fins are not bent. Some of this can be accomplished by folding. For instance the Airis paddle boards are folded one third up, then one-third again, then the fin is folded over (sticking up into the air). The board is then folded in half the long way, which nestles the fin between the layers.

 
Some inflatables come with fin protectors – bladder rings that slip over the fins.

If you don’t have fin protectors, you can easily fashion some by cutting a slit in a large block of styrofoam – any pressure will rest on the block, and not the fin itself.
Also make sure to not sit in the kayak when on dry ground for any length of time. If you must, then provide some type of support underneath.

Taking any of these simple steps will ensure that you are paddling on a straight course, and not “around in circles.”

Original Source: AirKayaks >>

How to Straighten a Bent Fin on an Inflatable

It’s a common occurrence – you just purchased an inflatable kayak or paddle board and excitedly open the box to discover – bent fins!

While this might appear devastating at first, straightening an integrated bent fin on an inflatable is a fairly easy task – basically, the application of heat allows it to return to normal. (Please note, this is just for the integrated flexi-fins found on many inflatables, not the removable rigid fins.)
Here are three options:
1) If it is a minor bend, flip your inflatable upside down and let it sit in the sun for a while. This often will return it to a straight position. (Please note: do NOT put your inflatable in the sun at full pressure – release some of the air so that it feels soft.)

2) For tougher bends, use a hair dryer. Hold the fin and after about 5 or 10 minutes the fin should soften enough to slowly straighten.

3) Very tough bends may require a little more effort. We thank Red Paddle Co for the photos and information on the “hot water” fix per below:

Pour hot water from the kettle on to the fin to make the fin flexible.

Straighten the fin with your hands and then using sticky tape secure the fin in its upright position.

Allow to cool either naturally or by pouring cold water over the fin. You should find your fin is now straight.

How to ensure this doesn’t happen again?
Make sure to store the inflatable in such a way that the fins are not bent. Some of this can be accomplished by folding. For instance the Airis paddle boards are folded one third up, then one-third again, then the fin is folded over (sticking up into the air). The board is then folded in half the long way, which nestles the fin between the layers.

 
Some inflatables come with fin protectors – bladder rings that slip over the fins.

If you don’t have fin protectors, you can easily fashion some by cutting a slit in a large block of styrofoam – any pressure will rest on the block, and not the fin itself.
Also make sure to not sit in the kayak when on dry ground for any length of time. If you must, then provide some type of support underneath.

Taking any of these simple steps will ensure that you are paddling on a straight course, and not “around in circles.”

Original Source: AirKayaks >>

Tales to Tell: A Hiking and Kayaking Journey Across Iceland

Earlier this year, we were approached by Charlie Turnbull, a young Australian adventurer with a passion for the outdoors. He had recently launched his “career” with a 25-day, one-thousand kilometer canoe journey from Mongolia to Russia, through one of the least densely populated areas on earth; from the southern end of Lake Khovsgol to the tiny river Eg, south across the Mongolian plains to the Selenga river, then crossing the border into Russia, and straight into Lake Baikal.

The travels were documented on Patagonia’s Australian website at http://www.patagonia.com.au/journal/2013/mongolia-to-russia/
Our emails criss-crossed while Charlie outlined his new plans – in a nutshell, to hike and kayak the length of Iceland. The proposed route traversed the volcanic highland region of Iceland and onto the Hofsjökull ice cap, crossing the ice to the headwaters of the Pjorsa River, then 230km of kayaking whitewater and flat sections to the Northern Sea. The trip would be in June/July, when the temperature averages 15 degrees C. The bulk of the paddling would be calm, with some rapids.
We discussed what products would be best suited for their needs – a tough decision as there are several. They needed a two person that could carry some gear, but weight was a concern. The need for material that would not become waterlogged in a chilly setting; and the need to traverse some rapids. We discussed Advanced Elements, Innova and others, and finally focused on the AquaGlide Klickitat Two, a 42-lb whitewater, self-bailing kayak that AquaGlide agreed to provide for the trip. And as the expedition expanded with a videographer to document the journey, we sent along an AquaGlide Chinook Two for Sam Brumby and his camera gear, Advanced Elements fiberglass Orbit breakdown paddles, and Astral Designs super-lightweight Ronny PFDs.

With good-humored ribbing from friends and family, Charlie and company headed off.
In July, we heard back from the trio. According to Charlie, “What an epic 20 days. The boats were amazing, so tough. Grade III glacial water, volcanic rocks, long portages – held up perfectly. The footage and pictures we have are awesome as well, will send through in the next weeks or so.”
Charlies’ crew is currently working on a multi-part video series on the Icelandic trip, which will be part of a larger project called  ‘Tales to Tell’. Tales To Tell is a collaboration between friends with a passion for adventure, journeys and storytelling; through image, film and text, the friends hope to share experiences and inspire others to explore and create at home and abroad, and in doing so foster a healthy respect for the environment.
The final video documentaries will be uploaded to the Tales to Tell website at http://www.talestotell.com.au/
But until that moment, Charlie has given us a “sneak peak” at

Original Source: AirKayaks >>