Tag Archives: reviews

Product Review: New Innova Twist II LN Inflatable Tandem Kayak

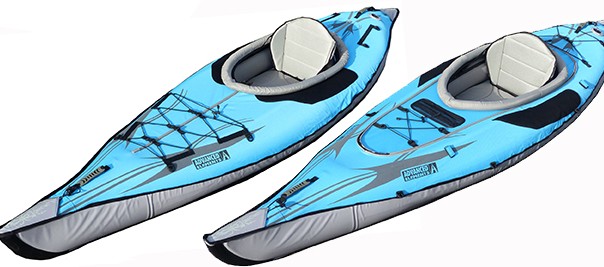
In May we received our first shipment of the newly-updated Innova Twist and Swing inflatable kayaks for 2016. Made in the Czech Republic, the Twist and Swing models are now constructed from Light Nitrilon (LN), a lighterweight version of the rugged material used in the traditional Innova Sunny, Helios and Safari models. Light Nitrilon is known for making the kayaks more rigid as well as water and abrasion resistant, without substantially increasing weight. It’s also PVC-free, thus environmentally friendly.

New features also include improved seating and beefed up foot brace. The new seating arrangement is removable and inflatable, making it easier to reposition the paddling locations, optimizing paddling performance and comfort.
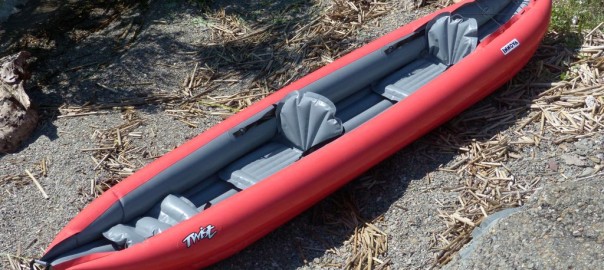
This week we had the first opportunity to take out the  revamped Innova Twist II LN, an 11 foot 10-inch two-person inflatable weighing a mere 26 lbs (including seats and foot brace) with a selling price of $549.
Please note: Some of this information will be repeated from prior write-ups.
Innova Twist II: Getting Started
The box as received measures 21.5 x 16 x 10 inches, weighing in at 28.5 lbs.

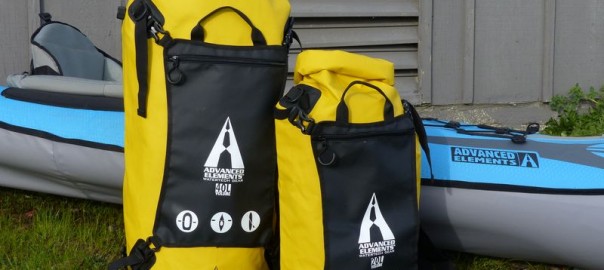
Inside is the Twist II LN body, cinch strap, multiple instruction sheets, tracking fin, foot rest, repair kit, two seats, bilge sponge and valve adaptor. The Twist II LN body with seats and brace weighs 26 lbs with a folded size of 20 x 15 x 8. AirKayaks note: While the instructions say the Twist II LN comes with a drawstring carrying sack, these were not included in the first shipments. The bags are currently being shipped over and will be added to the boxes.
Innova Twist 2 Setup/Inflatation
We read through the included instruction manuals. As with all the Innova manuals to date, the instructions are quite detailed – there is one instruction sheet for fin installation, one for utilizing the valves, and another on the kayak in general. Most include IKEA-style graphics which are occasionally just short of a brain twister, and while some steps are dauntingly detailed, some are not mentioned.  As the kayaks are made in Europe, many of the details are based around European specs and regulations.

First step, unpack and unfold the kayak body. What is immediately noticeable is how FLAT the kayak is when deflated.

Install the tracking fin before inflating the kayak. The Twist II LN utilizes a single fin with double slots. Slip the end with the larger slot in first, making sure that the fin is pointing towards the “back” of the kayak. This enables it to slide in enough to fit in the second slot. While the first time can be a struggle to get the back side into position, after a couple of rounds it becomes quite easy. Pull up on the fin to ensure you

Original Source: AirKayaks >>

Product Review: AquaGlide 2016 Cascade 12’0″ Inflatable Standup Paddle Board

Earlier this year, we received our new 2016 shipment of Aquaglide Cascade inflatable paddle boards consisting of three models ranging in size from 10 to 12 feet. This was subsequently joined by the new AquaGlide Blackfoot Angler 11’0 inflatable SUP.

For 2016, Aquaglide has jazzed up the Cascade image with beefed up graphics, upgraded backpack and redesigned dual action, high pressure pump – still maintaining low price points.  All three Cascades are now 6 inches thick.

The initial production series for the Cascade 12-0 inflatable paddle board lacked front bungee deck lacing – subsequent shipments will come with the deck lacing system as shown two photos above. We were able to purchase a number of these initial run models at a great savings of $300, which we are passing on to our customers. As a bonus, each board comes with a bungee deck lacing kit replete with glue, d-rings, lacing and application instructions. We took our prototype board and followed the instructions, and were surprised at how simple it was. See our write-up on Attaching D-Rings to an Inflatable Paddle Board.
So … our second review will focus on Aquaglide’s new Cascade 12’0″ (without deck lacing, otherwise identical to production model shown in the first photo) – a 14-18 PSI inflatable SUP with a capacity load of 230 lbs. Please note, some of this will be repeated from other write-ups.
Aquaglide Cascade 12’0″ iSUP – Getting Started
The double-boxed board as-arrived is 43 x 27 x 8 inches weighing in at 45 lbs.

Inside is the Cascade 12’0″ body, backpack, repair kit, high pressure pump with gauge and removable fin. The instructions were missing, but we did manage to locate them online – we have attached a link here. Once rolled up, the SUP board and pump fit into the backpack, as well as breakdown paddles, though the backpack is set up to also attach paddles to the outside (the pump is too large). The board itself weighs 26 lbs, or 32.5 lbs inside the backpack with pump – these all easily fit in the back of a small car. Folded up in the bag, the dimensions are 38 x 21 x 8 inches.

For your first set up unroll the SUP body. Lay it out face up so that you can access the military valve.

The Cascade 12-0 utilizes one spring-loaded military valve for inflation. These are very simple to use and feature an inflate mode (spring plunger is UP) and a deflate mode (spring plunger is DOWN). By using your finger to gently push on the plunger, it can be moved to the inflate mode (air goes in and doesn’t come back out) and deflate mode (air goes in and comes back out). Before you

Original Source: AirKayaks >>

Product Review: AquaGlide Blackfoot Angler 11’0″ Inflatable Standup Paddle Board

We have recently focused on the new AquaGlide models for 2016 as they’ve arrived over the past few months. A division of North Sports Inc., the Aquaglide brand has grown steadily over the past 15 years, now encompassing inflatable kayaks and standup paddle boards.
To-date, product reviews have included the new BlackFoot SL inflatable fishing kayak and the Cascade 11’0″ inflatable paddle board.

We have been eager to try out the new Blackfoot Angler 11’0″ inflatable SUP, which this year joined the three Cascade recreational models – the Cascades 10’0″, 11’0″ and 12’0″ – as the only fishing-specific model in the AquaGlide  standup paddle board line.
Time and weather came together last week. So, our second board review will focus on Aquaglide’s new Blackfoot 11’0″– a 14-18 PSI inflatable SUP workhorse with a capacity load of 450 lbs. Please note, some of this will be repeated from other write-ups.
Aquaglide Blackfoot 11’0″ iSUP – Getting Started
The double-boxed board as-arrived is 47 x 24 x 8.5 inches weighing in at 47 lbs.

Inside is the Blackfoot 11’0″ body, backpack, repair kit, high pressure pump with gauge and removable fin. The instructions were missing, but we did manage to locate them online – we have attached a link here. Once rolled up, the SUP board and pump fit into the backpack, as well as breakdown paddles, though the backpack is set up to also attach paddles or pump to the outside.
The board itself weighs 29 lbs, or 36 lbs inside the backpack with pump – these all easily fit in the back of a small car. Folded up in the bag, the dimensions are 38 x 21 x 8 inches.

For your first set up unroll the SUP body. Lay it out face up so that you can access the military valve.

The Blackfoot 11-0 utilizes one spring-loaded military valve for inflation. These are very simple to use and feature an inflate mode (spring plunger is UP) and a deflate mode (spring plunger is DOWN). By using your finger to gently push on the plunger, it can be moved to the inflate mode (air goes in and doesn’t come back out) and deflate mode (air goes in and comes back out). Before you go to all the effort of inflating the board, PLEASE make sure the plunger is in the inflate position.
The Blackfoot paddle board we received included the standard AquaGlide wide-barrel, single-action kayak pump with gauge – we understand that subsequent shipments will include the new-style Bravo high-pressure, dual-action hand pump.

First, attach the gauge to the hose, then the hose to the pump handle. Take the military valve adaptor (the one with locking arms) and friction fit it over the Boston valve adaptor, which is attached to the

Original Source: AirKayaks >>

Product Review: AquaGlide Blackfoot SL Inflatable Fishing Kayak

We continue with our series on the new Aquaglide inflatable kayak models for 2016.  Our last review focused on the new Cascade 11’0″ inflatable paddle board. We now switch gears to take a look at the AquaGlide angler series, in particular this year’s new Blackfoot HB SL inflatable fishing kayak.

At 11-feet in length with a price tag of $799, the high-pressure Blackfoot HB SL is a stripped-down solo inflatable kayak featuring a more economical price point than the current Blackfoot XL tandem. Please note, some of this will be repeated from other reviews.
Getting Started with the AquaGlide Blackfoot HB SL:

We unpacked the box and laid out the pieces – inflatable kayak, backpack, instructions, repair kit, foot brace, tracking fin, visor lift and seat.
Initial measurements showed the kayak body weighs 25 lbs while the kayak with seat, fin and brace – all in the backpack – weighs 30 lbs. Backpack size (filled) is roughly 26 x 19 x 12 inches. Boxed up, the dimensions are 26 x 23 x 14 inches with a shipping weight of 39 lbs.

(AirKayaks Side note #1: When initially removing the kayak from the carrying case, take a good look at how the kayak is folded This is probably the most overlooked step and it is VERY helpful when trying to get the kayak back into the bag.)
The included instructions are adequate and include diagrams with inflation details.

Set up is straight-forward and simple  – unpack, unfold, inflate.
There are three inflation chambers utilizing high-pressure military valves – the two side chambers and the floor. The floor is pumped up first.

The military-style plunger valve is simple to use – with your finger, twist the plunger slightly to the “up” position to inflate (air goes in but doesn’t come back out) and “down” to deflate (air comes out).

The Blackfoot HB valves require a military valve adaptor, which does not come with most standard pumps. Here is where we came to our first issue – no military valve adaptor was included. We did manage to grab the AquaGlide Dual Action pump from our previous writeup on the AquaGlide Cascade 11-0 inflatable paddle board – this had the correct adaptor, so we were ready to keep going. In the interim, Aquaglide has shipped us adaptors to include with each kayak and will make sure upcoming shipments have them included.
While we used the AquaGlide pump, if using the “included” adaptor, friction fit the military valve adaptor onto the Boston valve adaptor, then lock onto the military valve with a slight twist. Since the chambers are inflated from 3 to 12 PSI, it is helpful to use a pump with pressure gauge to ensure the kayak is inflated appropriately.

The floor is held in place with

Original Source: AirKayaks >>

Product Review: AquaGlide 2016 Cascade 11’0″ Inflatable Standup Paddle Board

Last week, we received our new 2016 shipment of Aquaglide Cascade inflatable paddle boards consisting of three models ranging in size from 10 to 12 feet.

Original Source: AirKayaks >>

Product Review: 2016 Jobe Aero SUP 11-6 Inflatable Paddle Board System

Last month we received the first of Jobe’s 2016 inflatable paddle board line. Well known in Europe for windsurf, water boards and attire, Jobe expanded into the inflatable paddle board line a few years ago. Since then, the line has evolved to encompass a cohesive look, epitomized by complete “paddle board packages” including paddle, pump, backpack, leash and board – pretty much everything needed to get on the water.

The 2016 inflatable Aero SUP line includes 6 models ranging in size from 9’4″ to 12’6″ covering the gamut from surf to yoga. The current boards also feature Jobe’s new technology  – a heavy-duty, double-laminate material which is stronger and lighter, providing up to 35% weight savings over previous models; the 2016 models now hover around the 20 lb. mark.
Our first Jobe review features the Aero SUP 11-6 all-round, recreational touring model.
(Please note: some of the info will be repeated from prior writeups.)
Jobe Aero SUP 11-6 Inflatable SUP – Getting Started
The board as-arrived is 35 x 17 x 12 inches in the box.

Inside is the Aero SUP 11-6 body, backpack, repair kit, single action pump with pressure gauge, cinch belt, removable fin, adjustable fiberglass breakdown paddle, ankle leash and instructions. Once rolled up, the SUP board fits into the backpack, as well as breakdown paddle  and pump – each of these attach to the outside of the backpack, but could also be stowed inside. The board itself weighs 22.5 lbs, while the paddle and pump are 2 lbs each – a total of 31.75 lbs in the pack. The boxed weight is 36 lbs. The package easily fits in the back of a small car.

For your first set up, remove the cinch strap and unroll the SUP body. Lay it out face up so that you can access the military valve.

The Aero SUP 11-6 utilizes one spring-loaded military valve for inflation. These are very simple to use and feature an inflate mode (spring plunger is UP) and a deflate mode (spring plunger is DOWN). By using your finger to gently push on the plunger, it can be moved to the inflate mode (air goes in and doesn’t come back out) and deflate mode (air goes in and comes back out). As a cautionary note, before you make the effort to inflate the board, PLEASE make sure the plunger is in the inflate position.
The Aero SUP paddle board system includes a high-pressure, 2000 cm3 single-action pump with a gauge – what we term the “tall  barrel” as it pushes out less air, though takes a bit less effort to attain the higher pressures.
First, attach the gauge to the pump – the gauge attaches via a pin/slot system.

Next, attach the hose to the gauge.

Original Source: AirKayaks >>

Product Review: Advanced Elements StashPak RollTop Dry Bags – 20L & 40L

This past summer, Advanced Elements of Benicia, California, introduced their new WaterTech™ Gear line of deck and cargo bags designed to fully complement Advanced Elements inflatable kayaks and paddle boards, as well as any kayak or watercraft.

The new WaterTech Gear accessory line consists of seven models ranging in size from 3 to 60 liters, with retail prices of $24.95 to $79.99. The product line covers a wide range of applications from small roll-tops and waterproof backpacks to deck bags and duffels.
We decided to take a look at the product line, beginning with the new 20-liter and 40-liter StashPak rolltop drybags.

The StashPaks are basically large duffels constructed from a heavy-duty PVC tarpaulin for water-resistance and durability; each is capable of handling quite a bit of gear. The bags are easy to use – after filling, simply roll down the top 3-5 times, then clip it shut. The more it’s rolled, the more water-resistant it becomes. (AirKayaks note: These are water- resistant, not water-proof. If you are concerned about your belongings, put them first in a waterproof ziplock inside the bag.)

Each bag comes with a nifty, removable, clip-on pack with zipper – perfect for small gear that needs to be easily accessed like phones, GPS, keys and wallet. When detached, the packs can also serve as carrying pouches; each has a handle and measures roughly 14 inches tall and 8 inches wide. The four attachment straps are adjustable roughly 7 inches each side, and each attachment point has an additional d-ring for lashing gear. As an added bonus, the StashPak body can be rolled up and stored inside the detachable pouch.

Each StashPak comes with two detachable carrying straps with clips; these attach to four d-rings located on the back side. The carrying straps turn the bag into a quasi-backpack; each can be adjusted from 24 to 42 inches in length. There are an additional two d-rings adjacent to the rolltop clips.

While not mentioned in the product specifications, each of the StashPaks come with a “compression valve” – basically a small valve that is screwed open or shut to add or remove air. To use, make sure you have a good seal of 3 to 5 rolls and then clip shut. Screw open the valve and start pushing out the air to create a vacuum, then screw the vent shut – this makes a smaller package if carrying a lot of gear. Conversely, one can open the valve and blow air in, making it more “floatable.”
Outer bag measurements are as follows:
20L: 26 inches tall (unrolled) with a 10 inch diameter. Rolled 4 times, 20 inches tall (unfilled)
40L: 34 inches tall (unrolled) with a 12 inch diameter. Rolled 4 times, 28 inches tall (unfilled).
The

Original Source: AirKayaks >>

Product Review: 2016 Red Paddle Co Explorer Plus 13’2″ Inflatable SUP Board

As mentioned in a prior post, we have been awaiting the arrival of the 2016 Red Paddle Co product line. The shipment recently arrived and we had our first opportunity to take a look at the new Red Air inflatable SUPS, consisting of 17 models. New for this year are three boards – the 8’10” Whip, the Explorer Plus 13’2″, and the Sport 12’6″.

Founded in 2007, Red Paddle Company is a UK-based business focused solely on the design and manufacture of inflatable paddle boards and accessories. Well-known for their ruggedness, each of the boards utilize high pressure drop-stitch technology – allowing them to be inflated from 16-22 PSI – and feature quadruple rail construction and double layering. The larger boards come with the Red Paddle Titan pump, a dual-barrel pump allowing one to inflate a paddle board in minutes.
For 2016, Red Paddle Co introduced a technological advance termed MSL (Monocoque Structural Laminate) fusion technology. The new process has resulted in boards that weight up to 10 lbs lighter than previous models, without sacrificing soundness or rigidity. Indeed, the 2016 slogan for Red Paddle is “stronger, stiffer, lighter.”
Our first write-up on the new boards focused on the Sport 12’6″ iSUP – a 30″ wide, sleek, inflatable cruising model reminiscent of the original Race 12’6″, constructed from thicker 150mm drop-stitch material and the revolutionary new rocker stiffening system (RSS).
Included in this shipment was all the new Explorer + 13’2″, a feature-rich, high-speed cruiser built as the ultimate exploration board. So, we opened the box and started getting ourselves acquainted with this intriguing new model. (Please note, some of the information here will be repeated from other writeups.)
Red Paddle Co Explorer Plus 13-2: Getting Started
The box as received weighs 41 lbs, measuring 37 x 15 x 15 inches.

Inside the box is the SUP body, two RSS side battens, Titan dual barrel pump, pressure gauge, backpack, cinch belt, removable fin, instructions and repair kit – as well as a bonus cell phone case. Once rolled up, the SUP board and paddle fit into the backpack, as well as optional breakdown paddles under 37 inches.

Weight is 37 lbs for backpack, board and pump, which all easily fit in the back of a small car. The board alone is approximately 24 lbs.
Red Paddle Co Thirteen Two Explorer Plus: Setup
The Red Paddle Co 13’2 Explorer Plus inflatable SUP arrives rolled up around the Titan pump, inside the backpack. Instructions are located inside the cell phone case, attached to the zipper pull on the bag.

For your first set up, remove and unroll the SUP body. Lay it out face up so that you can access the military valve.

The Explorer Plus 13-2 utilizes one spring-loaded military valve for inflation.

Original Source: AirKayaks >>

Product Review: New 2016 Red Paddle Co Sport 12’6″ Inflatable SUP Board

We have avidly been awaiting the arrival of the 2016 Red Paddle Co product line. Recently, the truck rolled in and we had our first opportunity to take a look at the new Red Air inflatable SUPS, consisting of 17 models. New for this year are three boards – the 8’10” Whip, the Explorer Plus 13’2″, and the Sport 12’6″.

Founded in 2007, Red Paddle Company is a UK-based business focused solely on the design and manufacture of inflatable paddle boards and accessories.
For 2016, Red Paddle Co has streamlined many of the current models, focusing on technology improvements; the mantra this year is “stronger, stiffer, lighter.” And indeed, the new product line is quite a bit lighter. The introduction of a technological advance termed MSL (Monocoque Structural Laminate) fusion technology has resulted in boards that weight up to 10 lbs lighter than previous models, without sacrificing soundness or rigidity.
Included in this shipment is the new Sport 12-6 ISUP – a 30-inch wide, sleek, inflatable cruising model reminiscent of the original Race 12’6″ – featuring 150mm drop-stitch material and the revolutionary new rocker stiffening system (RSS).
So we begin our first in the series on the new 2016 models, featuring the Sport 12-6. (Please note: Some of this will be repeated from previous write-ups.)
Red Paddle Co Sport 12-6: Getting Started
The box as received weighs 39.5 lbs, measuring 37 x 15 x 15 inches.

Inside the box is the SUP body, two RSS side battens, Titan dual-barrel pump, pressure gauge, backpack, cinch belt, removable fin, instructions and repair kit – as well as a bonus cell phone case. Once rolled up, the SUP board and paddle fit into the backpack, as well as optional breakdown paddles under 37 inches.

Weight is 35 lbs for backpack, board and pump, which all easily fit in the back of a small car. The board alone is approximately 23 lbs.
The Red Paddle Sport 12-6 inflatable SUP arrives rolled up around the high pressure Titan pump, inside the backpack.
Instructions are located inside the cell phone case, attached to the zipper pull on the bag.

For your first set up, remove and unroll the SUP body. Lay it out face up so that you can access the military valve.

The Red Air Sport 12-6 utilizes one spring-loaded military valve for inflation. These are very simple to use and feature a deflate mode (spring plunger is DOWN) and inflate mode (spring plunger is UP). By using your finger to push on the plunger, it can be moved to the inflate mode (air goes in and doesn’t come back out) and deflate mode (air goes in and comes back out). Before you go to all the effort of inflating the board, PLEASE make sure the plunger

Original Source: AirKayaks >>

Product Review: New AE1044 AdvancedFrame DS-XL Inflatable Kayak from Advanced Elements

We continue with our reviews on the new Advanced Elements AE1044DS™ series of kayaks.
As previously mentioned, two years ago, AirKayaks introduced the specially-packaged, high-pressure AdvancedFrame DS series™ of kayaks from Advanced Elements. Featuring the same high quality construction and materials as the standard AE1012 AdvancedFrame and AE1007 Convertible, the DS Series™ was bundled with upgraded accessories to enhance performance and comfort.

This past year, AirKayaks worked with the designers at Advanced Elements, to introduce the next generation in the DS Series – the AdvancedFrame AE1044 DS-XL™* and DS-XLC™*.
The new DS-XL series is an elongated version of the classic AE1012 AdvancedFrame. With an additional 5 inches in length and an adjustable foot peg, the kayaks are comfortable enough for both taller and smaller paddlers. The longer, streamlined body – in conjunction with the high pressure floor – provides better tracking, higher payload capacity and increased glide with minimal increase in weight.
We grabbed two from the limited supply that initially arrived. Our first review focused on the AE1044 AdvancedFrame DS-XLC (Cover). The XLC kayak features a zip-on deck with storage options, allowing paddlers the flexibility of paddling an open style design for easy entry, or a closed deck design which can take an optional spray skirt.

We now turn to the AdvancedFrame AE1044DS-XL, a 10′ 10″ inflatable with fixed deck, weighing in at 35 lbs. in the carrying case. Please note, some of this information will be repeated from previous writeups.
AdvancedFrame DS-XL Setup/Inflatation
We unpacked the boxes and laid out the pieces – inflatable kayak, carrying case, instructions, repair kit, foot brace, double action pump with gauge, and high-back lumbar seat.

The kayak with seat, floor and brace weighs 35 lbs, or 39 lbs in the bag with the pump. Bag measurements are approximately 32 x 19 x 10 inches. The kayak box as arrived weighs 40 lbs, measuring 33 x 21 x 10 inches. The dropstitch (DS) floor weighs 5 lbs and comes in a second box with adaptor – the DS floor utilizes the same repair kit as included with the kayak.
(AirKayaks Side note #1: When initially removing the kayak from the carrying case, take a good look at how the kayak is folded. This is probably the most overlooked step and it is VERY helpful when trying to get the kayak back into the bag.)
Set up is straight-forward and simple  – unpack, unfold, inflate. The DS XL Series will have two sets of instructions – one can be found in the inner side pocket of the carrying case. This details the basic kayak instructions for inflation, deflation and folding. A second set of instructions is included in the dropstitch floor repair kit package, and details the floor inflation. TIP: Attach the floor instructions

Original Source: AirKayaks >>