Tag Archives: airkayak

Product Review: Mistral 11-5 Adventure Inflatable SUP Paddle Board

This year, we had our first hands-on experience with Mistral’s inflatable SUP line. Well-known for decades as a leader in windsurfing, the Mistral line originated in northwest US, but is now based out of Europe. Most recently, Mistral has forayed back into the US market, bringing their expanding inflatable SUP lines built in both Europe and Asia.

Our first two Mistral reviews focus on the Asian-produced boards, beginning with the Mistral Kailua inflatable paddle board – an 11 foot SUP touted as a fitness board, but also a great standup paddle board and sit-on-top.
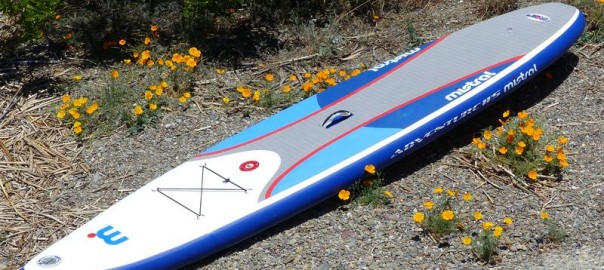
Now we check out the Mistral Adventure inflatable SUP, an all-round cruiser designed for a wide range of conditions from flatwater lakes to oceans and rivers. The Adventure comes in two sizes – the Adventure 10-5 and Adventure 11-6. For this review, we chose the Adventure 11-6 inflatable SUP.
(Please note: some of the info will be repeated from prior writeups.)
Mistral Adventure 11’5 Inflatable Standup Paddle Board – Getting Started
The board as-arrived is 34 x 19.5 x 11 inches in the box, weighing in at 38 lbs.

Inside is the Adventure body, backpack, repair kit, single action pump with pressure gauge, removable fin and instructions (inside front zippered pocket). Once rolled up, the SUP board fits into the backpack, as well as a breakdown paddle under 35 inches (longest shaft length) – if an excellent packer, the pump will fit inside too, or it can be attached to the outside of the bag. The board itself weighs 27 lbs, or 33 lbs inside the backpack with pump – these all easily fit in the back of a small car.

For your first set up, remove the SUP body from the backpack, and unroll. Lay it out face up so that you can access the military valve.

The Adventure 11-5 utilizes one spring-loaded military valve for inflation. These are very simple to use and feature an inflate mode (spring plunger is UP) and a deflate mode (spring plunger is DOWN). By using your finger to gently push on the plunger, it can be moved to the inflate mode (air goes in and doesn’t come back out) and deflate mode (air goes in and comes back out) – before you make the effort to inflate the board, PLEASE make sure the plunger is in the inflate position.
The Adventure paddle board system includes a high-pressure, single-action pump with a gauge – what we term the “slim barrel” as it pushes out a bit less air, making it easier to attain very high pressures. Recommended board pressure is 15 PSI.

First, hook the gauge onto the pump then attach the hose to the gauge. Push and twist the military valve adaptor onto the valve, and lock into

Original Source: AirKayaks >>

Closeout 2014 AquaGlide Columbia HB Tandem Inflatable Kayaks 25-30% off

Just in time for the summer months! AirKayaks is pleased to announce a special purchase of remaining 2014 AquaGlide high-pressure Columbia HB Tandem and Columbia HB Two inflatable kayaks, now 25% to 30% off original prices!

The AquaGlide Columbia HB series features a 6+ PSI high-pressure “hard bottom (HB)” floor which – when coupled with the 3 PSI side chambers – provides rigidity and stability. Designed for recreational touring and all-around use, the Columbia HB flagship series is constructed from a commercial grade Duratex hull material blended with a rugged 600 denier polyester.

Front and rear spray guards are positioned to keep paddlers dry, each with ample bungee deck lacing for attaching gear. Both models can accept optional AquaGlide single and double decks, providing even greater protection from the elements, and the ability to utilize after-market spray skirts.

Paddling comfort is enhanced with the adjustable Pro-Formance seats, featuring an inflatable base and high backrest with plenty of storage features – mesh pockets, integrated fishing rod holders and removable beverage holder.
A removable tracking fin and sculpted hull keeps the kayak on course.
Other features include neoprene knuckle guards, military inflation valves, quick-release tracking fin system, molded handles, front foot rests and paddle holders. Each kayak comes with an oversized carrying bag with backstrap. Each also includes a military valve adaptor needed to inflate the floor.
Closeout models include:

Columbia HB Tandem –  a 15 foot long inflatable kayak designed for one or two paddlers, with a third jumper seat and extra space for gear, child or pet. Weight capacity 600 lbs. Originally $1099, now $799.

Columbia HB Two – a 13.5 foot single or tandem version, with a weight capacity of 400 lbs. Originally $999, now $699.
A limited amount of the Columbia HB One kayaks (capacity 300 lbs) and Deschutes HB Two, are still available.

The Columbia HB One is a 10.5 foot single model with a 300 lbs carrying capacity. Original price $799, now $549.

The Deschutes HB Two is a stable, high pressure all-purpose recreational design kayak that is great for solo paddlers with plenty of room for gear, though has the option to carry two small adults or an adult with child. Original price $899, now $649.
The Columbia HB One and Deschutes HB Two are available for immediate shipment. The Columbia HB Two arrives June 4th, with the HB Tandem inventory arriving June 11th, pre-orders accepted, while supplies last.
Visit the AquaGlide Product Pages at AirKayaks.com to purchase, or click on the links above.

Original Source: AirKayaks >>

Product Review: Jobe SUP Aero 11-6 Inflatable Paddle Board System

This past month, we had the opportunity to get details on the Jobe inflatable SUP line. Well known in Europe for windsurf, water boards and attire, Jobe has recently moved into the inflatable paddle board line. Our first sample (2014 model) arrived, allowing us to take a look at the 15 PSI Jobe Aero 11-6  – a 33 inch-wide, 6-inch thick, all-around cruising and touring inflatable paddle board, complete with pump, backpack, paddle and leash.

(Please note: some of the info will be repeated from prior writeups.)
Jobe Aero 11-6 Inflatable SUP – Getting Started
The board as-arrived is 36 x 17.5 x 12 inches in the box.

Inside is the Aero 11-6 body, backpack, repair kit, single action pump with pressure gauge, cinch belt, 3 removable fins, adjustable breakdown paddle, ankle leash and instructions. Once rolled up, the SUP board fits into the backpack, as well as breakdown paddle  and pump – each of these attach to the outside of the backpack. The board itself weighs 30 lbs, while the paddle, pump and pack are 2.5 lbs each – a total of 37.5 lbs in the pack. The boxed weight is 47 lbs. The package easily fits in the back of a small car.

For your first set up, uncinch the strap and unroll the SUP body. Lay it out face up so that you can access the military valve.

The Aero 11-6 utilizes one spring-loaded military valve for inflation. These are very simple to use and feature an inflate mode (spring plunger is UP) and a deflate mode (spring plunger is DOWN). By using your finger to gently push on the plunger, it can be moved to the inflate mode (air goes in and doesn’t come back out) and deflate mode (air goes in and comes back out). Not to worry, the instructions are printed on the valve. But before you make the effort to inflate the board, PLEASE make sure the plunger is in the inflate position.
The Aero paddle board system includes a Bravo high-pressure, 2000 cm3 single-action pump with a gauge – what we term the “tall  barrel” as it pushes out less air, though takes a bit less effort to attain the higher pressures.

First, screw the gauge onto the pump. Tip #1: Make sure you screw the gauge on carefully – if it gets cross-threaded, air will leak out and you will have a difficult time pumping the board up to necessary pressure.

Next, attach the hose to the gauge. Take the military valve adaptor, and screw it onto the valve slightly to lock into position – the first time, you may need to push a bit harder to attach, but it gets easier. You’re ready to pump!
Please note: The included instructions

Original Source: AirKayaks >>

Product Review: New Panther Compact Inflatable Kayak from Aquaglide

As mentioned in previous posts, Aquaglide, Inc of White Salmon, Washington has recently introduced several new inflatable kayaks for 2015. The Aquaglide kayak product line consists of 15 models with MSRP pricing from $199.95 to $1199.95.

Our first shipment included the new Panther inflatable kayak. Part of Aquaglide’s “pricepoint” series, the Panther is a cross between the Columbia XP One and Chinook One inflatable kayaks, scaled down for “smaller” people – both youth and adults.
Following is our writeup on the Panther, a 24-lb, 9 foot solo model selling for $349.
Getting Started with the AquaGlide Panther Inflatable Kayak
We unpacked the box and laid out the pieces – inflatable kayak, backpack, instructions, repair kit, tracking fin and seat.

Initial measurements showed the kayak body weighs 19 lbs, with a folded size of roughly 25 x 17 x 10 inches, while the kayak with seat in the drawstring sack weighs 24 lbs. Boxed up, the dimensions are 27 x 20 x 10 inches with a shipping weight of 29.5 lbs.
(AirKayaks Side note #1: When initially removing the kayak from the carrying case, take a good look at how the kayak is folded This is probably the most overlooked step and it is VERY helpful when trying to get the kayak back into the bag.)
AquaGlide Panther Inflatation and Setup:
The included instructions are adequate and include diagrams with inflation details.

Set up is straight-forward and simple  – unpack, unfold, inflate.

There are three inflation chambers utilizing Boston valves – the floor and two side chambers. Boston valves are two-part, screw-on valves. The bottom portion is threaded onto the kayak, the top valve is screwed open for inflation and then tightened shut after inflation. Air is easily released by unscrewing the base connector. How does it work? A flap inside the valve opens when air is pumped into the kayak, and falls shut when not pumped so that air will not rush back out.

According to the instructions, the floor is pumped up first, then the two side chambers. First, attach the Boston valves by screwing them onto the kayak.
(AirKayaks Side note #2: The Boston valves have a tether that keeps the valve attached to the kayak, ensuring that the valves don’t get lost after deflating. Make sure that the string does not get in the way when screwing on the valve base,and the valve is not cross-threaded, or you may have some air leakage.)

We pumped up the floor until firm (1.0 psi with slight give) using a standard double action hand pump – this took about 20 pumps.

We then pumped up each of the side chambers to 2 PSI – this was about 20 to 23 pumps each side – and screwed on the valve caps. (AirKayaks side note #3:

Original Source: AirKayaks >>

Product Review: New Chinook XP One Inflatable Kayak from Aquaglide

As mentioned in previous posts, Aquaglide, Inc of White Salmon, Washington has recently introduced several new inflatable kayaks for 2015. The Aquaglide product line consists of 15 models with MSRP pricing from $199.95 to $1199.95.

Our first shipment included the Chinook XP One. Part of Aquaglide’s “pricepoint” series, the Chinook kayaks are economically-priced recreational models, now in three sizes – 8.5, 10 and 13 feet.
Following is our writeup on the Chinook XP One, a 24-lb, 8.5 foot solo model selling for $349.
Getting Started with the Chinook XP One
We unpacked the box and laid out the pieces – inflatable kayak, drawstring duffel bag, instructions, repair kit, tracking fin and seat.

Initial measurements showed the kayak body weighs 21 lbs, with a folded size of roughly 23 x 17 x 8 inches, while the kayak with seat in the drawstring sack weighs 24 lbs. Boxed up, the dimensions are 24 x 21 x 12 inches with a shipping weight of 30 lbs.
(AirKayaks Side note #1: When initially removing the kayak from the carrying case, take a good look at how the kayak is folded This is probably the most overlooked step and it is VERY helpful when trying to get the kayak back into the bag.)
Chinook XP One Inflatation and Setup:
The included instructions are adequate and include diagrams with inflation details. Set up is straight-forward and simple  – unpack, unfold, inflate.

There are three inflation chambers utilizing Boston valves – the floor and two side chambers. Boston valves are two-part, screw-on valves. The bottom portion is threaded onto the kayak, the top valve is screwed open for inflation and then tightened shut after inflation. Air is easily released by unscrewing the base connector. How does it work? A flap inside the valve opens when air is pumped into the kayak, and falls shut when not pumped so that air will not rush back out.

According to the instructions, the floor is pumped up first, then the two side chambers. First, attach the Boston valves by screwing them onto the kayak.
(AirKayaks Side note #2: The Boston valves have a tether that keeps the valve attached to the kayak, ensuring that the valves don’t get lost after deflating. Make sure that the string does not get in the way when screwing on the valve base,and the valve is not cross-threaded, or you may have some air leakage.)

We pumped up the floor until firm (1.0 psi with slight give) using a standard double action hand pump – this took about 20 pumps.

We then pumped up each of the side chambers to 2 PSI – this was about 35 pumps each side – and screwed on the valve caps. (AirKayaks side note #3: If using a pressure gauge, please note

Original Source: AirKayaks >>

New Limited Edition AdvancedFrame LTD Inflatable Kayak from Advanced Elements

As mentioned in prior posts, Advanced Elements of Benicia, California, unveiled two 2015 limited edition inflatable kayak models at last summer’s Outdoor Retailer Show.

The new 10.5 ft limited edition AE1012-LTD AdvancedFrame LTD touring kayak is in transit and scheduled to be available May 15th.
The AdvancedFrame LTD features a major color redesign, as well as some updated design changes. Now in a Hi-Vis lime green with yellow graphics, the AdvancedFrame LTD sports a sleek silhouette with improved seating. A high-backed, rigid seat for added comfort and support is standard in the limited edition model.
Velcro paddle holders are now included as well as new d-rings, making it easier to attach gear.
An integrated “pressure relief valve” ensures the floor is not over-inflated. Set at 1 PSI, the relief valve releases enough air to maintain 1 PSI when pumping it up, or if left in the hot sun.

Street price is $499. For more details or to purchase, visit the AdvancedFrame LTD product page at AirKayaks.com

The larger Expedition LTD – a 13 foot touring model selling for $679 – is currently available. For more info see the Expedition LTD product page at AirKayaks.com. You can also see our Detailed Writeup with Photos on the Expedition LTD from Advanced Elements.

Original Source: AirKayaks >>

Product Review: The Limited Edition Expedition LTD Inflatable Kayak from Advanced Elements

Last summer we were able to get a sneak preview of the new Limited Edition Expedition LTD inflatable kayak from Advanced Elements. As long-time fans of the current yellow model, we were impressed with the LTD’s spiffed up graphics and feature enhancements.

Last week, the AE1009LTD hit the West Coast, and we managed to grab one before our first shipment sold out – not to worry, we picked up more.  Here are details on the Expedition LTD AE1009LTD, a 13 foot inflatable weighing in at roughly 42 lbs.
Getting Started with the Expedition LTD LTD Inflatable Kayak
The box as received measures 33 x 21 x 11 inches with a weight of 52 lbs. Inside is a rugged carrying case measuring 37 x 17 x 9 inches (seam to seam) which contains the kayak body, high-backed seat, aluminum riser, repair kit, foot brace and instructions.

The kayak folded size is approximately 31 x16 x 10 inches leaving just enough room to store a pump and breakdown paddle (not included).
The included manual features the current Expedition – set up is pretty much the same – so we will re-copy some of the instructions written in our initial Expedition write-up.

First step, unfold the kayak. The Expedition LTD features an “inner rib” in the bow and stern, which is basically a u-shaped aluminum rib, about one foot long and one-half inch wide.

This comes “pre-assembled” meaning it arrives already inserted into two sleeves inside the kayak cover. Unless you remove the inner bladder, they remain in position. When the kayak is pumped up, the inner bladder with rib presses against the kayak cover – that, in conjunction with two bow and stern plastic sheets, give the kayak a sharp silhouette which aids in slicing through the water.
The Expedition LTD kayak features 9 inflation chambers – two military valves (main chambers) and 7 smaller twist-loks (deck lifts, floor and coaming tubes).
Each Expedition LTD comes with a screw-on adaptor (found in the repair kit in the mesh pocket behind the seat) which locks onto many pumps with pin/slot hose fittings. Additionally, a standard Boston valve adaptor will friction fit into the opening.

First step, open the military valve. The military-style plunger valves are simple to use – twist one way to inflate (UP position) and the other to deflate (DOWN position).

Attach the screw-on adaptor to your pump and then couple it to the first main chamber, located on the rear hull. While there is not a pressure gauge included with the kayak, the adaptor features a “lip” that pushes open the spring plunger, allowing a pump gauge to read the back-pressure; if using the Boston valve adaptor, most gauges will only register as you are inflating.

Pump up the first chamber until

Original Source: AirKayaks >>

Video: AquaGlide Chelan HB Tandem XL Inflatable Kayak

See our new video on the AquaGlide Chelan HB Tandem XL – a 15 foot inflatable kayak perfect for two adults and child, furry friend or gear – with set-up overview and features.

You can also see our Detailed Product Review on the AquaGlide Chelan Tandem with photos!

Original Source: AirKayaks >>

Video: AquaGlide Columbia XP Tandem XL Inflatable Kayak

See our new video on the AquaGlide Columbia XP Tandem XL – a 15 foot inflatable kayak perfect for two adults and child, furry friend or gear – with set-up overview and features.

You can also see our Detailed Product Review on the AquaGlide Columbia XP Tandem with photos!

Original Source: AirKayaks >>

Product Review: Single & Double Spray Decks for Aquaglide Chelan & Columbia Kayaks

This past week we received our first shipment of AquaGlide splash decks – optional accessories which can turn your AquaGlide kayak from an open design to an enclosed one or two seater. The decks can be used with the Chelan, Columbia XP and Columbia HB series inflatable kayaks.

There are two deck options in three lengths – a single for solo paddling and a double for tandem paddling – sized to fit the single, two and tandem sizes. The spray decks keep water and wind out during chilly or inclement weather, while the coaming tubes allow you to attach optional spray skirts for even more protection from the elements.
We initially looked at the Tandem spray decks, a single and a double-seater sized for the Columbia XP, Columbia HB and Chelan Tandem XLs.
Installing the AquaGlide Spray Decks

The decks are quite portable. They each arrive rolled up in separate, draw-string, carrying cases measuring 42 x 3 x 12 inches and weighing in at 9 lbs each. (AirKayaks note: As the cases are identical, you may want to mark them 1 and 2 for differentiation.) 

Each deck comes with a repair kit and a set of 14 clips.
There are no instructions included, but once you get the hang of it, installing the decks is pretty simple.  We began with the double deck.

Remove the deck from the bag, and drape it over the kayak, aligning ends with the raised visors. (AirKayaks note: As we learned the hard way, there is a right and wrong way to orient the decks. Make sure that the plastic zippering “map case” is positioned in the bow, and that the twistlok valves on each of the coaming areas are on the back side of each cockpit opening.)

With the kayak fully inflated, take each of the clips and attach them to the cloth d-rings, located 6 on each side, and one each on the front and back raised visors. To make things easy, the clips can be left in position – if you purchase both decks, you’ll then have one full extra set if any clips are lost.

The visor portion is quite simple, but not intuitive at glance. Roll over the deck bow so that it slips over the raised visor – repeat this in the stern.

You will notice that each of the d-rings lines up with velcro strips on the spray decks.

Run the velcro loops through the clips, and fasten shut, pulling slightly to make it taught.

Next, inflate the two coaming tube twistloks (1 per seat). The coaming tubes help deflect water, but also can be used to attach optional spray skirts. The Boston valve adaptor will not friction fit over the twistlok so you will have to do one of

Original Source: AirKayaks >>