As mentioned in previous posts, Aquaglide, Inc of White Salmon, Washington has recently introduced several new inflatable kayaks for 2015. The Aquaglide product line consists of 15 models with MSRP pricing from $199.95 to $1199.95.
Our first shipment included the Chinook XP One. Part of Aquaglide’s “pricepoint” series, the Chinook kayaks are economically-priced recreational models, now in three sizes – 8.5, 10 and 13 feet.
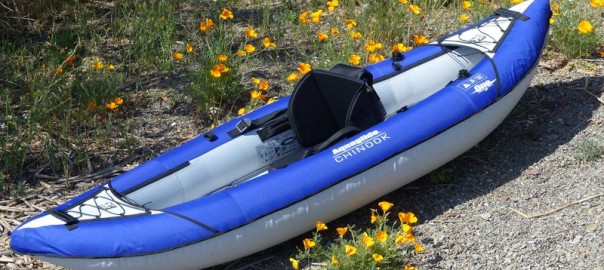
Following is our writeup on the Chinook XP One, a 24-lb, 8.5 foot solo model selling for $349.
Getting Started with the Chinook XP One
We unpacked the box and laid out the pieces – inflatable kayak, drawstring duffel bag, instructions, repair kit, tracking fin and seat.
Initial measurements showed the kayak body weighs 21 lbs, with a folded size of roughly 23 x 17 x 8 inches, while the kayak with seat in the drawstring sack weighs 24 lbs. Boxed up, the dimensions are 24 x 21 x 12 inches with a shipping weight of 30 lbs.
(AirKayaks Side note #1: When initially removing the kayak from the carrying case, take a good look at how the kayak is folded This is probably the most overlooked step and it is VERY helpful when trying to get the kayak back into the bag.)
Chinook XP One Inflatation and Setup:
The included instructions are adequate and include diagrams with inflation details. Set up is straight-forward and simple – unpack, unfold, inflate.
There are three inflation chambers utilizing Boston valves – the floor and two side chambers. Boston valves are two-part, screw-on valves. The bottom portion is threaded onto the kayak, the top valve is screwed open for inflation and then tightened shut after inflation. Air is easily released by unscrewing the base connector. How does it work? A flap inside the valve opens when air is pumped into the kayak, and falls shut when not pumped so that air will not rush back out.
According to the instructions, the floor is pumped up first, then the two side chambers. First, attach the Boston valves by screwing them onto the kayak.
(AirKayaks Side note #2: The Boston valves have a tether that keeps the valve attached to the kayak, ensuring that the valves don’t get lost after deflating. Make sure that the string does not get in the way when screwing on the valve base,and the valve is not cross-threaded, or you may have some air leakage.)
We pumped up the floor until firm (1.0 psi with slight give) using a standard double action hand pump – this took about 20 pumps.
We then pumped up each of the side chambers to 2 PSI – this was about 35 pumps each side – and screwed on the valve caps. (AirKayaks side note #3: If using a pressure gauge, please note
You must be logged in to post a comment.