Tag Archives: high-pressure kayak

Product Review: Kokopelli Moki Inflatable High Pressure Kayak with Deck

We recently posted our Sneak Preview on the new series of Moki inflatable kayaks from Kokopelli Packraft – two exciting new models we’ve seen for 2020. What’s so special? The new Moki Series expands the Kokopelli product line, providing a traditional paddling experience.

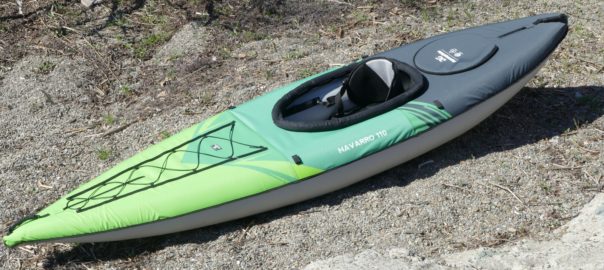
Last month, the 2020 models started rolling in. We began the series with the new 13.6 lbs XPD, so we now turn to the high-pressure Moki inflatable kayak, a 12 ft 2-inch model with zip-off deck and spray skirt.
Getting Started with the Kokopelli Moki Inflatable Kayak

We unpacked the box and laid out the pieces – inflatable kayak body with high pressure floor, EVA seat, removable deck, spray skirt, foot brace, coaming tube, pump with gauge, repair kit, roller backpack, fin, deck rod, repair kit and instructions. The fin and the repair kit are found in a pocket inside the backpack.
Boxed up, the dimensions are 36 x 25 x 15 inches with a shipping weight of 58 lbs. The kayak weighs 33 lbs with the seat, floor, brace and fin – add another 1.75 lbs for the deck and 1 lb for the coaming and spray skirt. All packed up in the bag, everything weighs 46 lbs. The folded kayak size is 29 x 21 x 9 inches.
The generic instructions for Kokopelli’s inflatable kayak series include inflation and deflation techniques, deck, seat and skirt installation, but lack details on actual set up; we will outline the steps we took, below. In general, set up is straight-forward – unpack, unfold, inflate.

The first step is to unfold the kayak.

The Kokopelli Moki utilizes three main GRI push-push valves for inflation. These are very simple to use and feature an inflate mode (spring plunger is UP) and a deflate mode (spring plunger is DOWN). By using your finger to gently push on the plunger, it can be moved to the inflate mode (air goes in and doesn’t come back out) and deflate mode (air goes in and comes back out). Before you go to all the effort of inflating the board, PLEASE make sure the plunger is in the inflate position.

Next, set up the pump – this is not mentioned in the instructions. The Moki comes with a very nifty, collapsible, dual-action Nano pump and built-in pressure gauge. Fold down the feet and attach the hose to the side that says Inflate (there is also a Deflate side). There are two pieces of plastic tubes in the plastic packaging – these are screw on handles. Unfortunately, there is no place to attach/store the handles when removed so you may want to buy a mesh laundry bag to keep everything together. Or, don’t even bother attaching the handles as the pump is pretty easy

Original Source: AirKayaks >>

Product Review: Navarro 110 Inflatable Kayak from AquaGlide

We continue with our series on the new Aquaglide line of inflatable kayaks. For 2020, Aquaglide introduced four new models – Navarro, Deschutes, McKenzie and Noyo – consisting of 9 different styles.
Our three previous reviews focused on the Deschutes recreational series. We now switch over to the Navarro line of decked kayaks, a new design for Aquaglide.

We begin with the Navarro 110 – an 11-foot high-pressure touring model for one paddler, retailing for $599.99. The Navarro line also consists of the Navarro 130 (for one paddler with removable deck) and the Navarro 145 Tandem (for one or two paddlers with optional single and double decks.)
Getting Started with the Aquaglide Navarro 110
We unpacked the box and laid out the pieces – inflatable kayak, stuff sack with handles, instructions, repair kit, foot brace, tracking fin and seat.

Initial measurements show the kayak body weighs 29 lbs, with a folded size of roughly 22 x 21 x 11 inches. The kayak with seat, fin and brace – all in the stuff sack – weighs 31.5 lbs. Boxed up, the dimensions are 25 x 23 x 12 inches with a shipping weight of 38 lbs.
(AirKayaks Side Note: When initially removing the kayak from the carrying case, take a good look at how the kayak is folded.)
The Navarro 110 comes with an instruction manual, but as previously mentioned in our Deschutes series, the instructions aren’t detailed enough for new users. This is compounded by the manual layout in which each section is first written in English, then up-to 17 different languages (including Bulgarian and Estonian), before you get to the next English section. The inflation instructions start on page 16.

Set up is straight-forward and simple – unpack, unfold, inflate.
There are two side chambers utilizing Boston valves, while the high-pressure floor features a military valve. The instructions say to pump up the two side chambers to 2 PSI, and then the floor to 6 PSI. (We did follow those instructions, but we are going to suggest a different method, and will explain why. Some of this is mentioned in the manual.)

First, attach the Boston valves by screwing them onto the kayak. Boston valves are two-part, screw-on valves. The bottom portion is threaded onto the kayak, the top valve is screwed open for inflation and then tightened shut after inflation. Air is easily released by unscrewing the base connector. How does it work? A flap inside the valve opens when air is pumped into the kayak, and falls shut when not pumped so that air will not rush back out.
(AirKayaks Side Note #2: The Boston valves have a tether that keeps the valve attached to the kayak, ensuring that the valves don’t get lost after deflating. Make sure

Original Source: AirKayaks >>

Sneak Preview: New AirFusion EVO Hi-Pressure Inflatable Kayak from Advanced Elements

At the recent 2017 Outdoor Retailers Show in Utah, Advanced Elements debuted one of their cutting edge new models for 2018 – the high-pressure AirFusion EVO inflatable kayak with dropstitch bladders.

Nearly six years ago, Advanced Elements debuted the original AirFusion kayak – an inflatable hybrid designed to rival the handling and speed of skin-on-frame kayaks. The AirFusion was unique in that it featured a blended design of aluminum alloy frame poles and pressurized air tubes, resulting in a high performance rigid frame system.
The original design was followed three years later by the AE1041 AirFusion Elite. The Elite featured a streamlined set up procedure with fewer poles, a wider beam of 28″ and an integrated rear storage hatch.
The new, patented AE1042 AirFusion EVO design kicks that up a notch, with high-pressure, left and right drop-stitch side chambers which can be inflated from 6 to 10 PSI. Drop-stitch (DS) material is the same used in the inflatable paddle board market, where thousands of threads string the top and bottom panels together, allowing it to be pumped up to higher pressures, thus making it more rigid.
According to Ryan Pugh, designer at Advanced Elements, the leading factor in developing the EVO was to keep improving on the AirFusion design, maximizing performance and simplifying setup. The EVO features 6 inflation chambers (two side chambers, booster seat, two thwarts and the coaming tube) versus four side chambers in the previous model.  The DS tubes are removable, allowing one to replace just a part – rather than the entire kayak shell – if ever needed.

As the DS chambers are more rigid, the kayak is less finicky to set up – originally, one had to air up the kayak slowly, reposition chambers and then top it off. According to Ryan, the EVO is much simpler – just install the poles, air up and go.
In the case of the AirFusion EVO, the DS material on the side chambers also creates a narrower profile without decreasing the interior width. The EVO as currently designed is 24 inches wide.
Additionally, an extra “DS booster” chamber on the seat base, keeps one off the floor.
The outer shell is now constructed from a polyurethane tarpaulin, which – in conjunction with the DS side chambers – gives a smoother finish, increased rigidity and a more hydrodynamic outline.
The EVO still features three aluminum ribs on the floor and under the hull, providing a sculpted look as well as a v-shaped keel, which aids in slicing through the water.
Other features incorporated from the prior models include a foam floor, integrated storage hatch, bungee deck lacing, coaming tube for attaching a skirt, two landing plates, lower seat back and the ability to use an optional tracking fin.

How does

Original Source: AirKayaks >>

New Video: Advanced Elements AdvancedFrame DS-XL Inflatable Kayak

Our most recent video on the new AE1044DS – the AdvancedFrame DS-XL from Advanced Elements. Now 5 inches longer than the standard AdvancedFrame with minimal increase in weight. The streamlined body – in conjunction with the high pressure floor – provides better tracking and increased glide.  See video details on performance, setup and features.

An AirKayaks exclusive! For more details, visit the AdvancedFrame DS-XL product page on AirKayaks.com. You can also see our Detailed Product Review on our blog.

Original Source: AirKayaks >>