Tag Archives: reviews

Product Review: Single & Double Spray Decks for Aquaglide Chelan & Columbia Kayaks

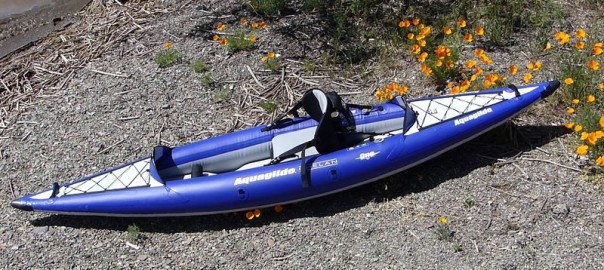
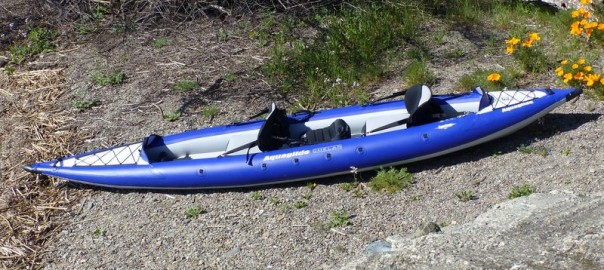
This past week we received our first shipment of AquaGlide splash decks – optional accessories which can turn your AquaGlide kayak from an open design to an enclosed one or two seater. The decks can be used with the Chelan, Columbia XP and Columbia HB series inflatable kayaks.

There are two deck options in three lengths – a single for solo paddling and a double for tandem paddling – sized to fit the single, two and tandem sizes. The spray decks keep water and wind out during chilly or inclement weather, while the coaming tubes allow you to attach optional spray skirts for even more protection from the elements.
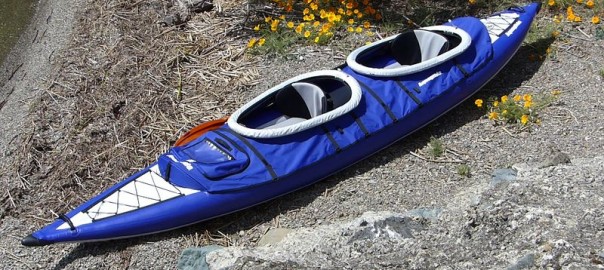
We initially looked at the Tandem spray decks, a single and a double-seater sized for the Columbia XP, Columbia HB and Chelan Tandem XLs.
Installing the AquaGlide Spray Decks

The decks are quite portable. They each arrive rolled up in separate, draw-string, carrying cases measuring 42 x 3 x 12 inches and weighing in at 9 lbs each. (AirKayaks note: As the cases are identical, you may want to mark them 1 and 2 for differentiation.) 

Each deck comes with a repair kit and a set of 14 clips.
There are no instructions included, but once you get the hang of it, installing the decks is pretty simple.  We began with the double deck.

Remove the deck from the bag, and drape it over the kayak, aligning ends with the raised visors. (AirKayaks note: As we learned the hard way, there is a right and wrong way to orient the decks. Make sure that the plastic zippering “map case” is positioned in the bow, and that the twistlok valves on each of the coaming areas are on the back side of each cockpit opening.)

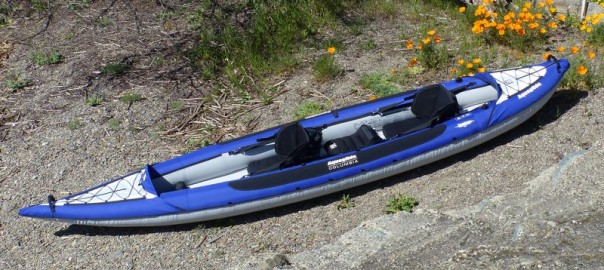
With the kayak fully inflated, take each of the clips and attach them to the cloth d-rings, located 6 on each side, and one each on the front and back raised visors. To make things easy, the clips can be left in position – if you purchase both decks, you’ll then have one full extra set if any clips are lost.

The visor portion is quite simple, but not intuitive at glance. Roll over the deck bow so that it slips over the raised visor – repeat this in the stern.

You will notice that each of the d-rings lines up with velcro strips on the spray decks.

Run the velcro loops through the clips, and fasten shut, pulling slightly to make it taught.

Next, inflate the two coaming tube twistloks (1 per seat). The coaming tubes help deflect water, but also can be used to attach optional spray skirts. The Boston valve adaptor will not friction fit over the twistlok so you will have to do one of

Original Source: AirKayaks >>

Product Review: AquaGlide Chelan HB One Inflatable Kayak

Last summer, AquaGlide unveiled their inflatable kayak lineup for 2015, which included a series of new models and revamps. Based on the number of inquiries, we were anxious to try out the new Chelan HB high-pressure series.
As the new models arrived, we started inflating and testing – initially focusing on the longer AquaGlide Chelan HB Tandem and Columbia XP Tandem kayaks.

Our third AquaGlide review for 2015 focuses on the Chelan HB One, an 11′ 4″ long, high-pressure, inflatable kayak designed for solo paddling. (Please note: some of the information will be repeated from other writeups.)
Getting Started with the Aquaglide Chelan HB One:
We unpacked the box and laid out the pieces – inflatable kayak, backpack, instructions, repair kit, foot brace, tracking fin, seat, valve adaptor and two plastic splash guards.

Initial measurements showed the kayak body weighs approximately 22 lbs, with a folded size of 25 x 9 x 21 inches. The kayak with seat, fin and brace – all in the backpack – weighs 29 lbs with a backpack size of roughly 27 x 22 x 18 inches, which can be cinched down. All boxed up, the  dimensions are 27 x 23 x 14 inches with a shipping weight of 35 lbs. We were able to get everything – plus a pump and paddle – into the pack.
(AirKayaks Side note #1: When initially removing the kayak from the carrying case, take a good look at how the kayak is folded. This is probably the most overlooked step and it is VERY helpful when trying to get the kayak back into the bag.)
The included instructions appeared adequate and include diagrams with inflation details.

Set up is straight-forward and simple  – unpack, unfold, inflate.
There are three military valves (both sides and the floor) with one more small chamber utilizing a twistlock valve for the seat base.
The instructions say to pump up the floor first, to 6 PSI. As the floor is held in place with two adjustable straps, from prior experience, we found it best to loosen up the straps, making it easier to center if necessary.

The military-style plunger valve is simple to use – with your finger, twist the plunger slightly to the “up” position to inflate (air goes in but doesn’t come back out) and “down” to deflate (air comes out).

The Chelan HB One military valves require a special adaptor, which does not come with most standard pumps. In Aquaglide’s first year, the military adaptors were not included with the high-pressure kayaks. All the 2015 high pressure models now include the adaptor, which is found in the repair kit.
The Aquaglide military adaptor couples to the valve with a Boston valve adaptor; this is a common fitting, slightly conical and about 1/2 inch

Original Source: AirKayaks >>

Product Review: AquaGlide Columbia XP Tandem Inflatable Kayak for 1-3 paddlers

We continue with the second in our series on the new 2015 Aquaglide line of inflatable kayaks – our first review focused on the high-pressure Chelan HB Tandem XL touring kayak.
This year AquaGlide debuted the Columbia XP recreational line of kayaks consisting of three standard-pressure models – the Columbia XP One for solo paddling, the Columbia XP Two for one to two paddlers and the Columbia XP Tandem XL.

This review features the Columbia XP Tandem XL, a 15 foot long inflatable kayak designed for one or two paddlers, with extra space for gear, child or pet. (Please note: some of the information will be repeated from other writeups.)
Getting Started with the Aquaglide Columbia XP Tandem XL:

We unpacked the box and laid out the pieces – inflatable kayak, backpack, instructions, repair kit, foot braces, tracking fin, two standard seats and a jumper seat.
Initial measurements showed the kayak body weighs approximately 40 lbs, with a backpack size of roughly 27 x 22 x 18 inches, while the kayak with seats, fin and braces – all in the backpack – weighs 49 lbs. Boxed up, the dimensions are 30 x 23 x 16 inches inches with a shipping weight of 59 lbs.
(AirKayaks Side note #1: When initially removing the kayak from the carrying case, take a good look at how the kayak is folded This is probably the most overlooked step and it is VERY helpful when trying to get the kayak back into the bag.)

The included instructions are adequate and include diagrams with inflation details.

Set up is straight-forward and simple  – unpack, unfold, inflate.

There are three inflation chambers utilizing Boston valves – the two side chambers and floor. There is one more small chamber with a twistlock valve for the jumper seat base. The floor is pumped up first.

Boston valves are two-part, screw-on valves. The bottom portion is threaded onto the kayak, the top valve is screwed open for inflation and then tightened shut after inflation. Air is easily released by unscrewing the base connector. How does it work? A flap inside the valve opens when air is pumped into the kayak, and falls shut when not pumped so that air will not rush back out.
(AirKayaks Side note #2: The Boston valves have a tether that keeps the valve attached to the kayak, ensuring that the valves don’t get lost after deflating. Make sure that the string does not get in the way when screwing on the valve base, and the valve is not cross-threaded, or you may have some air leakage. Also make sure the ring plate or “base” ring is also screwed on tightly.)

With the base portion screwed onto the kayak body, and the top portion screwed open, locate the

Original Source: AirKayaks >>

Product Review: AquaGlide Chelan HB Tandem XL Inflatable Kayak for 1-3 paddlers

Last summer, AquaGlide unveiled their new inflatable kayak lineup for 2015, which included a series of new models and revamps. Based on the number of inquiries, we were anxious to try out the new Chelan HB high-pressure series.
The new models arrived last week, and we started inflating and testing.

Our first review focuses on the Chelan HB Tandem XL, a 15 foot long inflatable kayak designed for one or two paddlers – with extra space for gear, child or pet. (Please note: some of the information will be repeated from other write-ups.)
Getting Started with the Aquaglide Chelan HB Tandem XL:
We unpacked the box and laid out the pieces – inflatable kayak, backpack, instructions, repair kit, foot braces, tracking fin, two seats, a jumper seat, valve adaptor and two pieces of plastic.

Initial measurements showed the kayak body weighs approximately 32 lbs, with a backpack size of roughly 27 x 22 x 18 inches, while the kayak with seats, fin and braces – all in the backpack – weighs 44 lbs. Boxed up, the dimensions are 26 x 25 x 14 inches with a shipping weight of 52 lbs.
(AirKayaks Side note #1: When initially removing the kayak from the carrying case, take a good look at how the kayak is folded. This is probably the most overlooked step and it is VERY helpful when trying to get the kayak back into the bag.)
The included instructions appeared adequate and include diagrams with inflation details.

Set up is straight-forward and simple  – unpack, unfold, inflate.

There are three military valves (both sides and the floor) with three more small chambers utilizing twistlock valves for the seat bases – the floor is pumped up first, to 6 PSI.
The floor is held in place with two adjustable straps. From our prior experience, we found it best to loosen up the straps, otherwise the floor could be inflated “lopsided.”

The military-style plunger valve is simple to use – with your finger, twist the plunger slightly to the “up” position to inflate (air goes in but doesn’t come back out) and “down” to deflate (air comes out).

The Chelan HB Tandem XL military valves require a special adaptor, which does not come with most standard pumps. In Aquaglide’s first year, the military adaptors were not included with the high-pressure kayaks, which caused problems. All the 2015 high pressure models now include the adaptor, which is found in the repair kit.
The Aquaglide military adaptor couples to the valve with a Boston valve adaptor; this is a common fitting, slightly conical and about 1/2 inch thick. Friction fit the adaptor onto the Boston valve fitting, then attach the fitting to the military valve with a slight twist. It is helpful to use a pump with

Original Source: AirKayaks >>

Product Review: Mistral Kailua Fit 11-5 Inflatable Fitness Paddle Board

This past month we received our first shipment of standup inflatable paddle boards from Mistral.
Founded in 1972, European-based Mistral rapidly became one of the leaders in the windsurf industry. Mistral has since refocused the product line, branching into paddle boards and kite surfing – even watches and clothing.

Recently, Mistral expanded into the inflatable SUP market. The 2015 line includes the popular all-around Adventure boards, a fitness-oriented board named the Kailua Fit, and a new line of high-pressure, lightweight, sub-20 lb. boards made in Europe – the Equipes and Crossovers. With the introduction of the new Crossover inflatable WindSup boards, Mistral is brought full-circle, back to their roots.
Our first review features the Mistral Kailua Fit, an 11′ 5″ inflatable paddle board decked out for stand up paddling as well as yoga/fitness workouts.
(Please note: some of the info will be repeated from prior write-ups.)
Mistral Kailua Fit 11’5 Inflatable Yoga Standup Paddle Board – Getting Started
The board as-arrived is 33 x 18 x 10 inches in the box, weighing in at 34 lbs.

Inside is the Kailua body, backpack, repair kit, single action pump with pressure gauge, removable fin, fitness cord and instructions. Once rolled up, the SUP board fits into the backpack, as well as a breakdown paddle under 35 inches (longest shaft length) and the pump.

The board itself weighs 24.6 lbs, or 28.8 lbs inside the backpack with pump – these all easily fit in the back of a small car.

For your first set up, remove the SUP body from the backpack, and unroll. Lay it out face up so that you can access the military valve.

The Kailua 11-5 utilizes one spring-loaded military valve for inflation. These are very simple to use and feature an inflate mode (spring plunger is UP) and a deflate mode (spring plunger is DOWN). By using your finger to gently push on the plunger, it can be moved to the inflate mode (air goes in and doesn’t come back out) and deflate mode (air goes in and comes back out) – before you make the effort to inflate the board, PLEASE make sure the plunger is in the inflate position.
The Kailua paddle board system includes a high-pressure, single-action pump with a gauge – what we term the “slim barrel” as it pushes out a bit less air, making it easier to attain very high pressures.

First, hook the gauge onto the pump then attach the hose to the gauge. Push and twist the military valve adaptor onto the valve, and lock into position – you’re ready to pump!

Initial pumping is a breeze. I pumped for about 180 strokes (3+ minutes) until the board filled out and the gauge started to move. With another 50 strokes I was at

Original Source: AirKayaks >>

Product Review: New Innova Swing EX 13.5 ft Inflatable Touring Kayak

This past summer, Innova Recreational Products of Burlington, WA announced the latest addition to their inflatable kayak lineup – the Swing EX.
As mentioned in previous write-ups, the Innova line is unique in that the kayaks are handmade in Czechoslovakia rather than China or Korea. Additionally, the Swing series (now consisting of the Swing 1, the Swing 2 Double and the new Swing EX) – as well as the Twist series – utilize materials that are PVC-free, making them a greener option than most kayaks on the market.

This week we had the first opportunity to take out the Innova Swing EX, a 13′ 6″ solo inflatable touring kayak weighing a mere 28 lbs with a selling price of $999. Please note, some of this will be repeated from the previous Swing reviews, as there are obviously many similarities.
Getting Started with the Innova Swing EX Inflatable Kayak
The box as received weighs 31.2 lbs with dimensions of 28 x 18 x13 inches.

Inside is the Swing EX body – neatly folded with a cinch strap inside a lightweight drawsack – multiple instruction sheets, 3 metal insertion bars, tracking fin, seat, foot rest, coaming collar, repair kit, and valve adaptor. At 28 lbs for the combined package and a folded size of 23 x 17 x 11 inches, the Swing EX is small enough to fit in plane overhead cargo bins.
Swing EX Kayak Setup/Inflatation
As with all the Innova manuals to date, the Swing EX instructions are quite detailed – there is one instruction sheet for fin installation, one for utilizing the valves, another on the kayak in general and added instructions detailing the “insertion bars.” As the kayaks are made in Europe, many of the details are based around European specs and regulations.

First step, unpack and unfold the kayak body. What is immediately noticeable is how FLAT the kayak is when deflated.

Install the tracking fin before inflating the kayak. The Swing EX utilizes a single fin with double slots. Slip the end with the larger slot in first, making sure that the fin is pointing towards the “back” of the kayak. This enables it to slide in enough to fit in the second slot. While the first time can be a struggle to get the back side into position, after a couple of rounds it becomes quite easy. Do make sure it is solidly in position.

Attach the foot brace (this comes attached from the factory) by weaving the webbing through the floor connector and back. The foot brace uses a twistlok valve for inflation. There are no adaptors that couple with the valve, so you must either hold the adaptor onto the valve while pumping with one hand, have someone else hold the adaptor in

Original Source: AirKayaks >>

Product Review: JP-Australia CruisAir 12’0″ Inflatable SUP Paddle Board

This past summer we took our first look at the JP-Australia inflatable SUPs.

Part of the Pryde Group, JP-Australia has been a well-known player in the windsurf board industry; recently, JP-Australia moved into paddle boards, bringing their line of inflatable SUPs to the US. This past summer we took our first look at the 15 PSI JP-Australia CruisAir – a 12-foot, 32-inch wide all-around cruising and touring inflatable paddle board.  (Please note: some of the info will be repeated from prior writeups.)
JP-Australia CruisAir 12-0 Inflatable SUP – Getting Started
The board as-arrived is 36 x 20 x 11 inches in the box, weighing in at 37 lbs.

Inside is the CruisAir 12’ body, backpack, repair kit, single action pump with pressure gauge, cinch belt, removable fin and instructions. Once rolled up, the SUP board fits into the backpack, as well as breakdown paddle (longer shafts can jut out of the top) and the pump; the pump can also be strapped to the side of the pack. The board itself weighs 25 lbs, or 31 lbs inside the backpack with pump – these all easily fit in the back of a small car.

For your first set up, uncinch the strap and unroll the SUP body. Lay it out face up so that you can access the military valve.

The CruisAir 12-0 utilizes one spring-loaded military valve for inflation. These are very simple to use and feature an inflate mode (spring plunger is UP) and a deflate mode (spring plunger is DOWN). By using your finger to gently push on the plunger, it can be moved to the inflate mode (air goes in and doesn’t come back out) and deflate mode (air goes in and comes back out). Not to worry, the instructions are printed on the valve. But before you make the effort to inflate the board, PLEASE make sure the plunger is in the inflate position.

The CruisAir paddle board system includes a Bravo high-pressure, single-action pump with a gauge – what we term the “wide barrel” as it pushes out a bit more air, though takes a little more effort to attain very high pressures.

First, screw the gauge onto the hose. Tip #1: Make sure you screw the gauge on carefully – if it gets cross-threaded, air will leak out and you will have a difficult time pumping the board up to necessary pressure. Then attach the hose to the pump barrel.

Take the military valve adaptor, and screw it onto the valve slightly to lock into position – the first time, you may need to push a bit harder to attach, but it gets easier. You’re ready to pump!

After 100 strokes with the single action pump, the board started to fill out, and at

Original Source: AirKayaks >>

Product Review: 2015 Red Air Ride 9-8 Inflatable SUP Board from Red Paddle Co

In October, some of the new Red Air 2015 models from Red Paddle Co arrived in the States. Having previously reviewed the 2012 and 2013 models, we were eager to take a re-look to see how the boards had evolved; we weren’t disappointed.

The bulk of the 2015 inventory sailed in a few weeks later. Our first choice was the Ride 9-8, a new 2015 model which blended the best attributes of the previous Allwater 9-6 and Surfer 10-0.
Well-known for their ruggedness, each of the Red Air boards utilize high-pressure, dropstitch technology – allowing them to be inflated from 15-25 PSI – and feature quadruple rail construction with double layering.
Following is our write-up on the 2015 Red Air Ride Nine Eight from Red Paddle Company. (Please note, some of this is repeated from previous writeups.)
Getting Started with the Red Paddle Co Ride 9-8
The box as received weighs 36 lbs, measuring 37 x 15 x 15 inches.

Inside the box is the SUP body, back pack, HP EZee pump, pressure gauge, cinch belt, fin guards, RSS side battens, instructions and repair kit – and a very nifty bonus cell phone case! Once rolled up, the SUP board and pump fit into the backpack, as well as a breakdown paddle under 37 inches.

Weight is 33 lbs for backpack, board and pump, which all easily fit in the back of a small car. The board alone is just under 25 lbs.
The 9-8 Ride inflatable SUP arrives rolled up inside the backpack. While French instructions were sitting in the box, if you locate the cell phone case (attached to the back pack), the English version is folded inside.

Remove the fin guards and unroll the SUP body. There are three integrated tracking fins at the rear of the board. Lay it out face up (fins down) so that you can access the military valve.

The Red Air Ride 9-8 utilizes one spring-loaded military valve for inflation. These are very simple to use and feature an inflate mode (spring plunger is UP) and a deflate mode (spring plunger is DOWN). By using your finger to gently push on the plunger, it can be moved to the inflate mode (air goes in and doesn’t come back out) and deflate mode (air goes in and comes back out). Before you go to all the effort of inflating the board, PLEASE make sure the plunger is in the inflate position.

The included single-action pump comes with a pressure gauge, so you can monitor the board’s PSI. The gauge screws onto the pump – pull the pump handle up (so the pump body doesn’t get in the way) then start with the gauge face down and it will screw on to end face up.

Original Source: AirKayaks >>

Product Review: 2015 Red Air Sport 11 Inflatable SUP Board from Red Paddle Co.

We recently had an opportunity to get a sneak preview on some of the newest 2015 Red Air inflatable paddle board models from Red Paddle Co.

Included is the new Sport 11 ISUP – a sleek, streamlined inflatable SUP featuring 120mm drop-stitch material and the revolutionary new rocker stiffening system (RSS), making it a whopping 20+% tougher and more rigid than most ISUPs on the market.
Founded in 2007, Red Paddle Company is a UK-based business focused solely on the design and manufacture of inflatable paddle boards and accessories. While well known throughout Europe, Australia and New Zealand, if was only in the past couple of years that the Red Airs started arriving in the US.
Each of the Red Air boards utilize high pressure drop-stitch technology – allowing them to be inflated from 15-25PSI – and feature quadruple rail construction and double layering. Each board comes with the Red Air EZee pump, allowing one to inflate a paddle board to 20 PSI and higher in less than 10 minutes.

This is the third in the series on the new 2015 models – the first was on the Ten Six Ride, followed by the Twelve Six Explorer. So, here is our write-up on the 2015 Red Air Sport 11 from Red Paddle Company. (Please note: Some of this will be repeated from previous write-ups.)

Red Air Sport 11: Getting Started
The box as received weighs 38 lbs, measuring 38 x 15 x 15 inches.

Inside the box is the SUP body, two RSS side battens, HP EZee pump, pressure gauge, backpack, cinch belt, removable fin, instructions and repair kit – as well as a bonus cell phone case. Once rolled up, the SUP board and paddle fit into the backpack, as well as optional breakdown paddles under 37 inches.

Weight is 33 lbs for backpack, board and pump, which all easily fit in the back of a small car. The board alone is approximately 25 lbs.
Red Air Sport 11: Setup
The Red Air Sport 11 inflatable SUP arrives rolled up around the high pressure EZee pump, inside the backpack.

While the box included instructions in French, if you locate the cell phone case (attached to the back pack), the English version is folded inside the case.

For your first set up, remove and unroll the SUP body. Lay it out face up so that you can access the military valve.

The Red Air Sport 11 utilizes one spring-loaded military valve for inflation. These are very simple to use and feature a deflate mode (spring plunger is DOWN) and inflate mode (spring plunger is UP). By using your finger to push on the plunger, it can be moved to the inflate mode (air goes in and doesn’t come back out) and deflate mode

Original Source: AirKayaks >>