Tag Archives: Inflatable Kayaks, SUPS & Canoes

Product Review: New 2018 Red Paddle Co Voyager 12’6″ Inflatable SUP

We have avidly been awaiting the arrival of the 2018 Red Paddle Co product line. Recently, the truck rolled in and we had our first opportunity to take a look at the new Red Paddle inflatable SUPS, consisting of 23 models for surfing, whitewater, recreation, touring and racing, ranging in size from 8’10 to 22’0.

Attach the hose to the pump, making sure there is no cross-threading. Then attach the integrated adaptor on the end of the hose, to the board by pushing in and turning. You’re ready to pump!

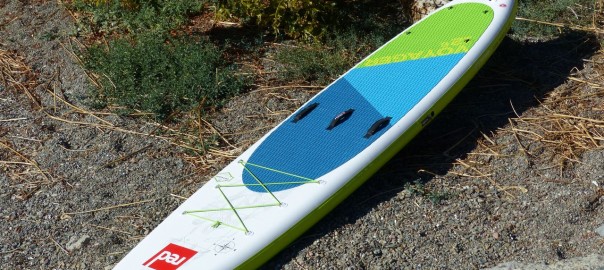
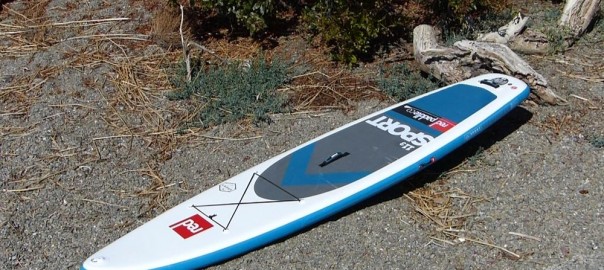
We did measurement tests. The Voyager 12’6″ inflated is approximately 149.5 inches long, 32 inches wide, and just over 5.5 inches deep – pretty much on target with the published specs. Payload is up to 340 lbs/150 kgs.
Red Paddle Twelve Six Voyager On the Water

Besides being very fast and fun to paddle, it’s a great option for long days on the boards, or when the wind kicks up.

While I didn’t bring Cleo along this time, here is a photo of Eddie on an earlier version of the Race 12-6 shown above. Dog claws are no match for the beefy construction material.
Packing It Up

Deflating the board is pretty simple. Remove the tracking fin, making sure to re-attach the fin plate to the screw, so as not to lose it. Burp the plunger a couple of times to release some of the pressure, then push the plunger to the open (down) position and immediately the air will swoosh out. Remove the RSS battens. Move to the snout of the ISUP. Lay the Titan pump down and start tightly rolling up the board from the snout, top side up with the bottom on the outside. As you roll it up, air will continuously be pushed out of the open valve.

When fully rolled up, replace the valve cover and then take the attached strap and cinch it around the bundle. If you’ve rolled up tight enough, the board will easily slip back into the backpack. Put the fin into the interior pocket and use the interior cinch straps to position the load.
Red Paddle Twelve Six Voyager: Bottom Line

Original Source: AirKayaks >>

Product Review: New Advanced Elements Expedition Elite Hi-Pressure Inflatable Kayak

At last summer’s Outdoor Retailer show, Advanced Elements unveiled the next generation in the Expedition series – the Expedition Elite. As long-time fans of the original yellow model – and the subsequent blue Limited Edition – we were impressed with the Elite’s feature enhancements.

Earlier this spring the Elite hit the West Coast, and we managed to grab one before our first shipment sold out – not to worry, we have more. Here are details on the Expedition Elite AE1009XE, a 13 foot inflatable weighing in at roughly 42 lbs.
Getting Started with the Expedition Elite Inflatable Kayak
The box as received measures 34 x 21 x 11 inches with a weight of 57 lbs.

Inside is a new, backpack-style carrying case measuring 36 x 16 x 11 inches which contains the kayak body, high-backed lumbar seat, aluminum deck riser, rear thwart, repair kit, foot brace and instructions (these are located in a pocket inside the carrying case) . The repair kit, screw-on adaptor and floor adaptor are located in the mesh pocket behind the seat. The kayak with seat weighs 44.5 lbs, or 48 lbs in the pack.
The kayak folded size is approximately 31 x 16 x 10 inches, leaving just enough room to store a pump and breakdown paddle (not included) if folded properly.

First step, unfold the kayak. As with all the AdvancedFrame models, the Expedition Elite features an “inner rib” in the bow and stern, which is basically a u-shaped aluminum rib, about one foot long and one-half inch wide.

This comes “pre-assembled” meaning it arrives already inserted into two sleeves inside the kayak cover. Unless you remove the inner bladder, they remain in position. When the kayak is pumped up, the inner bladder with rib presses against the kayak cover – that, in conjunction with two bow and stern plastic sheets, give the kayak a sharp silhouette which aids in slicing through the water.
The Expedition Elite kayak features 11 inflation chambers – three military valves (main chambers and floor) and 8 smaller twist-loks (4 deck lifts, 2 coaming tubes, thwart and seat).

Each Expedition Elite comes with a screw-on adaptor (center image, found in the repair kit in the mesh pocket behind the seat) which locks onto many pumps with pin/slot hose fittings. Additionally, a standard Boston valve adaptor (left image) will friction fit directly into the valve opening. A separate adaptor is also included for the high pressure floor (right image).

First step, turn the military valve to the inflate position. The military-style plunger valves are simple to use – twist one way to inflate (UP position) and the other to deflate (DOWN position).

Attach the screw-on adaptor to your pump and then couple it to the first main chamber, located on the

Original Source: AirKayaks >>

Product Review: New Innova Seawave Inflatable Touring Kayak for 1-3 paddlers

This past week we had the opportunity to take our first look at the Innova Seawave inflatable kayak – a two+ person kayak with a versatile design that allows one to attach optional spray decks, spray skirts and a foot rudder system.

The Innova line is unique for a number of reasons. First, all the kayaks are handmade in the Czech Republic; the factory has manufactured inflatable boats for well over 50 years. In Europe, a similar line is marketed under the name Gumotex.
We previously published our review on the new Solar 410C, Innova’s other 2+ person inflatable introduced into the US market simultaneously. So here is our write-up on the the Innova Seawave inflatable tandem kayak, which weighs 44 lbs in the pack, is 15 feet in length with a payload of 551 lbs for two+ persons and gear. (Please note: some of the information will be duplicated from other Innova reviews).
Getting Started with the Innova Seawave
The box as received weighs in at 48 lbs, measuring 27 x 18.5 x 12.5 inches.

Inside is a very nifty 100L backpack with adjustable shoulder straps, front pouch pocket and roll top closure. This contains the kayak body, tracking fin, foot rests, repair kit, instructions, cinch belt, valve adaptor, seats and sponge. Packed dimensions are 24 x 17 x 12 inches as received in the bag, with a weight of 44 lbs. The kayak with seats and foot rests is 41 lbs. (Please note: This is the actual kayak weight, NOT the 29 lbs as stated from the manufacturer’s literature.)
Innova Seawave Kayak Setup/Inflatation
We read through the included instruction manuals. Just like all the other Innova  products, the Innova Seawave manual is surprisingly detailed in some aspects, while lacking in others. As the kayaks are made in Europe, many of the details are based around European specs and regulations and can sound more complicated than it actually is. Additionally, some of the translations are a bit difficult to understand.

First step, unpack and unfold the kayak body. What is immediately noticeable is how FLAT the kayak is when deflated – of course, this makes it quite compact for travel.

Next, flip the kayak over to install the tracking fin before inflation, locating the fin “shoe” towards the stern. Slip the end with the larger slot in first, making sure that the fin is pointing towards the “back” of the kayak. This enables it to slide in enough to fit in the second side.

The instructions suggest attaching and inflating the foot braces and seats first, though these actually come pre-attached from the factory. (If they are not attached, start with the foot braces. There are five buckles on the floor – when paddling tandem, use the 1st and

Original Source: AirKayaks >>

Product Review: Innova Solar 410C Inflatable Kayak for 1 to 3 paddlers

This past week we had the opportunity to take our first look at the Innova Solar 410C inflatable kayak – a 2+ person kayak for recreational paddling.

The Innova line is unique for a number of reasons. First, all the kayaks are handmade in the Czech Republic – the factory has manufactured inflatable boats for well over 50 years. Secondly, the manufacturing process produces kayaks that can become quite compact, making them a great choice for travel. And third, the kayaks are environmentally-friendly as they are mostly PVC-free.
While various iterations of the Solar have been available in Europe for years, Innova recently brought in the newly-redesigned Solar 410C. We had our first opportunity to take out the kayak late last year. So here is our write-up on the the Innova Solar 410C inflatable tandem kayak, which weighs 36 lbs in the pack, is 13 feet 2 inches in length and has a payload of 595 lbs for two persons and gear. (Please note: some of the information will be duplicated from other Innova reviews).
Getting Started with the Innova Solar 410C
The box as received measures 25 x 16 x 11 inches, weighing in at 40 lbs.

Inside is a very nifty and compact backpack with adjustable shoulder straps, front pouch pocket and roll top closure. This contains the kayak body, tracking fin, foot rests, repair kit, instructions, valve adaptor, seats and sponge. Packed dimensions are 25 x 16 x 10 inches as received in the bag, with a weight of 38 lbs for the pack and contents.
We read through the included instruction manuals. Just like all the other Innova  products, the Innova Solar manual is surprisingly detailed in some aspects, while lacking in others. As the kayaks are made in Europe, many of the details are based around European specs and regulations and can sound more complicated than it actually is. Please also note that some of the instructions/diagrams have errors.

First step, unpack and unfold the kayak body. What is immediately noticeable is how FLAT the kayak is when deflated – of course, this makes it quite compact for travel.

Install the tracking fin into the “shoe” before inflating the kayak. Slip the end with the larger slot in first, making sure that the fin is pointing towards the “back” of the kayak. This enables it to slide in enough to fit in the second side. The first time we tried this, we struggled to get the second slot into position but this gets easier with use.

The instructions suggest attaching and inflating the foot braces and seats first, but these come already attached from the factory – the front seat is attached to the 2nd set of floor clips, and the back seat to

Original Source: AirKayaks >>

Product Review: Aire Tributary Strike Solo Inflatable Kayak

We recently posted our first review on Aire’s Tributary inflatable kayak product-line. The Tributary models – which are made overseas – offer great value for those on a budget or unwilling to make a large investment; these include the Strikes, Sawtooth and Tomcat kayaks as well as several rafts.

This week we had the first opportunity to take out the Aire Tributary Strike 1, a 10 foot 3-inch one-person inflatable with a price of $799. The Strike is billed as a crossover kayak, capable of spanning calm water to rapids. Please note, some of this may be repeated from other write-ups.
Aire Tributary Strike I Inflatable Kayak: Getting Started
The box as received measures 29 x 16 x 13 inches, weighing in at 33 lbs.

Inside is the Strike body, one Cheetah seat, flip strap, instructions and repair kit with adaptor, adaptor tube, wrench and patch material (including some TearAid). The Strike does not come with a carrying case. The body alone weighs 26 lbs, or 29.5 lbs with the seat. The folded body measures roughly 28 x 15 x 12 inches.
Aire Tributary Strike Setup/Inflatation

We read through the included instruction manual. First step, unfold the kayak body. Then pump up tthe main chambers until softly filled.

The Aire Tributary Strike features three main inflation chambers utilizing Summit II military valves – one for the floor and one for each side. The military-style plunger valve is simple to use – with your finger, twist the plunger slightly to the “up” position to inflate (air goes in but doesn’t come back out) and “down” to deflate (air comes out). Please note – the military valve push pins can sometimes deceptively look as if they are UP when actually in the deflate mode. When this happens, as soon as you remove the pump adaptor all the air will swoosh out. So, make sure they are truly popped up. On the positive side, this is so easy to pump up, it’s not a big issue.
Unlike many kayaks, the Aire Tributary Strike has two main inflation valves at opposite sides of the kayak – one on the upper rear right and one on the upper bow left.

Locate the military valve adaptor in the repair kit. The Strike does not come with a pump, but the adaptor allows one to use the Boston valve conical adaptor found on most pumps. To couple the Strike adaptor with the Boston valve adaptor, Aire has included a two-inch clear plastic tube. Insert the end of the Strike adaptor into one side of the clear tube, and then insert the Boston valve adaptor onto the other side via friction fit. Lock the Aire adaptor onto the military valve with a slight twist. Since the Strike

Original Source: AirKayaks >>

Product Review: Aire Tributary Sawtooth Inflatable Tandem Kayak

Well-known in the paddling world for top-notch quality, Aire has been manufacturing high-end inflatable rafts and kayaks out of their plant in Idaho for over 25 years ago. With the increased interest in inflatables, Aire introduced their Tributary line, an economical version made overseas, nearly 14 years ago. The Tributary models offer great value for those on a budget or unwilling to make a large investment; these include the Strikes, Sawtooth and Tomcat kayaks as well as several rafts.

This week we had the first opportunity to take out the Aire Tributary Sawtooth, a 13 foot 3-inch two-person inflatable weighing 35 lbs with a price of $749.
Aire Tributary Sawtooth Inflatable Tandem Kayak: Getting Started
The box as received measures 25 x 22 x 12 inches, weighing in at 40 lbs.

Inside is the Sawtooth body, two inflatable seats, removable tracking fin, instructions and repair kit with adaptor, adaptor tube, wrench and patch material (including some TearAid) but does not come with a carrying case.The Sawtooth body alone weighs 31 lbs; each seat weighs 1.7 lbs for a total of 35 lbs with fin. The folded body measures roughly 26 x 18 x 10 inches.
Aire Tributary Sawtooth 2 Setup/Inflatation

We read through the included instruction manual. First step, unfold the kayak body. Then pump up the main chambers until softly filled.

The Aire Tributary Sawtooth features three main inflation chambers utilizing Summit II military valves – one for the floor and one for each side. The military-style plunger valve is simple to use – with your finger, twist the plunger slightly to the “up” position to inflate (air goes in but doesn’t come back out) and “down” to deflate (air comes out). Please note – the military valve push pins can sometimes deceptively look as if they are UP when actually in the deflate mode. When this happens, as soon as you remove the pump adaptor all the air will swoosh out. So, make sure they are truly popped up. On the positive side, this is so easy to pump up, it’s not a big issue.

Locate the military valve adaptor in the repair kit. The Sawtooth does not come with a pump, but the adaptor allows one to use the Boston valve conical adaptor found on most pumps. To couple the Sawtooth adaptor with the Boston valve adaptor, Aire has included a two-inch clear plastic tube. Insert the end of the Sawtooth adaptor into one side of the clear tube, and then insert the Boston valve adaptor onto the other side, via friction fit. Lock the Aire adaptor onto the military valve with a slight twist. Since the Sawtooth main chambers are inflated to 2.5 PSI, it is helpful to use a pump with pressure gauge

Original Source: AirKayaks >>

Product Review: New 2017 Red Paddle Co Sport 11’3 MSL Inflatable SUP

As reported in our previous write-ups, the first Red Paddle Co inflatable paddle board models for 2017 started arriving in the States earlier this year.

Founded in 2007, Red Paddle Co. is a UK-based company which focuses solely on the design and manufacture of inflatable paddle boards and accessories – the Red Paddle Co boards are now well-known for performance, innovation and ruggedness. Each year, Red Paddle Co raises the industry bar with new models and new features, now sporting 22 models ranging in size from 8’10” to 22’0 for single to multi-paddlers.
Our first 2017 boards arrived in early September, and we were excited to try out one of the exciting new models in the lineup – the Sport 11’3.
So, following is our second write up on the Red Paddle Co 2017 line, with the 2017 Sport 11-3  – our first focused on the popular Ride 10-6. (Please note, some of this is repeated from previous writeups.)
Getting Started with the Red Paddle Co Sport 11’3″
The box as received weighs 39 lbs, measuring 38 x 15 x 15 inches.

Inside the box is the SUP body, roller backpack, Titan pump, pressure gauge, RSS fiberglass battens, FCS II fin, cinch belt, instructions, repair kit and cell phone case. Once rolled up, the SUP board and pump fit into the backpack, as well as a breakdown paddle under 37 inches.
Weight is 34 lbs for backpack, board and pump, which all easily fit in the back of a small car. The board alone is 22 lbs.
The 11-3 Sport inflatable SUP arrives rolled up around the high pressure Titan pump, inside the backpack. The instructions (Welcome Guide) are located in a mesh pocket inside the backpack. These include generic information on using the pump, using the valves, deflating the board, basic tips on using a paddle board, fin details and board care.

First step, unroll the SUP body. Lay it out face up (fins down) so that you can access the military valve.

The Red Paddle Sport 11-3 utilizes one spring-loaded military valve for inflation. These are very simple to use and feature an inflate mode (spring plunger is UP) and a deflate mode (spring plunger is DOWN). By using your finger to gently push on the plunger, it can be moved to the inflate mode (air goes in and doesn’t come back out) and deflate mode (air goes in and comes back out).

The included Titan dual-barrel (or twin cylinder) pump comes with a built-in pressure gauge, so you can monitor the board’s PSI. It also now comes with multiple adaptors, which can be used on inflatable kayaks, dinghies and kite equipment. To start off, you will be using both barrels, allowing the board to be filled in less

Original Source: AirKayaks >>

Product Review: 2017 Red Paddle Co Ride 10’6″ Inflatable SUP with MSL

We first stumbled across the Red Paddle Co inflatable SUPs in early 2012.

Founded in 2007, Red Paddle Co. is a UK-based business focused solely on the design and manufacture of inflatable paddle boards and accessories, now well-known for performance, innovation and ruggedness. Each year, Red Paddle Co raises the industry bar with new models and new features, now sporting 22 models ranging in size from 8’10” to 22’0 for single to multi-paddlers.
In September, some of the new 2017 models arrived in the States. Having previously reviewed the Ride 10-6 in 2015, we decided to take a look at the new features on our biggest selling board.
Following is our write-up on the 2017 Ride 10’6″ from Red Paddle Company. (Please note, some of this is repeated from previous write ups.)
Getting Started with the Red Paddle Co Ride 10-6
The box as received weighs 39 lbs, measuring 38 x 15 x 15 inches.

Inside the box is the SUP body, roller backpack, Titan pump, pressure gauge, cinch belt, instructions, repair kit and a bonus cell phone case. Once rolled up, the SUP board and pump fit into the backpack, as well as a breakdown paddle with shafts under 37 inches.
Weight is 34 lbs for backpack, board and pump, which all easily fit in the back of a small car. The board alone is 21 lbs.
The 10’6 Ride inflatable SUP arrives rolled up around the high pressure Titan pump, inside the backpack. The instructions (Welcome Guide) are located in a mesh pocket inside the backpack. These include generic information on using the pump, using the valves, deflating the board, basic paddle boarding tips, fin details and board care.

Remove the fin guards and unroll the SUP body. (AirKayaks note: the fin guards should be considered packing materials, they are not meant to be permanently used.) There are three integrated tracking fins at the rear of the board. Lay it out face up (fins down) so that you can access the military valve.

The Red Paddle Ride 10’6 utilizes one spring-loaded military valve for inflation. These are very simple to use and feature an inflate mode (spring plunger is UP) and a deflate mode (spring plunger is DOWN). By using your finger to gently push on the plunger, it can be moved to the inflate mode (air goes in and doesn’t come back out) and deflate mode (air goes in and comes back out). Before you go to all the effort of inflating the board, make sure the plunger is in the inflate position.
The included Titan dual-barrel (or twin cylinder) pump comes with a built-in pressure gauge, so you can monitor the board’s PSI. It also now comes with multiple adaptors, which can be used on inflatable kayaks,

Original Source: AirKayaks >>

Guide to Choosing Your AdvancedFrame or Sport Inflatable Kayak from Advanced Elements

We recently reviewed two of the popular Advanced Elements inflatable kayaks – the AE1012 AdvancedFrame and AE1017 Sport – which had undergone a series of upgrades.
The AdvancedFrame (rear) next to the Sport (bottom).
First introduced in 2002 as the AirFrame, the AdvancedFrame has evolved over the past 15 years into one of Advanced Elements most popular models, well-known as an excellent value for performance, quality and price. This was followed by the Sport in 2009, loosely modeled after its big brother but without all the “bells and whistles.”
One of the most commonly asked questions is – which one is right for me? Below we have compiled a list of similarities and differences to help guide you in making that personal decision.
What’s the same in both kayaks?

Both kayaks are constructed from the same same diamond ripstop, hull material and PVC i-beam floor construction with 1 PSI pressure relief valve. Each has the same molded rubber handles, high-backed seat, inflation valves, rear d-rings, tracking fin and landing plate. Both have the same aluminum rib inserts, plastic sleeve inserts, deck lifts, similar neoprene knuckle guards and velcro paddle holders. The basic footprint – length and width – are roughly the same at 10′ 4 inches by roughly 32-33 inches wide with interior dimensions roughly the same at 63-65 x 17.
So what’s different?
While there are many items that are similar, the AE1017 Sport is a stripped-down, simpler version of the AE1012 AdvancedFrame.
The Sport (bottom) has a wider cockpit opening and can not use a spray skirt.
The Sport features one main inflation chamber and three twistloks (floor valve, and two deck lifts). The Sport has a thin, non-inflatable coaming lip around the cockpit which will not accept a spray skirt. The top decks do not zipper open. The cockpit opening is a generous 44 x 19 inches. The bungee deck lacing area is about half the size in the Sport, with less d-rings. By removing some of the features and enlarging the deck opening, the weight is a lighter 26 lbs for kayak and seat, or 28 lbs in the carrying case. The carrying capacity is slightly lower at 250 lbs person and gear (235 lbs person). MSRP is slightly less at $449 ($399 street price). Most of the standard accessories – inflatable foot brace, backbone, high-pressure floor, advancedtrak rudder, accessory frame, lumbar seat, durafloor – will work with the Sport.
The AdvancedFrame (top) has more gear attachment points.
The AE1012 AdvancedFrame features two main inflation chambers and five twistloks (floor, decklifts and coaming tubes). The AdvancedFrame has a more enclosed cockpit measuring 32 x 17 inches with zippers on both front and rear decks. The front deck can be zipped open 24 inches for easier entry, or

Original Source: AirKayaks >>

Product Review: Newly Updated AE1017 Sport Inflatable Kayak from Advanced Elements

In late spring 2016, we received our first shipments of the newly updated AE1017 Advanced Elements AdvancedFrame Sport inflatable kayak – a stripped-down classic blending performance, price and simplicity. The kayaks now feature an integrated 1-PSI pressure relief valve in the floor bladder, enhanced high-backed seating, beefed-up graphics and redesigned hardware.

At that point we realized our previous write-up was several years ago and featured the Gen 1 version. So, we took the opportunity to also update our readers with details on the newly updated AdvancedFrame Sport AE1017, a 10’5″ inflatable weighing in at roughly 26 lbs with an MSRP of $449. (Please note: some of this will be repeated from prior reviews.)
Getting Started with the AdvancedFrame Sport Kayak
The box as received weighs 34.4 lbs, measuring 32 x 18 x 11 inches.

Inside, the rugged carrying case measures 30 x 18 x 10 inches, and houses the kayak body, seat, repair kit and instructions. The kayak folded size is approximately 30 x17 x 10 inches. The kayak body and seat in the case weighs 28 lbs, while the kayak and seat alone are 26 lbs. The case has just enough room to include a small pump and breakdown paddle (not included).  AirKayaks note: Take a good look at how the kayak is folded BEFORE setting up, this will help during breakdown. The instructions are located in a small plastic pocket inside the carrying case.
AdvancedFrame Sport Kayak Setup/Inflation
We re-acquainted ourselves with the kayak by reading the updated manual. This, too, has evolved over the years and gives excellent explanations on inflation, usage, refolding, etc.

First step, unfold the kayak. The AdvancedFrame Sport – along with all AdvancedFrame models – features an “inner rib” in the bow and stern, which is basically a u-shaped aluminum rib, about a foot long and one-half inch wide.

This comes “pre-assembled” meaning it arrives already inserted into two sleeves inside the kayak cover. Unless you remove the inner bladder, they remain in position. When the kayak is pumped up, the inner bladder with rib presses against the kayak cover – that, in conjunction with two bow and stern plastic sheets, give the kayak a sharp silhouette which aids in slicing through the water.

The kayak features 4 inflation chambers – one military valve and 3 twist-loks. The military-style plunger valves are simple to use – twist up to inflate (this is the closed position where air goes in and doesn’t come out) and down to deflate (air goes in and comes back out).

The kayak comes with a screw-on adaptor (found in the repair kit in the mesh pocket behind the seat) which will fit some pumps based on the hose fittings. Otherwise, a standard Boston valve adaptor will friction fit into

Original Source: AirKayaks >>