Tag Archives: Inflatable Kayaks, SUPS & Canoes

Product Review: Jobe SUP Aero 11-6 Inflatable Paddle Board System

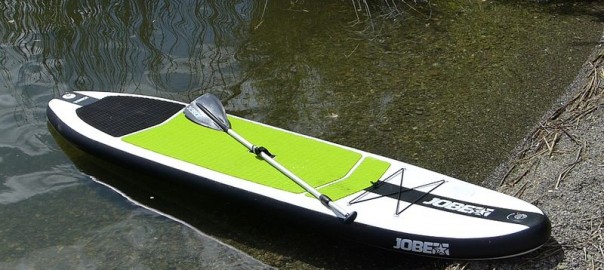
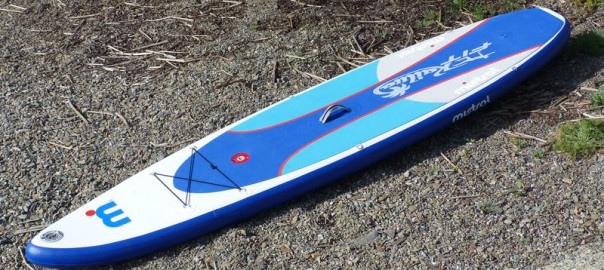
This past month, we had the opportunity to get details on the Jobe inflatable SUP line. Well known in Europe for windsurf, water boards and attire, Jobe has recently moved into the inflatable paddle board line. Our first sample (2014 model) arrived, allowing us to take a look at the 15 PSI Jobe Aero 11-6  – a 33 inch-wide, 6-inch thick, all-around cruising and touring inflatable paddle board, complete with pump, backpack, paddle and leash.

(Please note: some of the info will be repeated from prior writeups.)
Jobe Aero 11-6 Inflatable SUP – Getting Started
The board as-arrived is 36 x 17.5 x 12 inches in the box.

Inside is the Aero 11-6 body, backpack, repair kit, single action pump with pressure gauge, cinch belt, 3 removable fins, adjustable breakdown paddle, ankle leash and instructions. Once rolled up, the SUP board fits into the backpack, as well as breakdown paddle  and pump – each of these attach to the outside of the backpack. The board itself weighs 30 lbs, while the paddle, pump and pack are 2.5 lbs each – a total of 37.5 lbs in the pack. The boxed weight is 47 lbs. The package easily fits in the back of a small car.

For your first set up, uncinch the strap and unroll the SUP body. Lay it out face up so that you can access the military valve.

The Aero 11-6 utilizes one spring-loaded military valve for inflation. These are very simple to use and feature an inflate mode (spring plunger is UP) and a deflate mode (spring plunger is DOWN). By using your finger to gently push on the plunger, it can be moved to the inflate mode (air goes in and doesn’t come back out) and deflate mode (air goes in and comes back out). Not to worry, the instructions are printed on the valve. But before you make the effort to inflate the board, PLEASE make sure the plunger is in the inflate position.
The Aero paddle board system includes a Bravo high-pressure, 2000 cm3 single-action pump with a gauge – what we term the “tall  barrel” as it pushes out less air, though takes a bit less effort to attain the higher pressures.

First, screw the gauge onto the pump. Tip #1: Make sure you screw the gauge on carefully – if it gets cross-threaded, air will leak out and you will have a difficult time pumping the board up to necessary pressure.

Next, attach the hose to the gauge. Take the military valve adaptor, and screw it onto the valve slightly to lock into position – the first time, you may need to push a bit harder to attach, but it gets easier. You’re ready to pump!
Please note: The included instructions

Original Source: AirKayaks >>

Product Review: New Panther Compact Inflatable Kayak from Aquaglide

As mentioned in previous posts, Aquaglide, Inc of White Salmon, Washington has recently introduced several new inflatable kayaks for 2015. The Aquaglide kayak product line consists of 15 models with MSRP pricing from $199.95 to $1199.95.

Our first shipment included the new Panther inflatable kayak. Part of Aquaglide’s “pricepoint” series, the Panther is a cross between the Columbia XP One and Chinook One inflatable kayaks, scaled down for “smaller” people – both youth and adults.
Following is our writeup on the Panther, a 24-lb, 9 foot solo model selling for $349.
Getting Started with the AquaGlide Panther Inflatable Kayak
We unpacked the box and laid out the pieces – inflatable kayak, backpack, instructions, repair kit, tracking fin and seat.

Initial measurements showed the kayak body weighs 19 lbs, with a folded size of roughly 25 x 17 x 10 inches, while the kayak with seat in the drawstring sack weighs 24 lbs. Boxed up, the dimensions are 27 x 20 x 10 inches with a shipping weight of 29.5 lbs.
(AirKayaks Side note #1: When initially removing the kayak from the carrying case, take a good look at how the kayak is folded This is probably the most overlooked step and it is VERY helpful when trying to get the kayak back into the bag.)
AquaGlide Panther Inflatation and Setup:
The included instructions are adequate and include diagrams with inflation details.

Set up is straight-forward and simple  – unpack, unfold, inflate.

There are three inflation chambers utilizing Boston valves – the floor and two side chambers. Boston valves are two-part, screw-on valves. The bottom portion is threaded onto the kayak, the top valve is screwed open for inflation and then tightened shut after inflation. Air is easily released by unscrewing the base connector. How does it work? A flap inside the valve opens when air is pumped into the kayak, and falls shut when not pumped so that air will not rush back out.

According to the instructions, the floor is pumped up first, then the two side chambers. First, attach the Boston valves by screwing them onto the kayak.
(AirKayaks Side note #2: The Boston valves have a tether that keeps the valve attached to the kayak, ensuring that the valves don’t get lost after deflating. Make sure that the string does not get in the way when screwing on the valve base,and the valve is not cross-threaded, or you may have some air leakage.)

We pumped up the floor until firm (1.0 psi with slight give) using a standard double action hand pump – this took about 20 pumps.

We then pumped up each of the side chambers to 2 PSI – this was about 20 to 23 pumps each side – and screwed on the valve caps. (AirKayaks side note #3:

Original Source: AirKayaks >>

Product Review: New Chinook XP One Inflatable Kayak from Aquaglide

As mentioned in previous posts, Aquaglide, Inc of White Salmon, Washington has recently introduced several new inflatable kayaks for 2015. The Aquaglide product line consists of 15 models with MSRP pricing from $199.95 to $1199.95.

Our first shipment included the Chinook XP One. Part of Aquaglide’s “pricepoint” series, the Chinook kayaks are economically-priced recreational models, now in three sizes – 8.5, 10 and 13 feet.
Following is our writeup on the Chinook XP One, a 24-lb, 8.5 foot solo model selling for $349.
Getting Started with the Chinook XP One
We unpacked the box and laid out the pieces – inflatable kayak, drawstring duffel bag, instructions, repair kit, tracking fin and seat.

Initial measurements showed the kayak body weighs 21 lbs, with a folded size of roughly 23 x 17 x 8 inches, while the kayak with seat in the drawstring sack weighs 24 lbs. Boxed up, the dimensions are 24 x 21 x 12 inches with a shipping weight of 30 lbs.
(AirKayaks Side note #1: When initially removing the kayak from the carrying case, take a good look at how the kayak is folded This is probably the most overlooked step and it is VERY helpful when trying to get the kayak back into the bag.)
Chinook XP One Inflatation and Setup:
The included instructions are adequate and include diagrams with inflation details. Set up is straight-forward and simple  – unpack, unfold, inflate.

There are three inflation chambers utilizing Boston valves – the floor and two side chambers. Boston valves are two-part, screw-on valves. The bottom portion is threaded onto the kayak, the top valve is screwed open for inflation and then tightened shut after inflation. Air is easily released by unscrewing the base connector. How does it work? A flap inside the valve opens when air is pumped into the kayak, and falls shut when not pumped so that air will not rush back out.

According to the instructions, the floor is pumped up first, then the two side chambers. First, attach the Boston valves by screwing them onto the kayak.
(AirKayaks Side note #2: The Boston valves have a tether that keeps the valve attached to the kayak, ensuring that the valves don’t get lost after deflating. Make sure that the string does not get in the way when screwing on the valve base,and the valve is not cross-threaded, or you may have some air leakage.)

We pumped up the floor until firm (1.0 psi with slight give) using a standard double action hand pump – this took about 20 pumps.

We then pumped up each of the side chambers to 2 PSI – this was about 35 pumps each side – and screwed on the valve caps. (AirKayaks side note #3: If using a pressure gauge, please note

Original Source: AirKayaks >>

Product Review: The Limited Edition Expedition LTD Inflatable Kayak from Advanced Elements

Last summer we were able to get a sneak preview of the new Limited Edition Expedition LTD inflatable kayak from Advanced Elements. As long-time fans of the current yellow model, we were impressed with the LTD’s spiffed up graphics and feature enhancements.

Last week, the AE1009LTD hit the West Coast, and we managed to grab one before our first shipment sold out – not to worry, we picked up more.  Here are details on the Expedition LTD AE1009LTD, a 13 foot inflatable weighing in at roughly 42 lbs.
Getting Started with the Expedition LTD LTD Inflatable Kayak
The box as received measures 33 x 21 x 11 inches with a weight of 52 lbs. Inside is a rugged carrying case measuring 37 x 17 x 9 inches (seam to seam) which contains the kayak body, high-backed seat, aluminum riser, repair kit, foot brace and instructions.

The kayak folded size is approximately 31 x16 x 10 inches leaving just enough room to store a pump and breakdown paddle (not included).
The included manual features the current Expedition – set up is pretty much the same – so we will re-copy some of the instructions written in our initial Expedition write-up.

First step, unfold the kayak. The Expedition LTD features an “inner rib” in the bow and stern, which is basically a u-shaped aluminum rib, about one foot long and one-half inch wide.

This comes “pre-assembled” meaning it arrives already inserted into two sleeves inside the kayak cover. Unless you remove the inner bladder, they remain in position. When the kayak is pumped up, the inner bladder with rib presses against the kayak cover – that, in conjunction with two bow and stern plastic sheets, give the kayak a sharp silhouette which aids in slicing through the water.
The Expedition LTD kayak features 9 inflation chambers – two military valves (main chambers) and 7 smaller twist-loks (deck lifts, floor and coaming tubes).
Each Expedition LTD comes with a screw-on adaptor (found in the repair kit in the mesh pocket behind the seat) which locks onto many pumps with pin/slot hose fittings. Additionally, a standard Boston valve adaptor will friction fit into the opening.

First step, open the military valve. The military-style plunger valves are simple to use – twist one way to inflate (UP position) and the other to deflate (DOWN position).

Attach the screw-on adaptor to your pump and then couple it to the first main chamber, located on the rear hull. While there is not a pressure gauge included with the kayak, the adaptor features a “lip” that pushes open the spring plunger, allowing a pump gauge to read the back-pressure; if using the Boston valve adaptor, most gauges will only register as you are inflating.

Pump up the first chamber until

Original Source: AirKayaks >>

Product Review: AquaGlide Chelan HB One Inflatable Kayak

Last summer, AquaGlide unveiled their inflatable kayak lineup for 2015, which included a series of new models and revamps. Based on the number of inquiries, we were anxious to try out the new Chelan HB high-pressure series.
As the new models arrived, we started inflating and testing – initially focusing on the longer AquaGlide Chelan HB Tandem and Columbia XP Tandem kayaks.

Our third AquaGlide review for 2015 focuses on the Chelan HB One, an 11′ 4″ long, high-pressure, inflatable kayak designed for solo paddling. (Please note: some of the information will be repeated from other writeups.)
Getting Started with the Aquaglide Chelan HB One:
We unpacked the box and laid out the pieces – inflatable kayak, backpack, instructions, repair kit, foot brace, tracking fin, seat, valve adaptor and two plastic splash guards.

Initial measurements showed the kayak body weighs approximately 22 lbs, with a folded size of 25 x 9 x 21 inches. The kayak with seat, fin and brace – all in the backpack – weighs 29 lbs with a backpack size of roughly 27 x 22 x 18 inches, which can be cinched down. All boxed up, the  dimensions are 27 x 23 x 14 inches with a shipping weight of 35 lbs. We were able to get everything – plus a pump and paddle – into the pack.
(AirKayaks Side note #1: When initially removing the kayak from the carrying case, take a good look at how the kayak is folded. This is probably the most overlooked step and it is VERY helpful when trying to get the kayak back into the bag.)
The included instructions appeared adequate and include diagrams with inflation details.

Set up is straight-forward and simple  – unpack, unfold, inflate.
There are three military valves (both sides and the floor) with one more small chamber utilizing a twistlock valve for the seat base.
The instructions say to pump up the floor first, to 6 PSI. As the floor is held in place with two adjustable straps, from prior experience, we found it best to loosen up the straps, making it easier to center if necessary.

The military-style plunger valve is simple to use – with your finger, twist the plunger slightly to the “up” position to inflate (air goes in but doesn’t come back out) and “down” to deflate (air comes out).

The Chelan HB One military valves require a special adaptor, which does not come with most standard pumps. In Aquaglide’s first year, the military adaptors were not included with the high-pressure kayaks. All the 2015 high pressure models now include the adaptor, which is found in the repair kit.
The Aquaglide military adaptor couples to the valve with a Boston valve adaptor; this is a common fitting, slightly conical and about 1/2 inch

Original Source: AirKayaks >>

Choosing an Aquaglide Tandem XL Inflatable Kayak: Chelan vs. Columbia vs. Chinook

Last year, Aquaglide – a division of North Sports – launched their inflatable kayak line with a series of 13 models. For 2015, Aquaglide expanded to 19 models – including 7 new kayaks and 3 redesigns – with MSRP pricing from $199.95 to $1099.95.

The current line includes three Tandem XL models designed for one to two paddlers with extra space for gear, child or furry friend. This includes the Chelan (new model), Columbia (redesign) and Chinook (original model) inflatable kayaks.

The new Chelan high-pressure touring series is a hybrid of the original Columbia HB and Klickitat models. The Chelans feature the Columbia’s long sleek waterline but are constructed in the smooth skin Duratex material used on the Klickitats, which reduces drying time.

The Columbia HB series has undergone a significant manufacturing change from a high-pressure version to a standard pressure version, and is now called the Columbia XP, bridging the gap between the Chinook and Chelan product lines.
The Chinook XP series remains with its original design as an economical, standard pressure, recreational kayak.
We often get questions – which one should I choose?
The Columbia  and Chelan Tandems are 15 ft touring models with a sleek silhouette and long waterline, while the Chinook is a 12.5 ft recreational model built for price-point. While they have many differences, they have just as many similarities. Ultimately it comes down to a personal preference, so here are some things to think about.
AquaGlide Tandem XLs: What’s the same?
All three kayaks feature an open design for 2+ paddlers, but they can also be easily paddled by one. They each utilize velcro floor strips and multiple d-rings to create infinite seating positions while still leaving room enough for gear, a child or furry friend. All come with two seats with integrated fishing rod holders, a third jumper seat with TwistLok valve, foot braces, splash guards, bungee deck lacing, drain plug, removable tracking fin and molded rubber handles. Each have similar widths of 36 to 37 inches.
AquaGlide Tandem XLs: What’s different?

At 12.5 feet in length with a weight of 42 lbs in the pack (34 lbs kayak only), the Chinook XP Tandem is lighter-weight and the shortest.  The XP construction consists of three PVC chambers (floor and two side bladders) utilizing three Boston valves. The inflation chambers have a zippered fabric covering, which allows the chambers to be replaced if necessary, but also increases drying time. These chambers can be inflated 1 to 2 PSI respectively. Despite the lower pressure, the floor covering is attached to the sides, which helps in durability and increasing structural rigidity somewhat. Other features include paddle holders, drawstring carrying case and one drain plug. The Core seats have a one-inch foam base (paddlers sit lower in

Original Source: AirKayaks >>

Product Review: AquaGlide Columbia XP Tandem Inflatable Kayak for 1-3 paddlers

We continue with the second in our series on the new 2015 Aquaglide line of inflatable kayaks – our first review focused on the high-pressure Chelan HB Tandem XL touring kayak.
This year AquaGlide debuted the Columbia XP recreational line of kayaks consisting of three standard-pressure models – the Columbia XP One for solo paddling, the Columbia XP Two for one to two paddlers and the Columbia XP Tandem XL.

This review features the Columbia XP Tandem XL, a 15 foot long inflatable kayak designed for one or two paddlers, with extra space for gear, child or pet. (Please note: some of the information will be repeated from other writeups.)
Getting Started with the Aquaglide Columbia XP Tandem XL:

We unpacked the box and laid out the pieces – inflatable kayak, backpack, instructions, repair kit, foot braces, tracking fin, two standard seats and a jumper seat.
Initial measurements showed the kayak body weighs approximately 40 lbs, with a backpack size of roughly 27 x 22 x 18 inches, while the kayak with seats, fin and braces – all in the backpack – weighs 49 lbs. Boxed up, the dimensions are 30 x 23 x 16 inches inches with a shipping weight of 59 lbs.
(AirKayaks Side note #1: When initially removing the kayak from the carrying case, take a good look at how the kayak is folded This is probably the most overlooked step and it is VERY helpful when trying to get the kayak back into the bag.)

The included instructions are adequate and include diagrams with inflation details.

Set up is straight-forward and simple  – unpack, unfold, inflate.

There are three inflation chambers utilizing Boston valves – the two side chambers and floor. There is one more small chamber with a twistlock valve for the jumper seat base. The floor is pumped up first.

Boston valves are two-part, screw-on valves. The bottom portion is threaded onto the kayak, the top valve is screwed open for inflation and then tightened shut after inflation. Air is easily released by unscrewing the base connector. How does it work? A flap inside the valve opens when air is pumped into the kayak, and falls shut when not pumped so that air will not rush back out.
(AirKayaks Side note #2: The Boston valves have a tether that keeps the valve attached to the kayak, ensuring that the valves don’t get lost after deflating. Make sure that the string does not get in the way when screwing on the valve base, and the valve is not cross-threaded, or you may have some air leakage. Also make sure the ring plate or “base” ring is also screwed on tightly.)

With the base portion screwed onto the kayak body, and the top portion screwed open, locate the

Original Source: AirKayaks >>

Product Review: AquaGlide Chelan HB Tandem XL Inflatable Kayak for 1-3 paddlers

Last summer, AquaGlide unveiled their new inflatable kayak lineup for 2015, which included a series of new models and revamps. Based on the number of inquiries, we were anxious to try out the new Chelan HB high-pressure series.
The new models arrived last week, and we started inflating and testing.

Our first review focuses on the Chelan HB Tandem XL, a 15 foot long inflatable kayak designed for one or two paddlers – with extra space for gear, child or pet. (Please note: some of the information will be repeated from other write-ups.)
Getting Started with the Aquaglide Chelan HB Tandem XL:
We unpacked the box and laid out the pieces – inflatable kayak, backpack, instructions, repair kit, foot braces, tracking fin, two seats, a jumper seat, valve adaptor and two pieces of plastic.

Initial measurements showed the kayak body weighs approximately 32 lbs, with a backpack size of roughly 27 x 22 x 18 inches, while the kayak with seats, fin and braces – all in the backpack – weighs 44 lbs. Boxed up, the dimensions are 26 x 25 x 14 inches with a shipping weight of 52 lbs.
(AirKayaks Side note #1: When initially removing the kayak from the carrying case, take a good look at how the kayak is folded. This is probably the most overlooked step and it is VERY helpful when trying to get the kayak back into the bag.)
The included instructions appeared adequate and include diagrams with inflation details.

Set up is straight-forward and simple  – unpack, unfold, inflate.

There are three military valves (both sides and the floor) with three more small chambers utilizing twistlock valves for the seat bases – the floor is pumped up first, to 6 PSI.
The floor is held in place with two adjustable straps. From our prior experience, we found it best to loosen up the straps, otherwise the floor could be inflated “lopsided.”

The military-style plunger valve is simple to use – with your finger, twist the plunger slightly to the “up” position to inflate (air goes in but doesn’t come back out) and “down” to deflate (air comes out).

The Chelan HB Tandem XL military valves require a special adaptor, which does not come with most standard pumps. In Aquaglide’s first year, the military adaptors were not included with the high-pressure kayaks, which caused problems. All the 2015 high pressure models now include the adaptor, which is found in the repair kit.
The Aquaglide military adaptor couples to the valve with a Boston valve adaptor; this is a common fitting, slightly conical and about 1/2 inch thick. Friction fit the adaptor onto the Boston valve fitting, then attach the fitting to the military valve with a slight twist. It is helpful to use a pump with

Original Source: AirKayaks >>

Product Review: Mistral Kailua Fit 11-5 Inflatable Fitness Paddle Board

This past month we received our first shipment of standup inflatable paddle boards from Mistral.
Founded in 1972, European-based Mistral rapidly became one of the leaders in the windsurf industry. Mistral has since refocused the product line, branching into paddle boards and kite surfing – even watches and clothing.

Recently, Mistral expanded into the inflatable SUP market. The 2015 line includes the popular all-around Adventure boards, a fitness-oriented board named the Kailua Fit, and a new line of high-pressure, lightweight, sub-20 lb. boards made in Europe – the Equipes and Crossovers. With the introduction of the new Crossover inflatable WindSup boards, Mistral is brought full-circle, back to their roots.
Our first review features the Mistral Kailua Fit, an 11′ 5″ inflatable paddle board decked out for stand up paddling as well as yoga/fitness workouts.
(Please note: some of the info will be repeated from prior write-ups.)
Mistral Kailua Fit 11’5 Inflatable Yoga Standup Paddle Board – Getting Started
The board as-arrived is 33 x 18 x 10 inches in the box, weighing in at 34 lbs.

Inside is the Kailua body, backpack, repair kit, single action pump with pressure gauge, removable fin, fitness cord and instructions. Once rolled up, the SUP board fits into the backpack, as well as a breakdown paddle under 35 inches (longest shaft length) and the pump.

The board itself weighs 24.6 lbs, or 28.8 lbs inside the backpack with pump – these all easily fit in the back of a small car.

For your first set up, remove the SUP body from the backpack, and unroll. Lay it out face up so that you can access the military valve.

The Kailua 11-5 utilizes one spring-loaded military valve for inflation. These are very simple to use and feature an inflate mode (spring plunger is UP) and a deflate mode (spring plunger is DOWN). By using your finger to gently push on the plunger, it can be moved to the inflate mode (air goes in and doesn’t come back out) and deflate mode (air goes in and comes back out) – before you make the effort to inflate the board, PLEASE make sure the plunger is in the inflate position.
The Kailua paddle board system includes a high-pressure, single-action pump with a gauge – what we term the “slim barrel” as it pushes out a bit less air, making it easier to attain very high pressures.

First, hook the gauge onto the pump then attach the hose to the gauge. Push and twist the military valve adaptor onto the valve, and lock into position – you’re ready to pump!

Initial pumping is a breeze. I pumped for about 180 strokes (3+ minutes) until the board filled out and the gauge started to move. With another 50 strokes I was at

Original Source: AirKayaks >>

Product Review: New Innova Swing EX 13.5 ft Inflatable Touring Kayak

This past summer, Innova Recreational Products of Burlington, WA announced the latest addition to their inflatable kayak lineup – the Swing EX.
As mentioned in previous write-ups, the Innova line is unique in that the kayaks are handmade in Czechoslovakia rather than China or Korea. Additionally, the Swing series (now consisting of the Swing 1, the Swing 2 Double and the new Swing EX) – as well as the Twist series – utilize materials that are PVC-free, making them a greener option than most kayaks on the market.

This week we had the first opportunity to take out the Innova Swing EX, a 13′ 6″ solo inflatable touring kayak weighing a mere 28 lbs with a selling price of $999. Please note, some of this will be repeated from the previous Swing reviews, as there are obviously many similarities.
Getting Started with the Innova Swing EX Inflatable Kayak
The box as received weighs 31.2 lbs with dimensions of 28 x 18 x13 inches.

Inside is the Swing EX body – neatly folded with a cinch strap inside a lightweight drawsack – multiple instruction sheets, 3 metal insertion bars, tracking fin, seat, foot rest, coaming collar, repair kit, and valve adaptor. At 28 lbs for the combined package and a folded size of 23 x 17 x 11 inches, the Swing EX is small enough to fit in plane overhead cargo bins.
Swing EX Kayak Setup/Inflatation
As with all the Innova manuals to date, the Swing EX instructions are quite detailed – there is one instruction sheet for fin installation, one for utilizing the valves, another on the kayak in general and added instructions detailing the “insertion bars.” As the kayaks are made in Europe, many of the details are based around European specs and regulations.

First step, unpack and unfold the kayak body. What is immediately noticeable is how FLAT the kayak is when deflated.

Install the tracking fin before inflating the kayak. The Swing EX utilizes a single fin with double slots. Slip the end with the larger slot in first, making sure that the fin is pointing towards the “back” of the kayak. This enables it to slide in enough to fit in the second slot. While the first time can be a struggle to get the back side into position, after a couple of rounds it becomes quite easy. Do make sure it is solidly in position.

Attach the foot brace (this comes attached from the factory) by weaving the webbing through the floor connector and back. The foot brace uses a twistlok valve for inflation. There are no adaptors that couple with the valve, so you must either hold the adaptor onto the valve while pumping with one hand, have someone else hold the adaptor in

Original Source: AirKayaks >>