Well-known for eye-catching graphics and innovative technology, Hala Gear is one of the few standup paddle board companies focused on the inflatables market – most feature hard-shells with a few inflatables thrown into the mix.
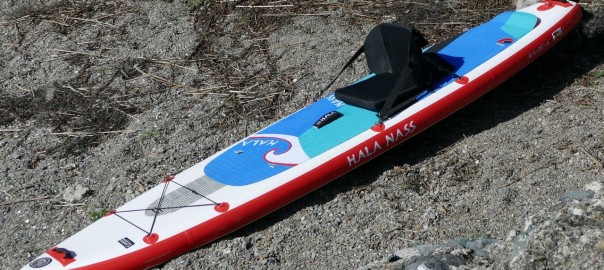
Well-known for eye-catching graphics and innovative technology, Hala Gear is one of the few standup paddle board companies focused on the inflatables market – most feature hard-shells with a few inflatables thrown into the mix.
This past spring, we received first-hand information on Advanced Elements’ new two-person inflatable kayak model, the 13-ft AdvancedFrame 2. Available in limited quantities, the AdvancedFrame 2 combines features from several current models. The kayak is a lightweight and compact version of the popular Convertible kayak with the silhouette of the Expedition, has a floor and seating setup similar to the Lagoon 2, with a higher 450 lbs weight capacity.
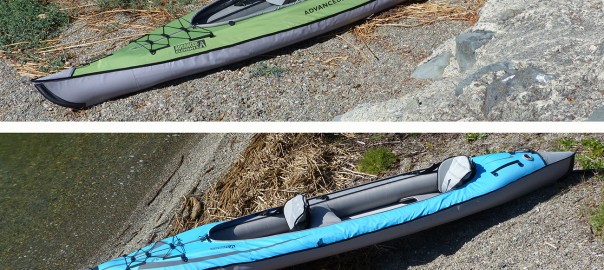
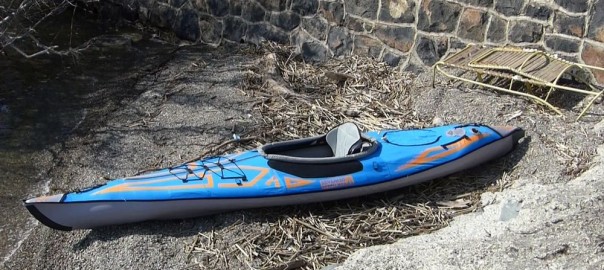
Before they arrived, we began fielding numerous questions on which to choose – the Convertible (shown in blue on the bottom) or the AdvancedFrame 2 (shown in green on top). Here are some things to think about.
What’s the same?
Both the Convertible and AdvancedFrame 2 utilize the same type of hull material and three-layer construction, consisting of a kayak outer cover, with PVC side tubes in their own covered fabric sheath. Both have an integrated tracking fin, landing plate and beefed up bow and stern. Both have the removable bow and stern aluminum ribs, and plastic bow and stern stiffening sheets. Both kayaks come with two seats, repair kit, instructions and carrying case (though the carrying case for the AdvancedFrame 2 is generously oversized). Both have 6 inflation chambers – two military valves and four twistloks. Both have two molded rubber handles – bow and stern – and front bungee deck lacking with d-rings and quick-connect clips as well as four rear d-rings. Both have velcro paddleholders.
Both can use the optional rapidup sail, backbone, high-pressure floor and foot pegs.
This is where the similarities end.
At 13 feet in length, the AdvancedFrame 2 is 2 feet shorter than the Convertible, and at 43 lbs with seats in the carrying case, weighs 9 lbs less. While the Convertible features a 1-PSI PVC inflatable floor with i-beam construction, the AdvancedFrame 2 floor does not inflate; it is constructed from a half-inch thick closed-cell foam – similar to that used under sleeping bags (see photo above). The lower “center of gravity” in the AdvancedFrame 2 is compensated for with inflatable seat bases, while the Convertible features a non-inflatable 1-inch seat base with a stiffer, higher back. As the foam floor “rolls” up, the folded dimensions are not quite as compact – hence the larger carrying case.
While both kayaks have open seating areas, the AdvancedFrame 2 has a slim, one-inch coaming area that helps to keep out water, but can not use a deck or spray skirt. The Convertible features a zippered perimeter that allows one to attach optional single and double spray decks (shown above) as well as optional spray skirts.
The Convertible has more flexibility in seating positions, featuring front, rear and center clipping positions. The AdvancedFrame 2 does not have the center clipping position, and the seat straps
Earlier this month, we received our first shipment of 2018 Red Paddle Co inflatable paddle boards with updated Titan pumps. First developed in 2015, the Titan pump was touted as a game-changer, with the ability to cut inflation time in half.
For years, the standard inflatable SUP pump was the Bravo HP single-action, high volume/low pressure pump, a squatter, thick-barrel single-action pump designed to put in more air volume, which in turn took more effort to reach higher pressures. Higher pressures in an inflatable board vastly improve the board performance, by increasing rigidity (reducing flex).
In 2013, Red Paddle Co introduced the HP EZee single-action, low volume/high pressure pump, a taller, thin-barrel single action pump designed to put in less air per stroke, thus allowing one to more easily pump to higher pressures. As the pros and cons of each are obvious – one fills a board up more rapidly, while the other takes longer but is less of a struggle to reach 18-20 PSI – numerous paddlers opted to purchase both pumps. In response, some manufacturers expanded the slim-barrel design to a double-action pump, putting air in on the up and down stroke. While theoretically this will put air in twice as fast, in actuality it becomes a struggle on the “up” stroke.
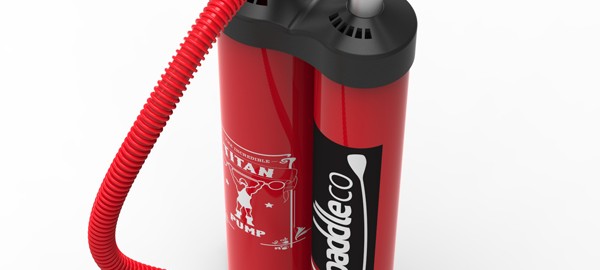
In 2015, Red Paddle debuted the Titan pump. What made the Titan different? The Red Paddle Co Titan pump is an amalgamation of the two pumps. The Titan pump has two chambers, basically one side is a high volume/low pressure, and the other a low volume/high pressure. A unique double gear system actually combines the two chambers, so that when initially pumping, paddlers are using BOTH chambers to fill the board, allowing them to put in a whopping 4.71 liters, compared with just over 2 liters for the standard HP pump. When the pumping starts to get tough, one can switch the internal gear over to the high pressure chamber, allowing one to easily attain higher PSIs with less effort. An integrated pressure gauge allows one to monitor the process.
Over the past three years, Red Paddle has continued to tweak the inner design and construction, resulting in a killer pump with wider applications.
We had the opportunity to test out the most recent iteration when inflating our 2018 Red Paddle Voyager 12’6″. Following is an update from our initial review of the Titan pump.
The new Titan pump – included with most of the boards – arrives rolled up inside the Red Paddle SUPs. If purchasing separately, the pump arrives in a box 24 x 13 x 6 inches weighing 6.2 lbs. Inside is the pump body with integrated pressure gauge, a detachable hose and a series of adaptors. Pump dimensions
We have avidly been awaiting the arrival of the 2018 Red Paddle Co product line. Recently, the truck rolled in and we had our first opportunity to take a look at the new Red Paddle inflatable SUPS, consisting of 23 models for surfing, whitewater, recreation, touring and racing, ranging in size from 8’10 to 22’0.
Attach the hose to the pump, making sure there is no cross-threading. Then attach the integrated adaptor on the end of the hose, to the board by pushing in and turning. You’re ready to pump!
We did measurement tests. The Voyager 12’6″ inflated is approximately 149.5 inches long, 32 inches wide, and just over 5.5 inches deep – pretty much on target with the published specs. Payload is up to 340 lbs/150 kgs.
Red Paddle Twelve Six Voyager On the Water
Besides being very fast and fun to paddle, it’s a great option for long days on the boards, or when the wind kicks up.
While I didn’t bring Cleo along this time, here is a photo of Eddie on an earlier version of the Race 12-6 shown above. Dog claws are no match for the beefy construction material.
Packing It Up
Deflating the board is pretty simple. Remove the tracking fin, making sure to re-attach the fin plate to the screw, so as not to lose it. Burp the plunger a couple of times to release some of the pressure, then push the plunger to the open (down) position and immediately the air will swoosh out. Remove the RSS battens. Move to the snout of the ISUP. Lay the Titan pump down and start tightly rolling up the board from the snout, top side up with the bottom on the outside. As you roll it up, air will continuously be pushed out of the open valve.
When fully rolled up, replace the valve cover and then take the attached strap and cinch it around the bundle. If you’ve rolled up tight enough, the board will easily slip back into the backpack. Put the fin into the interior pocket and use the interior cinch straps to position the load.
Red Paddle Twelve Six Voyager: Bottom Line
At last summer’s Outdoor Retailer show, Advanced Elements unveiled the next generation in the Expedition series – the Expedition Elite. As long-time fans of the original yellow model – and the subsequent blue Limited Edition – we were impressed with the Elite’s feature enhancements.
Earlier this spring the Elite hit the West Coast, and we managed to grab one before our first shipment sold out – not to worry, we have more. Here are details on the Expedition Elite AE1009XE, a 13 foot inflatable weighing in at roughly 42 lbs.
Getting Started with the Expedition Elite Inflatable Kayak
The box as received measures 34 x 21 x 11 inches with a weight of 57 lbs.
Inside is a new, backpack-style carrying case measuring 36 x 16 x 11 inches which contains the kayak body, high-backed lumbar seat, aluminum deck riser, rear thwart, repair kit, foot brace and instructions (these are located in a pocket inside the carrying case) . The repair kit, screw-on adaptor and floor adaptor are located in the mesh pocket behind the seat. The kayak with seat weighs 44.5 lbs, or 48 lbs in the pack.
The kayak folded size is approximately 31 x 16 x 10 inches, leaving just enough room to store a pump and breakdown paddle (not included) if folded properly.
First step, unfold the kayak. As with all the AdvancedFrame models, the Expedition Elite features an “inner rib” in the bow and stern, which is basically a u-shaped aluminum rib, about one foot long and one-half inch wide.
This comes “pre-assembled” meaning it arrives already inserted into two sleeves inside the kayak cover. Unless you remove the inner bladder, they remain in position. When the kayak is pumped up, the inner bladder with rib presses against the kayak cover – that, in conjunction with two bow and stern plastic sheets, give the kayak a sharp silhouette which aids in slicing through the water.
The Expedition Elite kayak features 11 inflation chambers – three military valves (main chambers and floor) and 8 smaller twist-loks (4 deck lifts, 2 coaming tubes, thwart and seat).
Each Expedition Elite comes with a screw-on adaptor (center image, found in the repair kit in the mesh pocket behind the seat) which locks onto many pumps with pin/slot hose fittings. Additionally, a standard Boston valve adaptor (left image) will friction fit directly into the valve opening. A separate adaptor is also included for the high pressure floor (right image).
First step, turn the military valve to the inflate position. The military-style plunger valves are simple to use – twist one way to inflate (UP position) and the other to deflate (DOWN position).
Attach the screw-on adaptor to your pump and then couple it to the first main chamber, located on the
The increased popularity of high-pressure inflatables – and the increased pressure needed for inflatable paddle boards – has launched a quest for easy inflation. Almost daily, we field calls from people who want easier and quicker pump options, so they can spend less time on the beach, and more on the water.
A while ago, we published our popular Guide to High Pressure Inflatable Pumps. Since then, more options have become available.
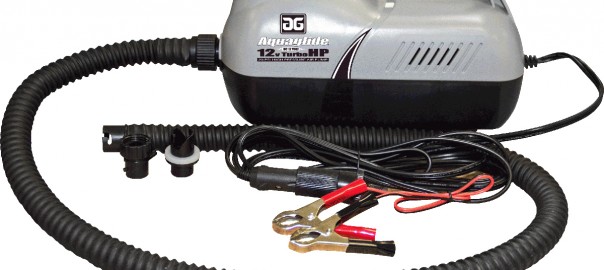
Recently we received our first shipment of Aquaglide’s 12-Volt 2-Stage Turbo HP Pumps, which bills itself as capable of inflating from 1 to 20 PSI. The Turbo HP is a fairly diminutive size, measuring 12 x 5 x 6 inches and weighing in at 3 lbs 5 oz. The pump includes a 4 foot long, rugged, non-kink hose with two adaptors – an HR-style military adaptor and a screw-on adaptor.
As most of our inflatable kayaks run 1 to 6 PSI, and our inflatable paddle boards run 12 to 18 PSI, this seemed a good option. Best of all, it works off a car power point-cigarette lighter, but also includes alligator clips for direct connection to car or boat battery.
Using the AquaGlide 12V Turbo HP Pump
As our previous tests were done with a Red Paddle 18-PSI Surfer 10’0″, we opted for a Red Paddle Ride 9-8 which we had in our boat building – a pretty similar size and volume of 196 liters.
Instructions are pretty basic. First, connect the HR-adaptor to the hose end, and screw the hose onto the pump. Initially, it was tough to couple as the o-ring material is stiff. We pushed hard and were able to make the connection. Turn on the car battery (not the motor) and plug the connector into the car power point. Dial in the desired PSI – in this case we opted for 18 PSI, and hit the on button.
The initial (first) stage was fairly quiet. By one minute, the board was totally unfurled, then it jumped to Turbo mode (2nd stage) and became louder. We timed the inflation. At 3 minutes the board was at 5 PSI, 4 minutes to 7 PSI, 6 minutes to 11 PSI, 8 minutes to 14 PSI, 9 minutes to 15 PSI. At 10 minutes, 29 seconds, the motor shut off after reaching 18 PSI.
We tried to carefully twist off the hose, and it nearly blew us off. We managed to re-make the connection, and re-pumped it to 15 PSI. Through trial and error, we found that slowly twisting off the hose would lose air. If we quickly pulled off the hose – by pushing/twisting and popping off – it came off easily. So practice a little first. We did use a K-Pump quick check valve.
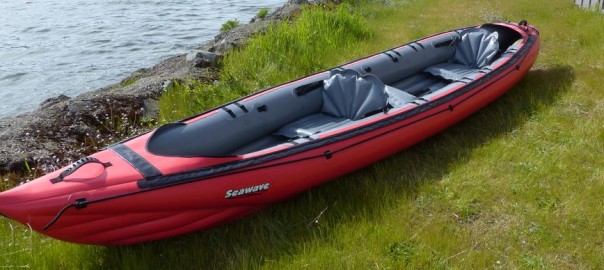
This past week we had the opportunity to take our first look at the Innova Seawave inflatable kayak – a two+ person kayak with a versatile design that allows one to attach optional spray decks, spray skirts and a foot rudder system.
The Innova line is unique for a number of reasons. First, all the kayaks are handmade in the Czech Republic; the factory has manufactured inflatable boats for well over 50 years. In Europe, a similar line is marketed under the name Gumotex.
We previously published our review on the new Solar 410C, Innova’s other 2+ person inflatable introduced into the US market simultaneously. So here is our write-up on the the Innova Seawave inflatable tandem kayak, which weighs 44 lbs in the pack, is 15 feet in length with a payload of 551 lbs for two+ persons and gear. (Please note: some of the information will be duplicated from other Innova reviews).
Getting Started with the Innova Seawave
The box as received weighs in at 48 lbs, measuring 27 x 18.5 x 12.5 inches.
Inside is a very nifty 100L backpack with adjustable shoulder straps, front pouch pocket and roll top closure. This contains the kayak body, tracking fin, foot rests, repair kit, instructions, cinch belt, valve adaptor, seats and sponge. Packed dimensions are 24 x 17 x 12 inches as received in the bag, with a weight of 44 lbs. The kayak with seats and foot rests is 41 lbs. (Please note: This is the actual kayak weight, NOT the 29 lbs as stated from the manufacturer’s literature.)
Innova Seawave Kayak Setup/Inflatation
We read through the included instruction manuals. Just like all the other Innova products, the Innova Seawave manual is surprisingly detailed in some aspects, while lacking in others. As the kayaks are made in Europe, many of the details are based around European specs and regulations and can sound more complicated than it actually is. Additionally, some of the translations are a bit difficult to understand.
First step, unpack and unfold the kayak body. What is immediately noticeable is how FLAT the kayak is when deflated – of course, this makes it quite compact for travel.
Next, flip the kayak over to install the tracking fin before inflation, locating the fin “shoe” towards the stern. Slip the end with the larger slot in first, making sure that the fin is pointing towards the “back” of the kayak. This enables it to slide in enough to fit in the second side.
The instructions suggest attaching and inflating the foot braces and seats first, though these actually come pre-attached from the factory. (If they are not attached, start with the foot braces. There are five buckles on the floor – when paddling tandem, use the 1st and
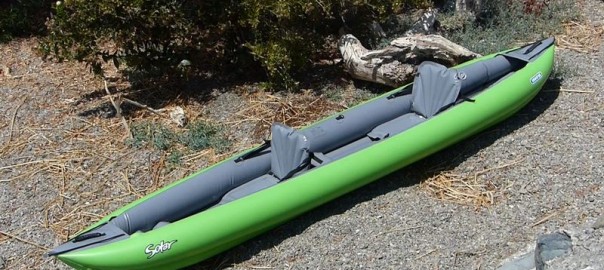
This past week we had the opportunity to take our first look at the Innova Solar 410C inflatable kayak – a 2+ person kayak for recreational paddling.
The Innova line is unique for a number of reasons. First, all the kayaks are handmade in the Czech Republic – the factory has manufactured inflatable boats for well over 50 years. Secondly, the manufacturing process produces kayaks that can become quite compact, making them a great choice for travel. And third, the kayaks are environmentally-friendly as they are mostly PVC-free.
While various iterations of the Solar have been available in Europe for years, Innova recently brought in the newly-redesigned Solar 410C. We had our first opportunity to take out the kayak late last year. So here is our write-up on the the Innova Solar 410C inflatable tandem kayak, which weighs 36 lbs in the pack, is 13 feet 2 inches in length and has a payload of 595 lbs for two persons and gear. (Please note: some of the information will be duplicated from other Innova reviews).
Getting Started with the Innova Solar 410C
The box as received measures 25 x 16 x 11 inches, weighing in at 40 lbs.
Inside is a very nifty and compact backpack with adjustable shoulder straps, front pouch pocket and roll top closure. This contains the kayak body, tracking fin, foot rests, repair kit, instructions, valve adaptor, seats and sponge. Packed dimensions are 25 x 16 x 10 inches as received in the bag, with a weight of 38 lbs for the pack and contents.
We read through the included instruction manuals. Just like all the other Innova products, the Innova Solar manual is surprisingly detailed in some aspects, while lacking in others. As the kayaks are made in Europe, many of the details are based around European specs and regulations and can sound more complicated than it actually is. Please also note that some of the instructions/diagrams have errors.
First step, unpack and unfold the kayak body. What is immediately noticeable is how FLAT the kayak is when deflated – of course, this makes it quite compact for travel.
Install the tracking fin into the “shoe” before inflating the kayak. Slip the end with the larger slot in first, making sure that the fin is pointing towards the “back” of the kayak. This enables it to slide in enough to fit in the second side. The first time we tried this, we struggled to get the second slot into position but this gets easier with use.
The instructions suggest attaching and inflating the foot braces and seats first, but these come already attached from the factory – the front seat is attached to the 2nd set of floor clips, and the back seat to
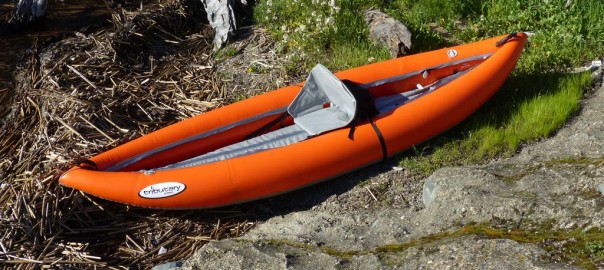
We recently posted our first review on Aire’s Tributary inflatable kayak product-line. The Tributary models – which are made overseas – offer great value for those on a budget or unwilling to make a large investment; these include the Strikes, Sawtooth and Tomcat kayaks as well as several rafts.
This week we had the first opportunity to take out the Aire Tributary Strike 1, a 10 foot 3-inch one-person inflatable with a price of $799. The Strike is billed as a crossover kayak, capable of spanning calm water to rapids. Please note, some of this may be repeated from other write-ups.
Aire Tributary Strike I Inflatable Kayak: Getting Started
The box as received measures 29 x 16 x 13 inches, weighing in at 33 lbs.
Inside is the Strike body, one Cheetah seat, flip strap, instructions and repair kit with adaptor, adaptor tube, wrench and patch material (including some TearAid). The Strike does not come with a carrying case. The body alone weighs 26 lbs, or 29.5 lbs with the seat. The folded body measures roughly 28 x 15 x 12 inches.
Aire Tributary Strike Setup/Inflatation
We read through the included instruction manual. First step, unfold the kayak body. Then pump up tthe main chambers until softly filled.
The Aire Tributary Strike features three main inflation chambers utilizing Summit II military valves – one for the floor and one for each side. The military-style plunger valve is simple to use – with your finger, twist the plunger slightly to the “up” position to inflate (air goes in but doesn’t come back out) and “down” to deflate (air comes out). Please note – the military valve push pins can sometimes deceptively look as if they are UP when actually in the deflate mode. When this happens, as soon as you remove the pump adaptor all the air will swoosh out. So, make sure they are truly popped up. On the positive side, this is so easy to pump up, it’s not a big issue.
Unlike many kayaks, the Aire Tributary Strike has two main inflation valves at opposite sides of the kayak – one on the upper rear right and one on the upper bow left.
Locate the military valve adaptor in the repair kit. The Strike does not come with a pump, but the adaptor allows one to use the Boston valve conical adaptor found on most pumps. To couple the Strike adaptor with the Boston valve adaptor, Aire has included a two-inch clear plastic tube. Insert the end of the Strike adaptor into one side of the clear tube, and then insert the Boston valve adaptor onto the other side via friction fit. Lock the Aire adaptor onto the military valve with a slight twist. Since the Strike

Well-known in the paddling world for top-notch quality, Aire has been manufacturing high-end inflatable rafts and kayaks out of their plant in Idaho for over 25 years ago. With the increased interest in inflatables, Aire introduced their Tributary line, an economical version made overseas, nearly 14 years ago. The Tributary models offer great value for those on a budget or unwilling to make a large investment; these include the Strikes, Sawtooth and Tomcat kayaks as well as several rafts.
This week we had the first opportunity to take out the Aire Tributary Sawtooth, a 13 foot 3-inch two-person inflatable weighing 35 lbs with a price of $749.
Aire Tributary Sawtooth Inflatable Tandem Kayak: Getting Started
The box as received measures 25 x 22 x 12 inches, weighing in at 40 lbs.
Inside is the Sawtooth body, two inflatable seats, removable tracking fin, instructions and repair kit with adaptor, adaptor tube, wrench and patch material (including some TearAid) but does not come with a carrying case.The Sawtooth body alone weighs 31 lbs; each seat weighs 1.7 lbs for a total of 35 lbs with fin. The folded body measures roughly 26 x 18 x 10 inches.
Aire Tributary Sawtooth 2 Setup/Inflatation
We read through the included instruction manual. First step, unfold the kayak body. Then pump up the main chambers until softly filled.
The Aire Tributary Sawtooth features three main inflation chambers utilizing Summit II military valves – one for the floor and one for each side. The military-style plunger valve is simple to use – with your finger, twist the plunger slightly to the “up” position to inflate (air goes in but doesn’t come back out) and “down” to deflate (air comes out). Please note – the military valve push pins can sometimes deceptively look as if they are UP when actually in the deflate mode. When this happens, as soon as you remove the pump adaptor all the air will swoosh out. So, make sure they are truly popped up. On the positive side, this is so easy to pump up, it’s not a big issue.
Locate the military valve adaptor in the repair kit. The Sawtooth does not come with a pump, but the adaptor allows one to use the Boston valve conical adaptor found on most pumps. To couple the Sawtooth adaptor with the Boston valve adaptor, Aire has included a two-inch clear plastic tube. Insert the end of the Sawtooth adaptor into one side of the clear tube, and then insert the Boston valve adaptor onto the other side, via friction fit. Lock the Aire adaptor onto the military valve with a slight twist. Since the Sawtooth main chambers are inflated to 2.5 PSI, it is helpful to use a pump with pressure gauge
You must be logged in to post a comment.