Tag Archives: reviews

Product Review: New Deschutes 130 Inflatable Kayak from Aquaglide

Late last summer, we were able to test out several of Aquaglide’s new inflatable kayaks for 2020. We were particularly intrigued with the Deschutes series featuring streamlined hulls that were lightweight, simple and quick to set up.

 
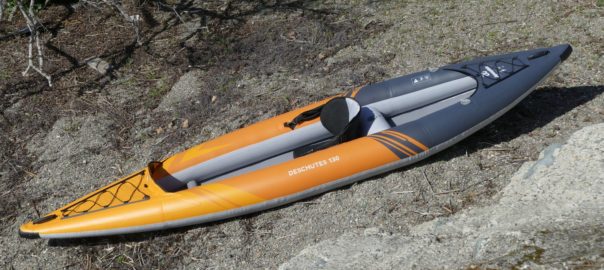
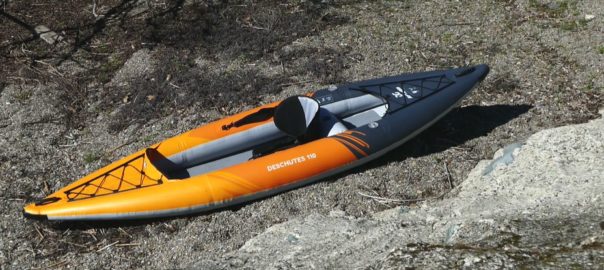
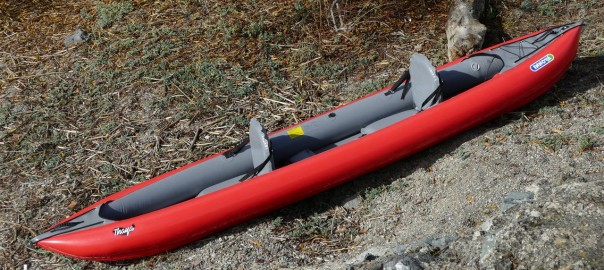
This past week, the first of the new products began to arrive. Our previous review was on the Deschutes 110, so our second review will be the Deschutes 130, an open-style, 13-foot inflatable kayak designed for solo paddling. (Please note: some of the information will be repeated from other writeups.)
Getting Started with the Aquaglide Deschutes 130
We unpacked the box and laid out the pieces – inflatable kayak body, backpack, instructions, repair kit, tracking fin, seat, valve adaptor and a plastic splash guard. The repair kit features generous-sized repair patches, a valve wrench and glue. Initial impression – the kayak is nicely presented and packaged with bubble wrap protecting valves, handles, etc.

The kayak body weighs approximately 22 lbs with the seat adding another 2 lbs. The kayak with seat and fin – all in the backpack – weighs 27.5 lbs, with a folded size of 27 x 16 x 10 inches for the body only. Backpack size is roughly 27 x 22 x 18 inches, which can be cinched down. All boxed up, the dimensions are 31 x 18 x 16 inches with a shipping weight of 36 lbs. We were able to get everything – plus a pump and paddle – into the pack.
(AirKayaks Side note #1: When initially removing the kayak from the carrying case, take a good look at how the kayak is folded.)
The Deschutes 130 comes with an instruction manual, but as mentioned in our Deschutes 110 writeup, the instructions are pretty sketchy for new users. This is compounded by the manual layout in which each section is first written in English, then up-to 17 different languages (including Bulgarian and Estonian), before you get to the next English section. The inflation instructions start on page 16.

Set up is straight-forward and simple – unpack, unfold, inflate.
The instructions say to put the valve in the closed position and to pump up the sides to 3 PSI, but there are no details explaining this in the instructions.

If you are unfamiliar with military-style valves, they are simple to use – with your finger, twist the plunger slightly up to the “closed” position to inflate (air goes in but doesn’t come back out) and “down” to deflate or open (air comes out).

The Deschutes 130 military valves require a special adaptor, which is found in the repair kit. The Aquaglide military adaptor couples to the valve with a Boston valve adaptor; this is a common fitting, slightly conical and about 1/2 inch thick. Friction fit the adaptor

Original Source: AirKayaks >>

Product Review: New Deschutes 110 Inflatable Kayak from Aquaglide

Earlier this year we posted details on Aquaglide’s inflatable kayak and paddle board product line for 2020, which included the introduction of seven new models, a facelift for three models and the retirement of 6 models.

This past week, the first of the new products began to arrive. Our initial choice for review was the Deschutes 110, an open-style, 11-foot inflatable kayak designed for solo paddling. (Please note: some of the information will be repeated from other writeups.)
Getting Started with the Aquaglide Deschutes 110
We unpacked the box and laid out the pieces – inflatable kayak body, backpack, instructions, repair kit, tracking fin, seat, valve adaptor and a plastic splash guard. First thing to note – the kayak is nicely packaged with bubble wrap protecting valves, handles, etc. Also to note – the repair kit features generous-sized repair patches, a valve wrench and glue.

Initial measurements showed the kayak body weighs approximately 18.8 lbs with the seat adding another 2 lbs. The kayak with seat and fin – all in the backpack – weighs 24.45 lbs. Backpack size is roughly 27 x 22 x 18 inches, which can be cinched down. All boxed up, the dimensions are 31 x 18 x 14 inches with a shipping weight of 32 lbs. We were able to get everything – plus a pump and paddle – into the pack.
(AirKayaks Side note #1: When initially removing the kayak from the carrying case, take a good look at how the kayak is folded.)
While familiar with most of the Aquaglide products, we began by reading the included instructions. Here we came to our first issue – the instructions are pretty sketchy for new users. This is compounded by the manual layout in which each section is first written in English, then up-to 17 different languages (including Bulgarian and Estonian), before you get to the next English section. The inflation instructions start on page 16.

Set up is straight-forward and simple – unpack, unfold, inflate.
The instructions say to put the valve in the closed position and to pump up the sides to 3 PSI – but there is no diagram or explanation of what “closed” means.

For those unfamiliar, the military-style plunger valve is simple to use – with your finger, twist the plunger slightly up to the “closed” position to inflate (air goes in but doesn’t come back out) and “down” to deflate or open (air comes out).

The Deschutes 110 military valves require a special adaptor, which is found in the repair kit. The Aquaglide military adaptor couples to the valve with a Boston valve adaptor; this is a common fitting, slightly conical and about 1/2 inch thick. Friction fit the adaptor onto the Boston valve fitting, then attach the fitting

Original Source: AirKayaks >>

Product Review: New Innova Twist 2 N Inflatable Tandem Kayak

In June we received our first shipment of the newly-updated Innova kayaks for 2019 – in particular the Twist N, Swing N and Solar 2019. Made in the Czech Republic, the Twist and Swing models are now constructed from Nitrilon (N), the same rugged material used in the traditional Innova Sunny, Helios and Safari models. Nitrilon is known for making the kayaks more rigid as well as water and abrasion resistant, without substantially increasing weight. It’s also PVC-free, thus environmentally friendly.

Our first selection was a review on the Twist II N. The Twist 2 interior has been redesigned slightly to include additional d-rings, providing an easy conversion from a tandem to a solo kayak, thus more versatile for larger paddlers or those needing more space for extra gear. While the kayak silhouette remains virtually unchanged, the added material thickness increased the kayak weight from 24 lbs to 29 lbs as well as a price increase.
This week we had the first opportunity to take out the revamped Innova Twist II N, an 11 foot 10-inch two-person inflatable weighing a mere 29 lbs (including seats and foot brace) with a selling price of $599.
Please note: Some of this information will be repeated from prior write-ups.
Innova Twist IIN: Getting Started
The box as received measures 23 x 16 x 10 inches, weighing in at 32 lbs.

Inside is the Twist II N body, cinch strap, multiple instruction sheets, tracking fin, foot rest, repair kit, two seats, bilge sponge, valve adaptor and a drawstring stuff-sack. The Twist II N body with seats and brace weighs 28 lbs with a folded size of 20 x 16 x 8.
Innova Twist 2 N Inflatable Kayak Setup/Inflatation
We read through the included instruction manuals. As with all the Innova manuals to date, the instructions are quite detailed – there is one instruction sheet for fin installation, one for utilizing the valves, one on refolding and another on the kayak in general. Most include IKEA-style graphics which are occasionally just short of a brain twister, and while some steps are dauntingly detailed, some are not mentioned. As the kayaks are made in Europe, many of the details are based around European specs and regulations.

First step, unpack and unfold the kayak body.

What is immediately noticeable is how FLAT the kayak is when deflated.

Install the tracking fin before inflating the kayak. The Twist II N utilizes a single fin with double slots. Slip the end with the larger slot in first, making sure that the fin is pointing towards the “back” of the kayak. This enables it to slide in enough to fit in the second slot. While the first time can be a struggle to get the back side into position, after a

Original Source: AirKayaks >>

Product Review: New Convertible Elite High Pressure Inflatable Kayak from Advanced Elements

 Advanced Elements of Benicia, California recently introduced one of two new kayaks for the 2019 product year. The AE1007E Convertible Elite is a package upgrade to the long-standing, popular AE1007R Advanced Elements Convertible inflatable kayak for one or two paddlers.

First launched in 2003 as the AE1004 AdvancedFrame2, the original model featured an integrated deck for double paddling. The kayak was reintroduced in 2006 as the AE1007R AdvancedFrame Convertible, sporting an open cockpit design which could be enclosed with optional single and double decks for solo or tandem paddling.
The new AE1007E Convertible Elite features the identical kayak materials and construction as the current AE1007R, but with upgraded accessories and features. The Convertible Elite now comes with a 4-6 PSI drop stitch floor, rather than the standard 1 PSI PVC floor with i-beams. The increased floor rigidity enhances the paddling experience with better tracking and glide.
The Convertible Elite arrived this past month so we took the opportunity – during a brief break in the rains – to put it through its paces. Here are details on the AdvancedFrame Convertible Elite AE1007E, a 15 foot inflatable kayak with high-pressure floor weighing in at roughly 54 lbs.
Getting Started with the Convertible Elite
The box as received weighs 60 lbs, measuring 34 x 21 x 12 inches.

Inside, the rugged backpack-style carrying case houses the kayak body, floor, seats, thwart, repair kit and instructions. The kayak with backpack and parts weighs in at 52.4 lbs, while the kayak body is 44 lbs.

Please note: A quick “overview” of set up is now sewn into the inside of the carrying case – we highly recommend that you read this.
Convertible Elite Setup/Inflatation
We began by reading the updated manual. This, too, has evolved over the years and gives excellent explanations on inflation, usage, refolding, etc. And here we come to AirKayak’s Tip #1: No matter how excited you are, take a good look at how the kayak is folded before you set the kayak up, so that you can get it back into the carrying case.

First step, unfold the kayak. (Please note: We will repeat some of the details previously mentioned in other writeups.) The AdvancedFrame series of kayaks feature an “inner rib” in the bow and stern, which is basically a u-shaped aluminum rib, about a foot long and one-half inch wide.

This comes “pre-assembled” meaning it arrives already inserted into two sleeves inside the kayak cover. Unless you remove the inner bladder, they remain in position. When the kayak is pumped up, the inner bladder with rib presses against the kayak cover – that, in conjunction with two bow and stern plastic sheets, give the kayak a sharp silhouette which aids in slicing through the water. (Please note: We removed

Original Source: AirKayaks >>

Product Review: Innova Thaya Hi-Pressure Inflatable Kayak for 1 to 2+ paddlers

Earlier this year we had the opportunity to take our first look at Innova’s new Thaya inflatable kayak – a 2+ person, high-pressure, inflatable kayak  for recreational paddling.

The Innova line is unique for a number of reasons. First, the kayaks are handmade in the Czech Republic – the factory has manufactured inflatable boats for well over 50 years. Secondly, the manufacturing process produces kayaks that can become quite compact, making them a great choice for travel. And third, the kayaks are environmentally-friendly as they are mostly PVC-free.

The Thaya is the newest introduction to the US market, already garnering a gold model at the 2019 European Paddlesport sProduct of the Year Awards, based on stability, paddling performance and its environmentally-friendly footprint.
While it is not yet available in the states (due in May 2019) we received an early production line piece for review. So here is our write-up on the the Innova Thaya inflatable tandem kayak, which weighs 39 lbs, is 13 feet 5 inches in length and has a payload of 595 lbs for two persons and gear. (Please note: some of the information will be duplicated from other Innova reviews).
Getting Started with the Innova Thaya
The box as received measures 28 x 19 x 13 inches, weighing in at 44 lbs.

Inside is a very nifty and compact 80-liter backpack with adjustable shoulder straps, front pouch pocket and roll top closure. This contains the kayak body, tracking fin, 2 foot rests, repair kit, instructions, valve adaptor, cinch belt, 2 seats and sponge. Packed dimensions are 25 x 16 x 10 inches as received in the bag, with a weight of 40.75 lbs for the pack and contents.
We read through the included instruction manuals. Just like all the Innova products, the Innova Thaya manual is surprisingly detailed in some aspects, while lacking in others. As the kayaks are made in Europe, many of the details are based around European specs and regulations and can sound more complicated than it actually is.
First step, unpack and unfold the kayak body. What is immediately noticeable is how FLAT the kayak is when deflated – of course, this makes it quite compact for travel.

Install the tracking fin into the “shoe” before inflating the kayak. Slip the end with the larger slot in first, making sure that the fin is pointing towards the “back” of the kayak. This enables it to slide in enough to fit in the second side. The first time we tried this, we struggled to get the second slot into position but this gets easier with use.
Next, decide which paddling mode you will be doing – solo, tandem or tandem with small being or gear. The instructions suggest attaching and inflating the foot braces

Original Source: AirKayaks >>

Choosing Your Advanced Elements Convertible, Convertible DS or Convertible Elite Inflatable Kayak

Earlier this year we received our first shipment of Advanced Elements’ new model, the AE1007E Convertible Elite in red: the Convertible is a popular tandem inflatable kayak for one to two paddlers. This joined the current models, the Convertible AE1007R or Convertible AE1007G in red or green and the AE1007 Convertible DS in blue.  Before they arrived, we were fielding inquiries on all three models which came down to one basic question – what is different?
In a nutshell, all three kayak models are identical in construction, materials and footprint – the only variations are in the colors and included accessories.
Standard AE1007G and AE1007R

The standard Convertible has been available for nearly 15 years, and now comes as AE1007G and AE1007R. These are identical except for the color – green or red – and come with a low-pressure 1-PSI inflatable floor with i-beams and pressure relief valve. Both have high-backed seats and come with the standard Advanced Elements duffel-style carry bag. Both have a street price of $699.
Convertible Elite and Convertible DS

Both the Convertible Elite AE1007E and Convertible DS AE1007DS come with the hi-pressure 4-6 PSI drop stitch floor (shown above with the standard 1 PSI low-pressure floor), which greatly enhances paddling performance and rigidity. The drop stitch floor ($239 value) also provides a firmer surface for getting into – and out of – the kayak. Both of these also come with two upgraded, high-backed seats with inflatable lumbar support ($128 value), and an additional padded seat bottom, providing a more comfortable paddling experience. Both of these also include a carrying case with backpack straps ($107.95 value), making it easier to transport. The new AE1007E Convertible Elite is available in red, with a street price of $949.

The Convertible DS AE1007DS in blue is exclusive to AirKayaks, and has been available for nearly 5 years.

In addition to the floor, seats and backpack upgrades listed previously, the current version also includes an integrated, adjustable front foot brace system ($29.99 value).

The base kayak also includes the Advanced Elements double action hand pump with gauge ($39.99 value) as well as a bonus StashPack 20 Liter dry bag ($49.99 value). Street price is $899.
Bottom Line:
If you plan on doing mostly tandem recreational paddling on calmer waters, don’t need all the whiz-bangs, or are on a budget, then the basic Convertible AE1007R/G with 1-PSI floor might be your best choice at $699.
If you plan on paddling in a variety of conditions both tandem and solo, with comfort and performance as a priority, then go with the high-pressure versions. For at-a-glance comparison, see the table below.

For more info, or to purchase, visit the Convertible product pages on AirKayaks.com.

AE1007R Convertible Inflatable Kayak in Red.
AE1007G Convertible Inflatable Kayak in Green
AE1007E Convertible

Original Source: AirKayaks >>

Product Review: Red Paddle Co Compact 9’6″ x 32″ Inflatable SUP Package

This past summer, Red Paddle Co announced the launch of their new 9’6″ Compact Inflatable SUP Package, a revolutionary game-changer in the inflatable paddle board industry.

With the Compact 9’6,” Red Paddle Co introduced the revolutionary PACT technology. Ten years in the making, PACT technology is a new weaving process which creates a denser, high-tensile thread matrix at the core of the board, with a super-strong, malleable outer layer. The Compact 9’6″ utilizes 120mm dropstitch technology, making the board more rigid than many boards yet still allowing the rider to keep a low center of gravity.

Deflating the board is pretty simple. Disassemble the paddle and put into the backpack. Remove the tracking fins and store in the bag. Burp the plunger a couple of times to release some of the pressure, then push the plunger to the open (down) position and immediately the air will swoosh out. Roll up the board from the nose to initially push out most air, and then unroll and fold the board in half down the centerline. Lay the Titan pump down on the nose end and start tightly rolling up the board from the snout. As you roll it up, air will continue to be pushed out of the open valve.

Original Source: AirKayaks >>

Product Review: Rival Nass 12’0″ Inflatable Paddle Board from Hala Gear

Well-known for eye-catching graphics and innovative technology, Hala Gear is one of the few standup paddle board companies focused on the inflatables market – most feature hard-shells with a few inflatables thrown into the mix.

Founded in 2011 by Peter Hall, Hala Gear headquarters is based out of Steamboat Springs, Colorado. The company philosophy is centered on performance, durability and quality – in fact, each of the Hala inflatable boards carries a three-year manufacturer’s warranty.
For 2018, Hala has 20 models for surfing, whitewater, recreation, touring and racing ranging in size from 6’11” to 14’0.
Our first review centered on the Carbon Nass with Hala’s unique carbon stringer. Based on that, we opted to test out the economy version Rival Nass package, which features the roller pack, dual-action pump and a breakdown paddle – part of Hala’s “Straight to the Water” package series.
So, here is our product review on the Rival Nass inflatable SUP, a 12’0 by 32″ x 6″ recreational and touring model from Hala Gear.
Hala Rival Nass 12’0″: Getting Started
The box as received weighs 42 lbs, measuring 39 x 22 x 12 inches.

Inside the box is the SUP body, high-pressure dual-action pump, pressure gauge, roller backpack, cinch belt, removable blue race fin, breakdown paddle, instructions and repair kit with valve wrench, fin plate and patch material (no glue) – as well as a bonus 12-volt car pump. Once rolled up, the SUP board and pumps fit into the backpack, as well as the paddle.
Weight is 35.5 lbs for backpack, board, paddle and pump, which all easily fit in the back of a small car. The board alone is 23 lbs, while the pump is 2.5 lbs, the paddle is 2.35 lbs and the backpack 5.4 lbs.

For your first set up, remove and unroll the SUP body. Lay it out face up so that you can access the military valve.

The Hala Rival Nass 12’0″ utilizes one spring-loaded military valve for inflation. These are very simple to use and feature an inflate mode (spring plunger is UP) and a deflate mode (spring plunger is DOWN). By using your finger to gently push on the plunger, it can be moved to the inflate mode (air goes in and doesn’t come back out) and deflate mode (air goes in and comes back out). Before you go to all the effort of inflating the board, PLEASE make sure the plunger is in the inflate position.
If using only the dual action pump, you will pump up the board in the UP (inflate mode) position.

If you are near your vehicle, you can start off with the included 12-volt car pump, which uses a slightly different process. Insert the cord into the car power point, and then extend the

Original Source: AirKayaks >>

Product Review: New Hi-Pressure Sport DS™ Inflatable Kayak from Advanced Elements

Earlier this spring, our first shipment of the new AdvancedFrame Sport DS arrived in port, becoming the fourth addition to the popular Advanced Elements DS series* of high pressure inflatable kayaks.
Manufactured by Advanced Elements exclusively for AirKayaks.com, the new Sport DS features the same footprint as the current low-pressure AE1017 Sport, but with high-pressure floor and upgraded accessories for added comfort and performance.

Following are details on the AdvancedFrame Sport DS AE1017DS, a 10’5″ hi-pressure inflatable weighing in at roughly 28 lbs with an MSRP of $499. (Please note: some of this will be repeated from prior reviews.)
Getting Started with the AdvancedFrame Sport DS Kayak
The box as received weighs 36 lbs, measuring 31 x 18 x 11 inches.

Inside, the rugged carrying case measures 33 x 19 x 11 inches, and houses the kayak body, high-backed lumbar seat, high pressure floor, repair kit, double action pump, gauge and instructions. The kayak and pump in the case weighs 30 lbs, while the kayak and seat alone are 28 lbs. The case has just enough room to include a breakdown paddle (not included). AirKayaks note: Take a good look at how the kayak is folded BEFORE setting up, this will help during breakdown.
AdvancedFrame Sport DS Kayak Setup/Inflation
The instructions are located in a small plastic pocket inside the carrying case. The manual included is for the standard low-pressure Sport, with an additional sheet on using the high-pressure DS floor. The inflation procedure is similar for both versions of the Sport, with the one difference the floor inflation pressure of 4-6 PSI for the dropstitch floor.

Additionally, a short version of the DS inflation can be found on the tag attached to the rear carrying handle.
First step, unfold the kayak. The AdvancedFrame Sport DS – along with all AdvancedFrame models – features an “inner rib” in the bow and stern, which is basically a u-shaped aluminum rib, about a foot long and one-half inch wide.

This comes “pre-assembled” meaning it arrives already inserted into two sleeves inside the kayak cover. Unless you remove the inner bladder, they remain in position. When the kayak is pumped up, the inner bladder with rib presses against the kayak cover – that, in conjunction with two bow and stern plastic sheets, give the kayak a sharp silhouette which aids in slicing through the water.

The kayak features 5 inflation chambers – two military valves and 3 twist-loks. The military-style plunger valves are simple to use – twist up to inflate (this is the closed position where air goes in and doesn’t come out) and down to deflate (air goes in and comes back out).

The pump comes with a screw-on adaptor for the main chamber, but a standard Boston valve adaptor will friction fit

Original Source: AirKayaks >>