Tag Archives: inflatable kayak reviews

Product Review: New Innova Seawave Inflatable Touring Kayak for 1-3 paddlers

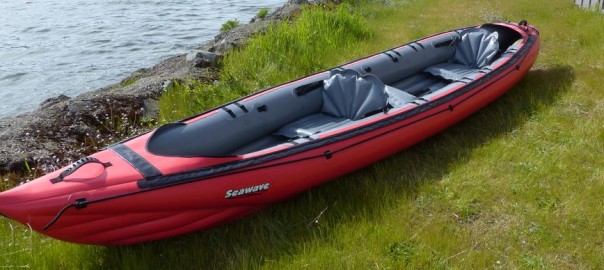
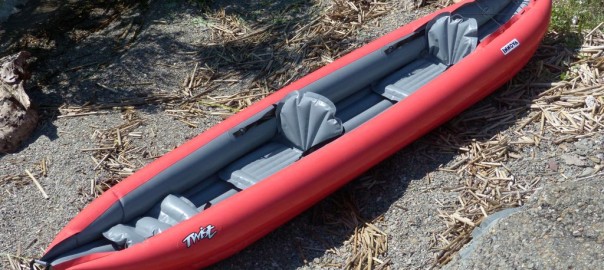
This past week we had the opportunity to take our first look at the Innova Seawave inflatable kayak – a two+ person kayak with a versatile design that allows one to attach optional spray decks, spray skirts and a foot rudder system.

The Innova line is unique for a number of reasons. First, all the kayaks are handmade in the Czech Republic; the factory has manufactured inflatable boats for well over 50 years. In Europe, a similar line is marketed under the name Gumotex.
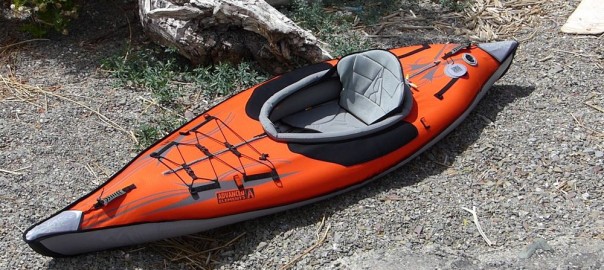
We previously published our review on the new Solar 410C, Innova’s other 2+ person inflatable introduced into the US market simultaneously. So here is our write-up on the the Innova Seawave inflatable tandem kayak, which weighs 44 lbs in the pack, is 15 feet in length with a payload of 551 lbs for two+ persons and gear. (Please note: some of the information will be duplicated from other Innova reviews).
Getting Started with the Innova Seawave
The box as received weighs in at 48 lbs, measuring 27 x 18.5 x 12.5 inches.

Inside is a very nifty 100L backpack with adjustable shoulder straps, front pouch pocket and roll top closure. This contains the kayak body, tracking fin, foot rests, repair kit, instructions, cinch belt, valve adaptor, seats and sponge. Packed dimensions are 24 x 17 x 12 inches as received in the bag, with a weight of 44 lbs. The kayak with seats and foot rests is 41 lbs. (Please note: This is the actual kayak weight, NOT the 29 lbs as stated from the manufacturer’s literature.)
Innova Seawave Kayak Setup/Inflatation
We read through the included instruction manuals. Just like all the other Innova  products, the Innova Seawave manual is surprisingly detailed in some aspects, while lacking in others. As the kayaks are made in Europe, many of the details are based around European specs and regulations and can sound more complicated than it actually is. Additionally, some of the translations are a bit difficult to understand.

First step, unpack and unfold the kayak body. What is immediately noticeable is how FLAT the kayak is when deflated – of course, this makes it quite compact for travel.

Next, flip the kayak over to install the tracking fin before inflation, locating the fin “shoe” towards the stern. Slip the end with the larger slot in first, making sure that the fin is pointing towards the “back” of the kayak. This enables it to slide in enough to fit in the second side.

The instructions suggest attaching and inflating the foot braces and seats first, though these actually come pre-attached from the factory. (If they are not attached, start with the foot braces. There are five buckles on the floor – when paddling tandem, use the 1st and

Original Source: AirKayaks >>

Product Review: Aire Tributary Strike Solo Inflatable Kayak

We recently posted our first review on Aire’s Tributary inflatable kayak product-line. The Tributary models – which are made overseas – offer great value for those on a budget or unwilling to make a large investment; these include the Strikes, Sawtooth and Tomcat kayaks as well as several rafts.

This week we had the first opportunity to take out the Aire Tributary Strike 1, a 10 foot 3-inch one-person inflatable with a price of $799. The Strike is billed as a crossover kayak, capable of spanning calm water to rapids. Please note, some of this may be repeated from other write-ups.
Aire Tributary Strike I Inflatable Kayak: Getting Started
The box as received measures 29 x 16 x 13 inches, weighing in at 33 lbs.

Inside is the Strike body, one Cheetah seat, flip strap, instructions and repair kit with adaptor, adaptor tube, wrench and patch material (including some TearAid). The Strike does not come with a carrying case. The body alone weighs 26 lbs, or 29.5 lbs with the seat. The folded body measures roughly 28 x 15 x 12 inches.
Aire Tributary Strike Setup/Inflatation

We read through the included instruction manual. First step, unfold the kayak body. Then pump up tthe main chambers until softly filled.

The Aire Tributary Strike features three main inflation chambers utilizing Summit II military valves – one for the floor and one for each side. The military-style plunger valve is simple to use – with your finger, twist the plunger slightly to the “up” position to inflate (air goes in but doesn’t come back out) and “down” to deflate (air comes out). Please note – the military valve push pins can sometimes deceptively look as if they are UP when actually in the deflate mode. When this happens, as soon as you remove the pump adaptor all the air will swoosh out. So, make sure they are truly popped up. On the positive side, this is so easy to pump up, it’s not a big issue.
Unlike many kayaks, the Aire Tributary Strike has two main inflation valves at opposite sides of the kayak – one on the upper rear right and one on the upper bow left.

Locate the military valve adaptor in the repair kit. The Strike does not come with a pump, but the adaptor allows one to use the Boston valve conical adaptor found on most pumps. To couple the Strike adaptor with the Boston valve adaptor, Aire has included a two-inch clear plastic tube. Insert the end of the Strike adaptor into one side of the clear tube, and then insert the Boston valve adaptor onto the other side via friction fit. Lock the Aire adaptor onto the military valve with a slight twist. Since the Strike

Original Source: AirKayaks >>

Product Review: Aire Tributary Sawtooth Inflatable Tandem Kayak

Well-known in the paddling world for top-notch quality, Aire has been manufacturing high-end inflatable rafts and kayaks out of their plant in Idaho for over 25 years ago. With the increased interest in inflatables, Aire introduced their Tributary line, an economical version made overseas, nearly 14 years ago. The Tributary models offer great value for those on a budget or unwilling to make a large investment; these include the Strikes, Sawtooth and Tomcat kayaks as well as several rafts.

This week we had the first opportunity to take out the Aire Tributary Sawtooth, a 13 foot 3-inch two-person inflatable weighing 35 lbs with a price of $749.
Aire Tributary Sawtooth Inflatable Tandem Kayak: Getting Started
The box as received measures 25 x 22 x 12 inches, weighing in at 40 lbs.

Inside is the Sawtooth body, two inflatable seats, removable tracking fin, instructions and repair kit with adaptor, adaptor tube, wrench and patch material (including some TearAid) but does not come with a carrying case.The Sawtooth body alone weighs 31 lbs; each seat weighs 1.7 lbs for a total of 35 lbs with fin. The folded body measures roughly 26 x 18 x 10 inches.
Aire Tributary Sawtooth 2 Setup/Inflatation

We read through the included instruction manual. First step, unfold the kayak body. Then pump up the main chambers until softly filled.

The Aire Tributary Sawtooth features three main inflation chambers utilizing Summit II military valves – one for the floor and one for each side. The military-style plunger valve is simple to use – with your finger, twist the plunger slightly to the “up” position to inflate (air goes in but doesn’t come back out) and “down” to deflate (air comes out). Please note – the military valve push pins can sometimes deceptively look as if they are UP when actually in the deflate mode. When this happens, as soon as you remove the pump adaptor all the air will swoosh out. So, make sure they are truly popped up. On the positive side, this is so easy to pump up, it’s not a big issue.

Locate the military valve adaptor in the repair kit. The Sawtooth does not come with a pump, but the adaptor allows one to use the Boston valve conical adaptor found on most pumps. To couple the Sawtooth adaptor with the Boston valve adaptor, Aire has included a two-inch clear plastic tube. Insert the end of the Sawtooth adaptor into one side of the clear tube, and then insert the Boston valve adaptor onto the other side, via friction fit. Lock the Aire adaptor onto the military valve with a slight twist. Since the Sawtooth main chambers are inflated to 2.5 PSI, it is helpful to use a pump with pressure gauge

Original Source: AirKayaks >>

Guide to Choosing Your AdvancedFrame or Sport Inflatable Kayak from Advanced Elements

We recently reviewed two of the popular Advanced Elements inflatable kayaks – the AE1012 AdvancedFrame and AE1017 Sport – which had undergone a series of upgrades.
The AdvancedFrame (rear) next to the Sport (bottom).
First introduced in 2002 as the AirFrame, the AdvancedFrame has evolved over the past 15 years into one of Advanced Elements most popular models, well-known as an excellent value for performance, quality and price. This was followed by the Sport in 2009, loosely modeled after its big brother but without all the “bells and whistles.”
One of the most commonly asked questions is – which one is right for me? Below we have compiled a list of similarities and differences to help guide you in making that personal decision.
What’s the same in both kayaks?

Both kayaks are constructed from the same same diamond ripstop, hull material and PVC i-beam floor construction with 1 PSI pressure relief valve. Each has the same molded rubber handles, high-backed seat, inflation valves, rear d-rings, tracking fin and landing plate. Both have the same aluminum rib inserts, plastic sleeve inserts, deck lifts, similar neoprene knuckle guards and velcro paddle holders. The basic footprint – length and width – are roughly the same at 10′ 4 inches by roughly 32-33 inches wide with interior dimensions roughly the same at 63-65 x 17.
So what’s different?
While there are many items that are similar, the AE1017 Sport is a stripped-down, simpler version of the AE1012 AdvancedFrame.
The Sport (bottom) has a wider cockpit opening and can not use a spray skirt.
The Sport features one main inflation chamber and three twistloks (floor valve, and two deck lifts). The Sport has a thin, non-inflatable coaming lip around the cockpit which will not accept a spray skirt. The top decks do not zipper open. The cockpit opening is a generous 44 x 19 inches. The bungee deck lacing area is about half the size in the Sport, with less d-rings. By removing some of the features and enlarging the deck opening, the weight is a lighter 26 lbs for kayak and seat, or 28 lbs in the carrying case. The carrying capacity is slightly lower at 250 lbs person and gear (235 lbs person). MSRP is slightly less at $449 ($399 street price). Most of the standard accessories – inflatable foot brace, backbone, high-pressure floor, advancedtrak rudder, accessory frame, lumbar seat, durafloor – will work with the Sport.
The AdvancedFrame (top) has more gear attachment points.
The AE1012 AdvancedFrame features two main inflation chambers and five twistloks (floor, decklifts and coaming tubes). The AdvancedFrame has a more enclosed cockpit measuring 32 x 17 inches with zippers on both front and rear decks. The front deck can be zipped open 24 inches for easier entry, or

Original Source: AirKayaks >>

Product Review: Newly Updated AE1017 Sport Inflatable Kayak from Advanced Elements

In late spring 2016, we received our first shipments of the newly updated AE1017 Advanced Elements AdvancedFrame Sport inflatable kayak – a stripped-down classic blending performance, price and simplicity. The kayaks now feature an integrated 1-PSI pressure relief valve in the floor bladder, enhanced high-backed seating, beefed-up graphics and redesigned hardware.

At that point we realized our previous write-up was several years ago and featured the Gen 1 version. So, we took the opportunity to also update our readers with details on the newly updated AdvancedFrame Sport AE1017, a 10’5″ inflatable weighing in at roughly 26 lbs with an MSRP of $449. (Please note: some of this will be repeated from prior reviews.)
Getting Started with the AdvancedFrame Sport Kayak
The box as received weighs 34.4 lbs, measuring 32 x 18 x 11 inches.

Inside, the rugged carrying case measures 30 x 18 x 10 inches, and houses the kayak body, seat, repair kit and instructions. The kayak folded size is approximately 30 x17 x 10 inches. The kayak body and seat in the case weighs 28 lbs, while the kayak and seat alone are 26 lbs. The case has just enough room to include a small pump and breakdown paddle (not included).  AirKayaks note: Take a good look at how the kayak is folded BEFORE setting up, this will help during breakdown. The instructions are located in a small plastic pocket inside the carrying case.
AdvancedFrame Sport Kayak Setup/Inflation
We re-acquainted ourselves with the kayak by reading the updated manual. This, too, has evolved over the years and gives excellent explanations on inflation, usage, refolding, etc.

First step, unfold the kayak. The AdvancedFrame Sport – along with all AdvancedFrame models – features an “inner rib” in the bow and stern, which is basically a u-shaped aluminum rib, about a foot long and one-half inch wide.

This comes “pre-assembled” meaning it arrives already inserted into two sleeves inside the kayak cover. Unless you remove the inner bladder, they remain in position. When the kayak is pumped up, the inner bladder with rib presses against the kayak cover – that, in conjunction with two bow and stern plastic sheets, give the kayak a sharp silhouette which aids in slicing through the water.

The kayak features 4 inflation chambers – one military valve and 3 twist-loks. The military-style plunger valves are simple to use – twist up to inflate (this is the closed position where air goes in and doesn’t come out) and down to deflate (air goes in and comes back out).

The kayak comes with a screw-on adaptor (found in the repair kit in the mesh pocket behind the seat) which will fit some pumps based on the hose fittings. Otherwise, a standard Boston valve adaptor will friction fit into

Original Source: AirKayaks >>

Product Review: Updated AE1012 AdvancedFrame Inflatable Kayak from Advanced Elements

We recently received our first shipments of the newly updated AE1012 Advanced Elements AdvancedFrame inflatable kayak – a classic model blending performance, price and portability. Having paddled the AdvancedFrame through all iterations since 2002, we were interested to see some of the fine-tuned enhancements.

In 2015, Advanced Elements began a factory expansion, moving the production line to Indonesia. While plant construction was completed in the fall of 2015, the reopening took longer than anticipated, causing delays in spring 2016 production for several models. Despite stockpiling, huge customer demand caused the AdvancedFrame to be out of stock for nearly a year.
In late spring 2016, the first shipment of AdvancedFrame inflatable kayaks sailed into port, now featuring an integrated 1-PSI pressure relief valve in the floor bladder, enhanced high-backed seating, redesigned hardware and the addition of velcro paddle holders.
As our previous write-up was several years ago, we took the opportunity to also update our readers with details on the newly updated AdvancedFrame AE1012, a 10’5″ inflatable weighing in at roughly 34 to 35 lbs with an MSRP of $539. (Please note: some of this will be repeated from prior reviews.)
Getting Started with the AdvancedFrame Kayak

The box as received weighs 41 lbs, measuring 32 x 19 x 11 inches. Inside, the rugged carrying case measures 32 x 18 x 10 inches, and houses the kayak body, seat, repair kit and instructions. The kayak folded size is approximately 30 x17 x 10 inches. The case has just enough room to include a small pump and breakdown paddle (not included). AirKayaks note: Take a good look at how the kayak is folded BEFORE setting up, this will help during breakdown.
AdvancedFrame Kayak Setup/Inflation
We re-acquainted ourselves with the kayak by reading the updated manual. This, too, has evolved over the years and gives excellent explanations on inflation, usage, refolding, etc.

First step, unfold the kayak. The AdvancedFrame features an “inner rib” in the bow and stern, which is basically a u-shaped aluminum rib, about a foot long and one-half inch wide.

This comes “pre-assembled” meaning it arrives already inserted into two sleeves inside the kayak cover. Unless you remove the inner bladder, they remain in position. When the kayak is pumped up, the inner bladder with rib presses against the kayak cover – that, in conjunction with two bow and stern plastic sheets, give the kayak a sharp silhouette which aids in slicing through the water.

The kayak features 7 inflation chambers – two military valves and 5 twist-loks. The military-style plunger valves are simple to use – twist one way to inflate and the other to deflate.

The kayak comes with a screw-on adaptor (found in the repair kit in the mesh pocket behind the seat) which will fit some pumps

Original Source: AirKayaks >>

Product Review: New Innova Twist LN Inflatable Kayak – only 18 lbs.

As mentioned in prior posts, we received our first shipment of the newly-updated Innova Twist and Swing inflatable kayaks for 2016.
Made in the Czech Republic, the Twist and Swing models are now constructed from Light Nitrilon (LN), a lighterweight version of the rugged material used in the traditional Innova Sunny, Helios and Safari models. Light Nitrilon is known for making the kayaks more rigid as well as water and abrasion resistant, without substantially increasing weight. It’s also PVC-free, thus environmentally friendly.

New features also include improved seating and beefed up foot brace. The new seating arrangement is removable and inflatable, making it easier to reposition the paddling location, optimizing paddling performance and comfort.
This week we had the first opportunity to take out the  revamped Innova Twist LN, an 8 foot 6-inch inflatable weighing a mere 18 lbs (including seat and foot brace) with a selling price of $449.
Please note: Some of this information will be repeated from prior write-ups.
Innova Twist: Getting Started
The box as received measures 22 x 16 x 10 inches, weighing in at 20 lbs.

Inside is the Twist LN body, cinch strap, multiple instruction sheets, tracking fin, foot rest, repair kit, seat, bilge sponge and valve adaptor. The Twist LN body with seat and brace weighs 18 lbs with a folded size of 20 x 15 x 78. AirKayaks note: While the instructions say the Twist LN comes with a drawstring carrying sack, these were not included in the first shipments. The bags are currently being shipped over and will be added to the boxes.
Innova Twist Setup/Inflatation
We read through the included instruction manuals. As with all the Innova manuals to date, the instructions are quite detailed – there is one instruction sheet for fin installation, one for utilizing the valves, and another on the kayak in general. Most include IKEA-style graphics which are occasionally just short of a brain twister, and while some steps are dauntingly detailed, some are not mentioned.  As the kayaks are made in Europe, many of the details are based around European specs and regulations.

First step, unpack and unfold the kayak body. What is immediately noticeable is how FLAT the kayak is when deflated.

Install the tracking fin before inflating the kayak. The Twist LN utilizes a single fin with double slots. Slip the end with the larger slot in first, making sure that the fin is pointing towards the “back” of the kayak. This enables it to slide in enough to fit in the second slot.

While the first time can be a struggle to get the back side into position, after a couple of rounds it becomes quite easy. Pull up on the fin to ensure you have a good fit.
Attach the foot brace (this

Original Source: AirKayaks >>

Product Review: New Innova Swing 1 LN High-Pressure PVC-Free Inflatable Kayak

In May we received our first shipment of the newly-updated Innova Twist LN and Swing LN inflatable kayaks for 2016. Made in the Czech Republic, the new Twist and Swing models are now constructed from Light Nitrilon (LN), a lighterweight version of the rugged material used in the traditional Innova Sunny, Helios and Safari models. Light Nitrilon is known for making the kayaks more rigid as well as water and abrasion resistant, without substantially increasing weight. It’s also PVC-free, thus environmentally friendly.

Other new features on the Swing LN include an improved coaming area which can take optional redesigned spray skirts.
This week we had the first opportunity to take out the revamped Innova Swing I LN, a 10 foot 4-inch one-person inflatable weighing a mere 22 lbs (including seat and foot brace) with a selling price of $599.
Please note: Some of this information will be repeated from prior write-ups.
Getting Started with the Innova Swing I LN Inflatable Kayak
The box as received weighs 26 lbs with dimensions of 29 x 16 x 12 inches.

Inside is the Swing I LN body – neatly folded with a cinch strap – multiple instruction sheets, 2 metal insertion bars, tracking fin, seat, foot rest, repair kit, sponge, and valve adaptor. At 23 lbs for the combined package with accessories, and a folded size of 25 x 16 x 11 inches, the Swing I LN is small enough to fit inside plane overhead cargo bins.
Innova Swing LN Setup/Inflation
The main instruction manual covers set-up for both the Swing I LN and Swing II LN kayaks, thus there will be overlap in both of our write-ups. As with all the Innova manuals to-date, the instructions are quite detailed – there is one instruction sheet for fin installation, one for utilizing the valves, and another on the kayak in general; the Swing has added instructions detailing the “insertion bars.” Most include IKEA-style graphics which are occasionally mind-boggling and while some steps are dauntingly detailed, some are not mentioned.  As the kayaks are made in Europe, many of the details are based around European specs and regulations.

First step, unpack and unfold the kayak body. What is immediately noticeable is how FLAT the kayak is when deflated. Ascertain which is the bow and which is the stern; while the instruction manual says the stern has the Innova logo, the logo and the floor valves are located at the front of the kayak.

Install the tracking fin before inflating the kayak. The Swing I LN utilizes a single fin with double slots.

Slip the end with the larger slot in first, making sure that the fin is pointing towards the “back” of the kayak. This enables it to slide in enough to fit in the

Original Source: AirKayaks >>

Product Review: AquaGlide Blackfoot HB Angler XL Inflatable Kayak for 1 or 2 Paddlers

We continue with our series on the new AquaGlide line of inflatable kayaks, specifically the fishing models. We previously reviewed the new high pressure Blackfoot HB Angler SL single-person inflatable kayak followed by the 11-0 Blackfoot Angler Inflatable Paddle Board. We now turn to the Blackfoot HB Angler XL – an elongated 13-foot version which can be set up as the ultimate one-person fishing machine, but can easily switch to a two-person model by adding an optional seat.

Please note, some of this will be repeated from other reviews.
Getting Started with the AquaGlide Blackfoot HB Angler XL:
We unpacked the box and laid out the pieces – inflatable kayak, backpack, instructions, repair kit, foot brace, tracking fin, visor lift, booster seat, adaptor, fishing cooler with rod holders and Core seat.

Initial measurements showed the kayak body with bolster weighs 31.75 lbs while the kayak with seat, fin and brace in the backpack (everything but the cooler) weighs 37.4 lbs. Backpack size (filled) is roughly 27 x 20 x 14 inches. The fishing cooler weighs an additional 3.25 lbs and flattens to 20 x 13 x 3 inches; we did manage to fit it into the backpack. Boxed up, the entire package dimensions are 24 x 20 x 14 inches with a shipping weight of 48 lbs.
(AirKayaks Side note #1: When initially removing the kayak from the carrying case, take a good look at how the kayak is folded. This is probably the most overlooked step and it is VERY helpful when trying to get the kayak back into the bag.)
The included instructions are adequate and include diagrams with inflation details.

Set up is straight-forward and simple  – unpack, unfold, inflate.
There are three inflation chambers utilizing high-pressure military valves – the two side chambers and the floor. The floor is pumped up first.

The military-style plunger valve is simple to use – with your finger, twist the plunger slightly to the “up” position to inflate (air goes in but doesn’t come back out) and “down” to deflate (air comes out).

The Blackfoot HB XL valves require a military valve adaptor, which does not come with most standard pumps. The adaptor was located inside the repair kit.  Friction fit the military valve adaptor onto the Boston valve adaptor (slightly conical-shaped nozzle), then lock onto the military valve with a slight twist. Since the chambers are inflated from 3 to 12 PSI, it is helpful to use a pump with pressure gauge to ensure the kayak is inflated appropriately.
Here we had our first issue – we could not get the adaptor to couple to the valve. From past experience, we found this could be two things. One, the o-ring can be very stiff initially or two, there is such

Original Source: AirKayaks >>

Product Review: New Innova Twist II LN Inflatable Tandem Kayak

In May we received our first shipment of the newly-updated Innova Twist and Swing inflatable kayaks for 2016. Made in the Czech Republic, the Twist and Swing models are now constructed from Light Nitrilon (LN), a lighterweight version of the rugged material used in the traditional Innova Sunny, Helios and Safari models. Light Nitrilon is known for making the kayaks more rigid as well as water and abrasion resistant, without substantially increasing weight. It’s also PVC-free, thus environmentally friendly.

New features also include improved seating and beefed up foot brace. The new seating arrangement is removable and inflatable, making it easier to reposition the paddling locations, optimizing paddling performance and comfort.
This week we had the first opportunity to take out the  revamped Innova Twist II LN, an 11 foot 10-inch two-person inflatable weighing a mere 26 lbs (including seats and foot brace) with a selling price of $549.
Please note: Some of this information will be repeated from prior write-ups.
Innova Twist II: Getting Started
The box as received measures 21.5 x 16 x 10 inches, weighing in at 28.5 lbs.

Inside is the Twist II LN body, cinch strap, multiple instruction sheets, tracking fin, foot rest, repair kit, two seats, bilge sponge and valve adaptor. The Twist II LN body with seats and brace weighs 26 lbs with a folded size of 20 x 15 x 8. AirKayaks note: While the instructions say the Twist II LN comes with a drawstring carrying sack, these were not included in the first shipments. The bags are currently being shipped over and will be added to the boxes.
Innova Twist 2 Setup/Inflatation
We read through the included instruction manuals. As with all the Innova manuals to date, the instructions are quite detailed – there is one instruction sheet for fin installation, one for utilizing the valves, and another on the kayak in general. Most include IKEA-style graphics which are occasionally just short of a brain twister, and while some steps are dauntingly detailed, some are not mentioned.  As the kayaks are made in Europe, many of the details are based around European specs and regulations.

First step, unpack and unfold the kayak body. What is immediately noticeable is how FLAT the kayak is when deflated.

Install the tracking fin before inflating the kayak. The Twist II LN utilizes a single fin with double slots. Slip the end with the larger slot in first, making sure that the fin is pointing towards the “back” of the kayak. This enables it to slide in enough to fit in the second slot. While the first time can be a struggle to get the back side into position, after a couple of rounds it becomes quite easy. Pull up on the fin to ensure you

Original Source: AirKayaks >>