Tag Archives: inflatable kayak reviews

Considering an Inflatable Kayak? Find out more

No room for a hardshell or too much of a hassle? Inflatable kayaks are easy to set up, lightweight, portable and fun! Get on the water fast with an air kayak for one, two or more paddlers.

See also our Guide to Choosing an Inflatable Kayak – What You Should Consider.
For detailed information on specific inflatable kayaks and manufacturers, visit the website at AirKayaks.com

Original Source: AirKayaks >>

New Video: Advanced Elements AdvancedFrame DS-XL Inflatable Kayak

Our most recent video on the new AE1044DS – the AdvancedFrame DS-XL from Advanced Elements. Now 5 inches longer than the standard AdvancedFrame with minimal increase in weight. The streamlined body – in conjunction with the high pressure floor – provides better tracking and increased glide.  See video details on performance, setup and features.

An AirKayaks exclusive! For more details, visit the AdvancedFrame DS-XL product page on AirKayaks.com. You can also see our Detailed Product Review on our blog.

Original Source: AirKayaks >>

Product Review: New AE1044 AdvancedFrame DS-XL Inflatable Kayak from Advanced Elements

We continue with our reviews on the new Advanced Elements AE1044DS™ series of kayaks.
As previously mentioned, two years ago, AirKayaks introduced the specially-packaged, high-pressure AdvancedFrame DS series™ of kayaks from Advanced Elements. Featuring the same high quality construction and materials as the standard AE1012 AdvancedFrame and AE1007 Convertible, the DS Series™ was bundled with upgraded accessories to enhance performance and comfort.

This past year, AirKayaks worked with the designers at Advanced Elements, to introduce the next generation in the DS Series – the AdvancedFrame AE1044 DS-XL™* and DS-XLC™*.
The new DS-XL series is an elongated version of the classic AE1012 AdvancedFrame. With an additional 5 inches in length and an adjustable foot peg, the kayaks are comfortable enough for both taller and smaller paddlers. The longer, streamlined body – in conjunction with the high pressure floor – provides better tracking, higher payload capacity and increased glide with minimal increase in weight.
We grabbed two from the limited supply that initially arrived. Our first review focused on the AE1044 AdvancedFrame DS-XLC (Cover). The XLC kayak features a zip-on deck with storage options, allowing paddlers the flexibility of paddling an open style design for easy entry, or a closed deck design which can take an optional spray skirt.

We now turn to the AdvancedFrame AE1044DS-XL, a 10′ 10″ inflatable with fixed deck, weighing in at 35 lbs. in the carrying case. Please note, some of this information will be repeated from previous writeups.
AdvancedFrame DS-XL Setup/Inflatation
We unpacked the boxes and laid out the pieces – inflatable kayak, carrying case, instructions, repair kit, foot brace, double action pump with gauge, and high-back lumbar seat.

The kayak with seat, floor and brace weighs 35 lbs, or 39 lbs in the bag with the pump. Bag measurements are approximately 32 x 19 x 10 inches. The kayak box as arrived weighs 40 lbs, measuring 33 x 21 x 10 inches. The dropstitch (DS) floor weighs 5 lbs and comes in a second box with adaptor – the DS floor utilizes the same repair kit as included with the kayak.
(AirKayaks Side note #1: When initially removing the kayak from the carrying case, take a good look at how the kayak is folded. This is probably the most overlooked step and it is VERY helpful when trying to get the kayak back into the bag.)
Set up is straight-forward and simple  – unpack, unfold, inflate. The DS XL Series will have two sets of instructions – one can be found in the inner side pocket of the carrying case. This details the basic kayak instructions for inflation, deflation and folding. A second set of instructions is included in the dropstitch floor repair kit package, and details the floor inflation. TIP: Attach the floor instructions

Original Source: AirKayaks >>

Product Review: New AE1044 AdvancedFrame DS-XLC Inflatable Kayak from Advanced Elements

Two years ago, AirKayaks introduced the specially-packaged, high-pressure AdvancedFrame DS series of kayaks from Advanced Elements. Featuring the same high quality construction and materials as the standard AE1012 AdvancedFrame and AE1007 Convertible, the DS Series™ was bundled with upgraded accessories to enhance performance and comfort.
The upgrades included:

AEDS High-pressure inflatable 4-6 PSI dropstitch floor for extreme rigidity
AE2011 Double action high-pressure 14 PSI handpump with pressure-gauge
AE2013HB High-back lumbar seat(s) for the ultimate in a comfortable, adjustable back rest.

The kayaks were wildly popular, and this past week, AirKayaks introduced the next generation in the DS Series – the AdvancedFrame AE1044 DS-XL™* and DS-XLC™*.
The new DS-XL series is an elongated version of the classic AE1012 AdvancedFrame. With an additional 5 inches in length and an adjustable foot peg, the kayaks are comfortable enough for both taller and smaller paddlers. The longer, streamlined body – in conjunction with the high pressure floor – provides better tracking and increased glide with minimal increase in weight.

We grabbed two from the limited supply that recently arrived – more are available in mid-September. Our first review focuses on the AE1044 AdvancedFrame DS-XLC (Cover). This kayak features a zip-on deck with storage options, allowing paddlers the flexibility of paddling an open style design for easy entry, or a closed deck design which can take an optional spray skirt.
So here are details on the AdvancedFrame AE1044 DS-XLC, a 10′ 10″ inflatable with zip-in cover, weighing in at 35 lbs. in the carrying case.
Setup/Inflatation

We unpacked the box and laid out the pieces – inflatable kayak, carrying case, instructions, repair kit, foot brace, double action pump with gauge, zip-on deck (installed on the kayak) and high-back lumbar seat. The kayak with seat, floor and brace weighs 35 lbs, or 39 lbs in the bag with the pump. Bag measurements are approximately 32 x 19 x 10 inches. The kayak box as arrived weighs 40 lbs, measuring 33 x 21 x 10 inches. The dropstitch (DS) floor weighs 5 lbs and comes in a second box with adaptor and repair kit.
(AirKayaks Side note #1: When initially removing the kayak from the carrying case, take a good look at how the kayak is folded. This is probably the most overlooked step and it is VERY helpful when trying to get the kayak back into the bag.)
Set up is straight-forward and simple  – unpack, unfold, inflate. As this is similar to the standard AdvancedFrame in many respects, we will re-copy much of the instructions found in the writeup on the standard AE1012. The DS XL Series will have two sets of instructions – one can be found in the inner side pocket of the carrying case. This details the basic kayak instructions for inflation, deflation and

Original Source: AirKayaks >>

Product Review: Island Voyage 2 Inflatable Kayak from Advanced Elements

This week we received our first shipment of the Island Voyage 2 inflatable kayak from Advanced Elements. New in 2015, the Island Voyage 2 is a recreational model with an open-design – allowing one to easily switch from single to tandem paddling – yet economically-priced at $399.

Following is our writeup on the Island Voyage 2, an 11 ft 2 inch kayak. Please note, some of this will be repeated from prior write-ups.
Getting Started with the Island Voyage 2
We unpacked the box and laid out the pieces – inflatable kayak, drawstring duffel bag, instructions, repair kit, tracking fin and two seats.

Initial measurements showed the kayak body weighs 25 lbs while the kayak with seats in the duffle is 30 lbs. The drawstring case is roughly 37 x 28 inches. Boxed up, the dimensions are 25 x 19 x 14 inches inches with a shipping weight of 35 lbs.
(AirKayaks Side note #1: When initially removing the kayak from the carrying case, take a good look at how the kayak is folded This is probably the most overlooked step and it is VERY helpful when trying to get the kayak back into the bag.)
Island Voyage 2 Inflatation and Setup
The included instructions appear adequate and include diagrams with inflation details.

Set up is straight-forward and simple  – unpack, unfold, inflate.

The first step is to attach the removable tracking fin, which enhances paddling/tracking in deeper water. Make sure the fin is pointing towards the rear of the kayak, then insert the front of the fin, pushing down and back, to lock the front end. Then move the fin back until the holes line up, and replace the retaining pin. At this point, pull up on the fin to make sure you have it locked in position. AirKayaks side note #2: You may want to bring along a towel, as the fin and bottom hull of the kayak are black, and become quite burning in the sun.

There are three inflation chambers utilizing Boston valves – the floor and two side chambers. Boston valves are two-part, screw-on valves. The bottom portion is threaded onto the kayak, the top valve is screwed open for inflation and then tightened shut after inflation. Air is easily released by unscrewing the base connector. How does it work? A flap inside the valve opens when air is pumped into the kayak, and falls shut when not pumped so that air will not rush back out.
(AirKayaks Side note #3: The Boston valves have a tether that keeps the valve attached to the kayak, ensuring that the valves don’t get lost after deflating. Make sure this does not get in the way when screwing on the valve base, and the valve is not cross-threaded, or

Original Source: AirKayaks >>

Product Review: Chelan HB Two Inflatable Kayak from Aquaglide – for 1-2 paddlers

Last summer, AquaGlide unveiled their new inflatable kayak lineup for 2015, which included a series of new models and revamps. Based on the number of inquiries, we were anxious to try out the new Chelan HB high-pressure series.
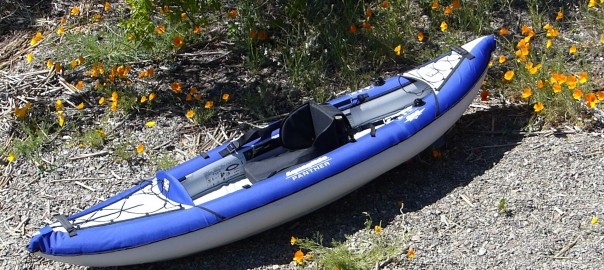
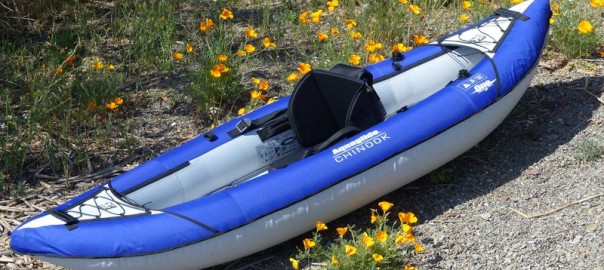
The new models arrived earlier this year, and we started inflating and testing, beginning with the Chelan HB Tandem XL and Chelan HB One. This was followed by the Columbia XP Tandem XL, Chinook One and Panther.

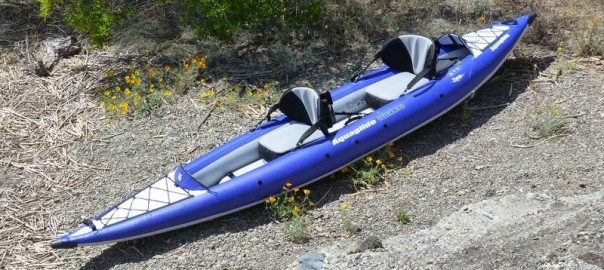
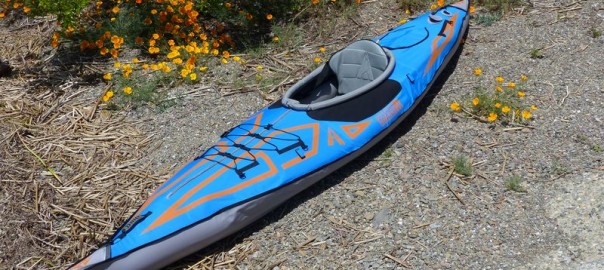
Our sixth 2015 review focuses on the Chelan HB Two, a 13.5 foot long inflatable kayak designed for one or two paddlers. At this time, we will point out that the AquaGlide kayak models are named after rivers in Washington State, and the river is pronounced “shuh-LAN.”
(Please note: some of the information will be repeated from other writeups.)
Getting Started with the Aquaglide Chelan HB Two:
We unpacked the box and laid out the pieces – inflatable kayak, backpack, instructions, repair kit, foot braces, tracking fin, two seats,  valve adaptor and two pieces of plastic.

Initial measurements showed the kayak body weighs approximately 27 lbs, with a backpack size of roughly 27 x 22 x 18 inches, while the kayak with seats, fin and braces – all in the backpack – weighs 38.5 lbs. Boxed up, the dimensions are 26 x 25 x 12 inches with a shipping weight of 46 lbs.
(AirKayaks Side note #1: When initially removing the kayak from the carrying case, take a good look at how the kayak is folded. This is probably the most overlooked step and it is VERY helpful when trying to get the kayak back into the bag.)
The included instructions appeared adequate and include diagrams with inflation details.

Set up is straight-forward and simple  – unpack, unfold, inflate.
There are three military valves (both sides and the floor) with two more small chambers utilizing twistlock valves for the seat bases – the floor is pumped up first, to 6 PSI.
The floor is held in place with two adjustable straps. From our prior experience, we found it best to loosen up the straps, otherwise the floor could be inflated “lopsided.”

The military-style plunger valve is simple to use – with your finger, twist the plunger slightly to the “up” position to inflate (air goes in but doesn’t come back out) and “down” to deflate (air comes out).
The Chelan HB Two military valves require a special adaptor, which does not come with most standard pumps. In Aquaglide’s first year, the military adaptors were not included with the high-pressure kayaks, which caused problems. All the 2015 high pressure models now include the adaptor, which is found in the repair kit.

The Aquaglide military adaptor couples to the valve with a Boston valve adaptor; this is a common fitting, slightly

Original Source: AirKayaks >>

Product Review: New Panther Compact Inflatable Kayak from Aquaglide

As mentioned in previous posts, Aquaglide, Inc of White Salmon, Washington has recently introduced several new inflatable kayaks for 2015. The Aquaglide kayak product line consists of 15 models with MSRP pricing from $199.95 to $1199.95.

Our first shipment included the new Panther inflatable kayak. Part of Aquaglide’s “pricepoint” series, the Panther is a cross between the Columbia XP One and Chinook One inflatable kayaks, scaled down for “smaller” people – both youth and adults.
Following is our writeup on the Panther, a 24-lb, 9 foot solo model selling for $349.
Getting Started with the AquaGlide Panther Inflatable Kayak
We unpacked the box and laid out the pieces – inflatable kayak, backpack, instructions, repair kit, tracking fin and seat.

Initial measurements showed the kayak body weighs 19 lbs, with a folded size of roughly 25 x 17 x 10 inches, while the kayak with seat in the drawstring sack weighs 24 lbs. Boxed up, the dimensions are 27 x 20 x 10 inches with a shipping weight of 29.5 lbs.
(AirKayaks Side note #1: When initially removing the kayak from the carrying case, take a good look at how the kayak is folded This is probably the most overlooked step and it is VERY helpful when trying to get the kayak back into the bag.)
AquaGlide Panther Inflatation and Setup:
The included instructions are adequate and include diagrams with inflation details.

Set up is straight-forward and simple  – unpack, unfold, inflate.

There are three inflation chambers utilizing Boston valves – the floor and two side chambers. Boston valves are two-part, screw-on valves. The bottom portion is threaded onto the kayak, the top valve is screwed open for inflation and then tightened shut after inflation. Air is easily released by unscrewing the base connector. How does it work? A flap inside the valve opens when air is pumped into the kayak, and falls shut when not pumped so that air will not rush back out.

According to the instructions, the floor is pumped up first, then the two side chambers. First, attach the Boston valves by screwing them onto the kayak.
(AirKayaks Side note #2: The Boston valves have a tether that keeps the valve attached to the kayak, ensuring that the valves don’t get lost after deflating. Make sure that the string does not get in the way when screwing on the valve base,and the valve is not cross-threaded, or you may have some air leakage.)

We pumped up the floor until firm (1.0 psi with slight give) using a standard double action hand pump – this took about 20 pumps.

We then pumped up each of the side chambers to 2 PSI – this was about 20 to 23 pumps each side – and screwed on the valve caps. (AirKayaks side note #3:

Original Source: AirKayaks >>

Product Review: New Chinook XP One Inflatable Kayak from Aquaglide

As mentioned in previous posts, Aquaglide, Inc of White Salmon, Washington has recently introduced several new inflatable kayaks for 2015. The Aquaglide product line consists of 15 models with MSRP pricing from $199.95 to $1199.95.

Our first shipment included the Chinook XP One. Part of Aquaglide’s “pricepoint” series, the Chinook kayaks are economically-priced recreational models, now in three sizes – 8.5, 10 and 13 feet.
Following is our writeup on the Chinook XP One, a 24-lb, 8.5 foot solo model selling for $349.
Getting Started with the Chinook XP One
We unpacked the box and laid out the pieces – inflatable kayak, drawstring duffel bag, instructions, repair kit, tracking fin and seat.

Initial measurements showed the kayak body weighs 21 lbs, with a folded size of roughly 23 x 17 x 8 inches, while the kayak with seat in the drawstring sack weighs 24 lbs. Boxed up, the dimensions are 24 x 21 x 12 inches with a shipping weight of 30 lbs.
(AirKayaks Side note #1: When initially removing the kayak from the carrying case, take a good look at how the kayak is folded This is probably the most overlooked step and it is VERY helpful when trying to get the kayak back into the bag.)
Chinook XP One Inflatation and Setup:
The included instructions are adequate and include diagrams with inflation details. Set up is straight-forward and simple  – unpack, unfold, inflate.

There are three inflation chambers utilizing Boston valves – the floor and two side chambers. Boston valves are two-part, screw-on valves. The bottom portion is threaded onto the kayak, the top valve is screwed open for inflation and then tightened shut after inflation. Air is easily released by unscrewing the base connector. How does it work? A flap inside the valve opens when air is pumped into the kayak, and falls shut when not pumped so that air will not rush back out.

According to the instructions, the floor is pumped up first, then the two side chambers. First, attach the Boston valves by screwing them onto the kayak.
(AirKayaks Side note #2: The Boston valves have a tether that keeps the valve attached to the kayak, ensuring that the valves don’t get lost after deflating. Make sure that the string does not get in the way when screwing on the valve base,and the valve is not cross-threaded, or you may have some air leakage.)

We pumped up the floor until firm (1.0 psi with slight give) using a standard double action hand pump – this took about 20 pumps.

We then pumped up each of the side chambers to 2 PSI – this was about 35 pumps each side – and screwed on the valve caps. (AirKayaks side note #3: If using a pressure gauge, please note

Original Source: AirKayaks >>

New Limited Edition AdvancedFrame LTD Inflatable Kayak from Advanced Elements

As mentioned in prior posts, Advanced Elements of Benicia, California, unveiled two 2015 limited edition inflatable kayak models at last summer’s Outdoor Retailer Show.

The new 10.5 ft limited edition AE1012-LTD AdvancedFrame LTD touring kayak is in transit and scheduled to be available May 15th.
The AdvancedFrame LTD features a major color redesign, as well as some updated design changes. Now in a Hi-Vis lime green with yellow graphics, the AdvancedFrame LTD sports a sleek silhouette with improved seating. A high-backed, rigid seat for added comfort and support is standard in the limited edition model.
Velcro paddle holders are now included as well as new d-rings, making it easier to attach gear.
An integrated “pressure relief valve” ensures the floor is not over-inflated. Set at 1 PSI, the relief valve releases enough air to maintain 1 PSI when pumping it up, or if left in the hot sun.

Street price is $499. For more details or to purchase, visit the AdvancedFrame LTD product page at AirKayaks.com

The larger Expedition LTD – a 13 foot touring model selling for $679 – is currently available. For more info see the Expedition LTD product page at AirKayaks.com. You can also see our Detailed Writeup with Photos on the Expedition LTD from Advanced Elements.

Original Source: AirKayaks >>

Product Review: The Limited Edition Expedition LTD Inflatable Kayak from Advanced Elements

Last summer we were able to get a sneak preview of the new Limited Edition Expedition LTD inflatable kayak from Advanced Elements. As long-time fans of the current yellow model, we were impressed with the LTD’s spiffed up graphics and feature enhancements.

Last week, the AE1009LTD hit the West Coast, and we managed to grab one before our first shipment sold out – not to worry, we picked up more.  Here are details on the Expedition LTD AE1009LTD, a 13 foot inflatable weighing in at roughly 42 lbs.
Getting Started with the Expedition LTD LTD Inflatable Kayak
The box as received measures 33 x 21 x 11 inches with a weight of 52 lbs. Inside is a rugged carrying case measuring 37 x 17 x 9 inches (seam to seam) which contains the kayak body, high-backed seat, aluminum riser, repair kit, foot brace and instructions.

The kayak folded size is approximately 31 x16 x 10 inches leaving just enough room to store a pump and breakdown paddle (not included).
The included manual features the current Expedition – set up is pretty much the same – so we will re-copy some of the instructions written in our initial Expedition write-up.

First step, unfold the kayak. The Expedition LTD features an “inner rib” in the bow and stern, which is basically a u-shaped aluminum rib, about one foot long and one-half inch wide.

This comes “pre-assembled” meaning it arrives already inserted into two sleeves inside the kayak cover. Unless you remove the inner bladder, they remain in position. When the kayak is pumped up, the inner bladder with rib presses against the kayak cover – that, in conjunction with two bow and stern plastic sheets, give the kayak a sharp silhouette which aids in slicing through the water.
The Expedition LTD kayak features 9 inflation chambers – two military valves (main chambers) and 7 smaller twist-loks (deck lifts, floor and coaming tubes).
Each Expedition LTD comes with a screw-on adaptor (found in the repair kit in the mesh pocket behind the seat) which locks onto many pumps with pin/slot hose fittings. Additionally, a standard Boston valve adaptor will friction fit into the opening.

First step, open the military valve. The military-style plunger valves are simple to use – twist one way to inflate (UP position) and the other to deflate (DOWN position).

Attach the screw-on adaptor to your pump and then couple it to the first main chamber, located on the rear hull. While there is not a pressure gauge included with the kayak, the adaptor features a “lip” that pushes open the spring plunger, allowing a pump gauge to read the back-pressure; if using the Boston valve adaptor, most gauges will only register as you are inflating.

Pump up the first chamber until

Original Source: AirKayaks >>