Tag Archives: Inflatable Kayaks, SUPS & Canoes

Product Review: Updated AE1012 AdvancedFrame Inflatable Kayak from Advanced Elements

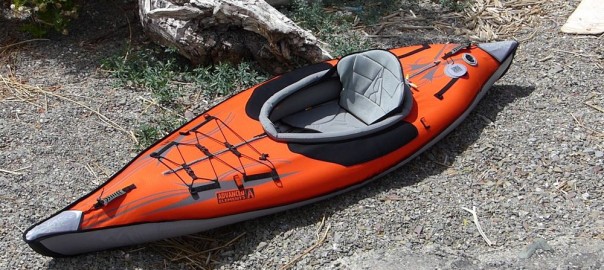
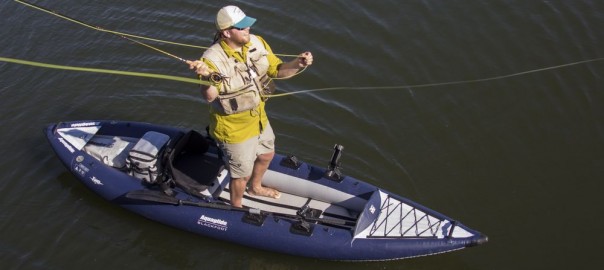
We recently received our first shipments of the newly updated AE1012 Advanced Elements AdvancedFrame inflatable kayak – a classic model blending performance, price and portability. Having paddled the AdvancedFrame through all iterations since 2002, we were interested to see some of the fine-tuned enhancements.

In 2015, Advanced Elements began a factory expansion, moving the production line to Indonesia. While plant construction was completed in the fall of 2015, the reopening took longer than anticipated, causing delays in spring 2016 production for several models. Despite stockpiling, huge customer demand caused the AdvancedFrame to be out of stock for nearly a year.
In late spring 2016, the first shipment of AdvancedFrame inflatable kayaks sailed into port, now featuring an integrated 1-PSI pressure relief valve in the floor bladder, enhanced high-backed seating, redesigned hardware and the addition of velcro paddle holders.
As our previous write-up was several years ago, we took the opportunity to also update our readers with details on the newly updated AdvancedFrame AE1012, a 10’5″ inflatable weighing in at roughly 34 to 35 lbs with an MSRP of $539. (Please note: some of this will be repeated from prior reviews.)
Getting Started with the AdvancedFrame Kayak

The box as received weighs 41 lbs, measuring 32 x 19 x 11 inches. Inside, the rugged carrying case measures 32 x 18 x 10 inches, and houses the kayak body, seat, repair kit and instructions. The kayak folded size is approximately 30 x17 x 10 inches. The case has just enough room to include a small pump and breakdown paddle (not included). AirKayaks note: Take a good look at how the kayak is folded BEFORE setting up, this will help during breakdown.
AdvancedFrame Kayak Setup/Inflation
We re-acquainted ourselves with the kayak by reading the updated manual. This, too, has evolved over the years and gives excellent explanations on inflation, usage, refolding, etc.

First step, unfold the kayak. The AdvancedFrame features an “inner rib” in the bow and stern, which is basically a u-shaped aluminum rib, about a foot long and one-half inch wide.

This comes “pre-assembled” meaning it arrives already inserted into two sleeves inside the kayak cover. Unless you remove the inner bladder, they remain in position. When the kayak is pumped up, the inner bladder with rib presses against the kayak cover – that, in conjunction with two bow and stern plastic sheets, give the kayak a sharp silhouette which aids in slicing through the water.

The kayak features 7 inflation chambers – two military valves and 5 twist-loks. The military-style plunger valves are simple to use – twist one way to inflate and the other to deflate.

The kayak comes with a screw-on adaptor (found in the repair kit in the mesh pocket behind the seat) which will fit some pumps

Original Source: AirKayaks >>

Product Review: Compact Innova Helios 2 Inflatable Kayak

This past week we had the opportunity to take our first look at the Innova Helios 2 inflatable kayak – a two person kayak with integrated decks providing expanded storage options.

The Innova line is unique for a number of reasons. First, all the kayaks are handmade in the Czech Republic; the factory has manufactured inflatable boats for well over 50 years. In Europe, a similar line is marketed under the name Gumotex.
We previously published our review on the single version Innova Helios 1. So here is our write-up on the the Innova Helios 2 inflatable tandem kayak, which weighs 36 lbs in the pack, is 12’6″ inches in length and has a payload of 396 lbs for two persons and gear. (Please note: some of the information will be duplicated from other Innova reviews).
Getting Started with the Innova Helios 2
The box as received is surprisingly small – only 25 x 16 x 11 inches – and weighing in at 38 lbs.

Inside is a very nifty and compact backpack with adjustable shoulder straps, front pouch pocket and roll top closure. This contains the kayak body, foot rests, repair kit, instructions, valve adaptor and sponge. At only 36 lbs for the pack and contents, the Helios 2 is small enough to be considered carry-on luggage, and will fit in an airplane overhead bin. Packed dimensions are 22 x 15 x 9 inches as received in the bag.
Helios 2 Setup/Inflatation
We read through the included instruction manuals. Just like all the other Innova  products, the Innova Helios manual is surprisingly detailed in some aspects, while lacking in others. As the kayaks are made in Europe, many of the details are based around European specs and regulations and can sound more complicated than it actually is.

First step, unpack and unfold the kayak body. What is immediately noticeable is how FLAT the kayak is when deflated – of course, this makes it quite compact for travel.

The Helios 2 has a “shoe” for those using an optional tracking fin. (Please note: both Helios kayaks do not come with the tracking fin, though we tested the following Helios 2 with one.) Install the tracking fin before inflating the kayak. Slip the end with the larger slot in first, making sure that the fin is pointing towards the “back” of the kayak. This enables it to slide in enough to fit in the second side. The first time we tried this, we struggled for a few minutes to get the second slot into position; this gets easier with use. (AirKayaks note: The second time we installed the fin, the kayak was wet and it was much simpler. According to Innova, utilizing McNett UV Tech also helps initially, but after

Original Source: AirKayaks >>

Product Review: New Innova Twist LN Inflatable Kayak – only 18 lbs.

As mentioned in prior posts, we received our first shipment of the newly-updated Innova Twist and Swing inflatable kayaks for 2016.
Made in the Czech Republic, the Twist and Swing models are now constructed from Light Nitrilon (LN), a lighterweight version of the rugged material used in the traditional Innova Sunny, Helios and Safari models. Light Nitrilon is known for making the kayaks more rigid as well as water and abrasion resistant, without substantially increasing weight. It’s also PVC-free, thus environmentally friendly.

New features also include improved seating and beefed up foot brace. The new seating arrangement is removable and inflatable, making it easier to reposition the paddling location, optimizing paddling performance and comfort.
This week we had the first opportunity to take out the  revamped Innova Twist LN, an 8 foot 6-inch inflatable weighing a mere 18 lbs (including seat and foot brace) with a selling price of $449.
Please note: Some of this information will be repeated from prior write-ups.
Innova Twist: Getting Started
The box as received measures 22 x 16 x 10 inches, weighing in at 20 lbs.

Inside is the Twist LN body, cinch strap, multiple instruction sheets, tracking fin, foot rest, repair kit, seat, bilge sponge and valve adaptor. The Twist LN body with seat and brace weighs 18 lbs with a folded size of 20 x 15 x 78. AirKayaks note: While the instructions say the Twist LN comes with a drawstring carrying sack, these were not included in the first shipments. The bags are currently being shipped over and will be added to the boxes.
Innova Twist Setup/Inflatation
We read through the included instruction manuals. As with all the Innova manuals to date, the instructions are quite detailed – there is one instruction sheet for fin installation, one for utilizing the valves, and another on the kayak in general. Most include IKEA-style graphics which are occasionally just short of a brain twister, and while some steps are dauntingly detailed, some are not mentioned.  As the kayaks are made in Europe, many of the details are based around European specs and regulations.

First step, unpack and unfold the kayak body. What is immediately noticeable is how FLAT the kayak is when deflated.

Install the tracking fin before inflating the kayak. The Twist LN utilizes a single fin with double slots. Slip the end with the larger slot in first, making sure that the fin is pointing towards the “back” of the kayak. This enables it to slide in enough to fit in the second slot.

While the first time can be a struggle to get the back side into position, after a couple of rounds it becomes quite easy. Pull up on the fin to ensure you have a good fit.
Attach the foot brace (this

Original Source: AirKayaks >>

Product Review: New Innova Swing 1 LN High-Pressure PVC-Free Inflatable Kayak

In May we received our first shipment of the newly-updated Innova Twist LN and Swing LN inflatable kayaks for 2016. Made in the Czech Republic, the new Twist and Swing models are now constructed from Light Nitrilon (LN), a lighterweight version of the rugged material used in the traditional Innova Sunny, Helios and Safari models. Light Nitrilon is known for making the kayaks more rigid as well as water and abrasion resistant, without substantially increasing weight. It’s also PVC-free, thus environmentally friendly.

Other new features on the Swing LN include an improved coaming area which can take optional redesigned spray skirts.
This week we had the first opportunity to take out the revamped Innova Swing I LN, a 10 foot 4-inch one-person inflatable weighing a mere 22 lbs (including seat and foot brace) with a selling price of $599.
Please note: Some of this information will be repeated from prior write-ups.
Getting Started with the Innova Swing I LN Inflatable Kayak
The box as received weighs 26 lbs with dimensions of 29 x 16 x 12 inches.

Inside is the Swing I LN body – neatly folded with a cinch strap – multiple instruction sheets, 2 metal insertion bars, tracking fin, seat, foot rest, repair kit, sponge, and valve adaptor. At 23 lbs for the combined package with accessories, and a folded size of 25 x 16 x 11 inches, the Swing I LN is small enough to fit inside plane overhead cargo bins.
Innova Swing LN Setup/Inflation
The main instruction manual covers set-up for both the Swing I LN and Swing II LN kayaks, thus there will be overlap in both of our write-ups. As with all the Innova manuals to-date, the instructions are quite detailed – there is one instruction sheet for fin installation, one for utilizing the valves, and another on the kayak in general; the Swing has added instructions detailing the “insertion bars.” Most include IKEA-style graphics which are occasionally mind-boggling and while some steps are dauntingly detailed, some are not mentioned.  As the kayaks are made in Europe, many of the details are based around European specs and regulations.

First step, unpack and unfold the kayak body. What is immediately noticeable is how FLAT the kayak is when deflated. Ascertain which is the bow and which is the stern; while the instruction manual says the stern has the Innova logo, the logo and the floor valves are located at the front of the kayak.

Install the tracking fin before inflating the kayak. The Swing I LN utilizes a single fin with double slots.

Slip the end with the larger slot in first, making sure that the fin is pointing towards the “back” of the kayak. This enables it to slide in enough to fit in the

Original Source: AirKayaks >>

Product Review: New Kokopelli Twain 13.6 lb Inflatable Tandem Packraft

We recently posted our Sneak Preview on the new Twain inflatable tandem packraft from Kokopelli Raft Co., an inflatable kayak/packraft for one or two paddlers, weighing in at a mere 13.6 lbs.

For those unfamiliar with the term, “packrafts” are loosely defined as a an inflatable raft weighing under 10 lbs, that can easily be packed/rolled up, making them a great choice for accessing remote locations. While the sport originated in Alaska, the popularity is rapidly expanding globally.
Kokopelli won Gear Junkies “Best In Show Top Gear for 2016” at last summer’s Outdoor Retailer. The current Kokopelli line-up consists of four whitewater models – the Nirvana and Nirvana XL in self-bailing and spray deck versions – joined by three new touring series, the Castaway, Castaway XL and Twain two-person version.
Weights range from 7.3 to 13.8 lbs, with the Castaway XL and Twain sporting removable tracking fins and removable floors. All models come with an inflation “bag” weighing a mere 4 ounces, as well as an inflatable seat(s), though they also can be pumped up using a traditional hand or foot pump. Prices range from $725 to $999 dependent upon the model and options.
While many reviews focus on whitewater backpacking, we will begin with the new touring/flatwater packrafts, in particular the two-person version.
Following is our writeup on the Kokopelli Twain Inflatable Packraft, a 10 ft 2 inch tandem kayak. Please note, some of this will be repeated from prior write-ups.
Getting Started with the Kokopelli Twain:

We unpacked the box and laid out the pieces – inflatable packraft body, inflatable floor, two seat backs, two seat bases, fin, inflator bag, instructions, 2 cinch belts and repair kit. Initial measurements showed the kayak body weighs 9.2 lbs (26 x 13 x 7 inches folded), or 14.5 lbs with everything minus the box. Boxed up, the dimensions are 27 x 14 x 7 inches with a shipping weight of 17.65 lbs.
For the minimalists reading this blog, we have detailed the weights of the individual pieces as follows:

Two seats (four pieces) weigh 21.7 oz. Each seat base is 5.3 oz, measuring 20 x19 inches flat. The seat backs each weigh 5.6 oz and measure 23 x 12.5 inches flat – this includes the webbing and clips.
The floor weighs 3 lbs, measuring 25 x 12 x 1 inch.
The two straps are 2.1 oz., inflator bag 4.4 oz, fin 2.1 oz and repair kit 2.6 oz.

Kokopelli Twain Inflatation and Setup:
The generic instructions include inflation and storage techniques, as well as use of a spray skirt (available for some models) but lack details on actual set up; we will outline the steps we took, below.  In general, set up is straight-forward  – unpack, unfold, inflate.

The first step is to unfold the

Original Source: AirKayaks >>

Product Review: AquaGlide Blackfoot HB Angler XL Inflatable Kayak for 1 or 2 Paddlers

We continue with our series on the new AquaGlide line of inflatable kayaks, specifically the fishing models. We previously reviewed the new high pressure Blackfoot HB Angler SL single-person inflatable kayak followed by the 11-0 Blackfoot Angler Inflatable Paddle Board. We now turn to the Blackfoot HB Angler XL – an elongated 13-foot version which can be set up as the ultimate one-person fishing machine, but can easily switch to a two-person model by adding an optional seat.

Please note, some of this will be repeated from other reviews.
Getting Started with the AquaGlide Blackfoot HB Angler XL:
We unpacked the box and laid out the pieces – inflatable kayak, backpack, instructions, repair kit, foot brace, tracking fin, visor lift, booster seat, adaptor, fishing cooler with rod holders and Core seat.

Initial measurements showed the kayak body with bolster weighs 31.75 lbs while the kayak with seat, fin and brace in the backpack (everything but the cooler) weighs 37.4 lbs. Backpack size (filled) is roughly 27 x 20 x 14 inches. The fishing cooler weighs an additional 3.25 lbs and flattens to 20 x 13 x 3 inches; we did manage to fit it into the backpack. Boxed up, the entire package dimensions are 24 x 20 x 14 inches with a shipping weight of 48 lbs.
(AirKayaks Side note #1: When initially removing the kayak from the carrying case, take a good look at how the kayak is folded. This is probably the most overlooked step and it is VERY helpful when trying to get the kayak back into the bag.)
The included instructions are adequate and include diagrams with inflation details.

Set up is straight-forward and simple  – unpack, unfold, inflate.
There are three inflation chambers utilizing high-pressure military valves – the two side chambers and the floor. The floor is pumped up first.

The military-style plunger valve is simple to use – with your finger, twist the plunger slightly to the “up” position to inflate (air goes in but doesn’t come back out) and “down” to deflate (air comes out).

The Blackfoot HB XL valves require a military valve adaptor, which does not come with most standard pumps. The adaptor was located inside the repair kit.  Friction fit the military valve adaptor onto the Boston valve adaptor (slightly conical-shaped nozzle), then lock onto the military valve with a slight twist. Since the chambers are inflated from 3 to 12 PSI, it is helpful to use a pump with pressure gauge to ensure the kayak is inflated appropriately.
Here we had our first issue – we could not get the adaptor to couple to the valve. From past experience, we found this could be two things. One, the o-ring can be very stiff initially or two, there is such

Original Source: AirKayaks >>

Product Review: New Innova Twist II LN Inflatable Tandem Kayak

In May we received our first shipment of the newly-updated Innova Twist and Swing inflatable kayaks for 2016. Made in the Czech Republic, the Twist and Swing models are now constructed from Light Nitrilon (LN), a lighterweight version of the rugged material used in the traditional Innova Sunny, Helios and Safari models. Light Nitrilon is known for making the kayaks more rigid as well as water and abrasion resistant, without substantially increasing weight. It’s also PVC-free, thus environmentally friendly.

New features also include improved seating and beefed up foot brace. The new seating arrangement is removable and inflatable, making it easier to reposition the paddling locations, optimizing paddling performance and comfort.
This week we had the first opportunity to take out the  revamped Innova Twist II LN, an 11 foot 10-inch two-person inflatable weighing a mere 26 lbs (including seats and foot brace) with a selling price of $549.
Please note: Some of this information will be repeated from prior write-ups.
Innova Twist II: Getting Started
The box as received measures 21.5 x 16 x 10 inches, weighing in at 28.5 lbs.

Inside is the Twist II LN body, cinch strap, multiple instruction sheets, tracking fin, foot rest, repair kit, two seats, bilge sponge and valve adaptor. The Twist II LN body with seats and brace weighs 26 lbs with a folded size of 20 x 15 x 8. AirKayaks note: While the instructions say the Twist II LN comes with a drawstring carrying sack, these were not included in the first shipments. The bags are currently being shipped over and will be added to the boxes.
Innova Twist 2 Setup/Inflatation
We read through the included instruction manuals. As with all the Innova manuals to date, the instructions are quite detailed – there is one instruction sheet for fin installation, one for utilizing the valves, and another on the kayak in general. Most include IKEA-style graphics which are occasionally just short of a brain twister, and while some steps are dauntingly detailed, some are not mentioned.  As the kayaks are made in Europe, many of the details are based around European specs and regulations.

First step, unpack and unfold the kayak body. What is immediately noticeable is how FLAT the kayak is when deflated.

Install the tracking fin before inflating the kayak. The Twist II LN utilizes a single fin with double slots. Slip the end with the larger slot in first, making sure that the fin is pointing towards the “back” of the kayak. This enables it to slide in enough to fit in the second slot. While the first time can be a struggle to get the back side into position, after a couple of rounds it becomes quite easy. Pull up on the fin to ensure you

Original Source: AirKayaks >>

Product Review: AquaGlide 2016 Cascade 12’0″ Inflatable Standup Paddle Board

Earlier this year, we received our new 2016 shipment of Aquaglide Cascade inflatable paddle boards consisting of three models ranging in size from 10 to 12 feet. This was subsequently joined by the new AquaGlide Blackfoot Angler 11’0 inflatable SUP.

For 2016, Aquaglide has jazzed up the Cascade image with beefed up graphics, upgraded backpack and redesigned dual action, high pressure pump – still maintaining low price points.  All three Cascades are now 6 inches thick.

The initial production series for the Cascade 12-0 inflatable paddle board lacked front bungee deck lacing – subsequent shipments will come with the deck lacing system as shown two photos above. We were able to purchase a number of these initial run models at a great savings of $300, which we are passing on to our customers. As a bonus, each board comes with a bungee deck lacing kit replete with glue, d-rings, lacing and application instructions. We took our prototype board and followed the instructions, and were surprised at how simple it was. See our write-up on Attaching D-Rings to an Inflatable Paddle Board.
So … our second review will focus on Aquaglide’s new Cascade 12’0″ (without deck lacing, otherwise identical to production model shown in the first photo) – a 14-18 PSI inflatable SUP with a capacity load of 230 lbs. Please note, some of this will be repeated from other write-ups.
Aquaglide Cascade 12’0″ iSUP – Getting Started
The double-boxed board as-arrived is 43 x 27 x 8 inches weighing in at 45 lbs.

Inside is the Cascade 12’0″ body, backpack, repair kit, high pressure pump with gauge and removable fin. The instructions were missing, but we did manage to locate them online – we have attached a link here. Once rolled up, the SUP board and pump fit into the backpack, as well as breakdown paddles, though the backpack is set up to also attach paddles to the outside (the pump is too large). The board itself weighs 26 lbs, or 32.5 lbs inside the backpack with pump – these all easily fit in the back of a small car. Folded up in the bag, the dimensions are 38 x 21 x 8 inches.

For your first set up unroll the SUP body. Lay it out face up so that you can access the military valve.

The Cascade 12-0 utilizes one spring-loaded military valve for inflation. These are very simple to use and feature an inflate mode (spring plunger is UP) and a deflate mode (spring plunger is DOWN). By using your finger to gently push on the plunger, it can be moved to the inflate mode (air goes in and doesn’t come back out) and deflate mode (air goes in and comes back out). Before you

Original Source: AirKayaks >>

Product Review: AquaGlide Blackfoot Angler 11’0″ Inflatable Standup Paddle Board

We have recently focused on the new AquaGlide models for 2016 as they’ve arrived over the past few months. A division of North Sports Inc., the Aquaglide brand has grown steadily over the past 15 years, now encompassing inflatable kayaks and standup paddle boards.
To-date, product reviews have included the new BlackFoot SL inflatable fishing kayak and the Cascade 11’0″ inflatable paddle board.

We have been eager to try out the new Blackfoot Angler 11’0″ inflatable SUP, which this year joined the three Cascade recreational models – the Cascades 10’0″, 11’0″ and 12’0″ – as the only fishing-specific model in the AquaGlide  standup paddle board line.
Time and weather came together last week. So, our second board review will focus on Aquaglide’s new Blackfoot 11’0″– a 14-18 PSI inflatable SUP workhorse with a capacity load of 450 lbs. Please note, some of this will be repeated from other write-ups.
Aquaglide Blackfoot 11’0″ iSUP – Getting Started
The double-boxed board as-arrived is 47 x 24 x 8.5 inches weighing in at 47 lbs.

Inside is the Blackfoot 11’0″ body, backpack, repair kit, high pressure pump with gauge and removable fin. The instructions were missing, but we did manage to locate them online – we have attached a link here. Once rolled up, the SUP board and pump fit into the backpack, as well as breakdown paddles, though the backpack is set up to also attach paddles or pump to the outside.
The board itself weighs 29 lbs, or 36 lbs inside the backpack with pump – these all easily fit in the back of a small car. Folded up in the bag, the dimensions are 38 x 21 x 8 inches.

For your first set up unroll the SUP body. Lay it out face up so that you can access the military valve.

The Blackfoot 11-0 utilizes one spring-loaded military valve for inflation. These are very simple to use and feature an inflate mode (spring plunger is UP) and a deflate mode (spring plunger is DOWN). By using your finger to gently push on the plunger, it can be moved to the inflate mode (air goes in and doesn’t come back out) and deflate mode (air goes in and comes back out). Before you go to all the effort of inflating the board, PLEASE make sure the plunger is in the inflate position.
The Blackfoot paddle board we received included the standard AquaGlide wide-barrel, single-action kayak pump with gauge – we understand that subsequent shipments will include the new-style Bravo high-pressure, dual-action hand pump.

First, attach the gauge to the hose, then the hose to the pump handle. Take the military valve adaptor (the one with locking arms) and friction fit it over the Boston valve adaptor, which is attached to the

Original Source: AirKayaks >>

Product Review: AquaGlide Blackfoot SL Inflatable Fishing Kayak

We continue with our series on the new Aquaglide inflatable kayak models for 2016.  Our last review focused on the new Cascade 11’0″ inflatable paddle board. We now switch gears to take a look at the AquaGlide angler series, in particular this year’s new Blackfoot HB SL inflatable fishing kayak.

At 11-feet in length with a price tag of $799, the high-pressure Blackfoot HB SL is a stripped-down solo inflatable kayak featuring a more economical price point than the current Blackfoot XL tandem. Please note, some of this will be repeated from other reviews.
Getting Started with the AquaGlide Blackfoot HB SL:

We unpacked the box and laid out the pieces – inflatable kayak, backpack, instructions, repair kit, foot brace, tracking fin, visor lift and seat.
Initial measurements showed the kayak body weighs 25 lbs while the kayak with seat, fin and brace – all in the backpack – weighs 30 lbs. Backpack size (filled) is roughly 26 x 19 x 12 inches. Boxed up, the dimensions are 26 x 23 x 14 inches with a shipping weight of 39 lbs.

(AirKayaks Side note #1: When initially removing the kayak from the carrying case, take a good look at how the kayak is folded This is probably the most overlooked step and it is VERY helpful when trying to get the kayak back into the bag.)
The included instructions are adequate and include diagrams with inflation details.

Set up is straight-forward and simple  – unpack, unfold, inflate.
There are three inflation chambers utilizing high-pressure military valves – the two side chambers and the floor. The floor is pumped up first.

The military-style plunger valve is simple to use – with your finger, twist the plunger slightly to the “up” position to inflate (air goes in but doesn’t come back out) and “down” to deflate (air comes out).

The Blackfoot HB valves require a military valve adaptor, which does not come with most standard pumps. Here is where we came to our first issue – no military valve adaptor was included. We did manage to grab the AquaGlide Dual Action pump from our previous writeup on the AquaGlide Cascade 11-0 inflatable paddle board – this had the correct adaptor, so we were ready to keep going. In the interim, Aquaglide has shipped us adaptors to include with each kayak and will make sure upcoming shipments have them included.
While we used the AquaGlide pump, if using the “included” adaptor, friction fit the military valve adaptor onto the Boston valve adaptor, then lock onto the military valve with a slight twist. Since the chambers are inflated from 3 to 12 PSI, it is helpful to use a pump with pressure gauge to ensure the kayak is inflated appropriately.

The floor is held in place with

Original Source: AirKayaks >>